I was given the honour and privilege to turn this "undrilled, piece of gold" into something very attractive, as well as being so very ultra-expensive.
These photos are 'out of sequence' but that is due to my wanting to capture every aspect of the 'drilling & spacing' sequences.
(The actual Pave setting of each stone can be viewed in other of my "blog essays").
On the Difficulty Scale, this project is about "50-75, out of 10".
The importance of this essay is to give a greater understanding of all the spacing techniques that were involved.
======================
Underneath, each hole had to be 'countersunk', thus enabling me to have a smoother surface. Not to mention opening up each hole to have as much light to pass through.

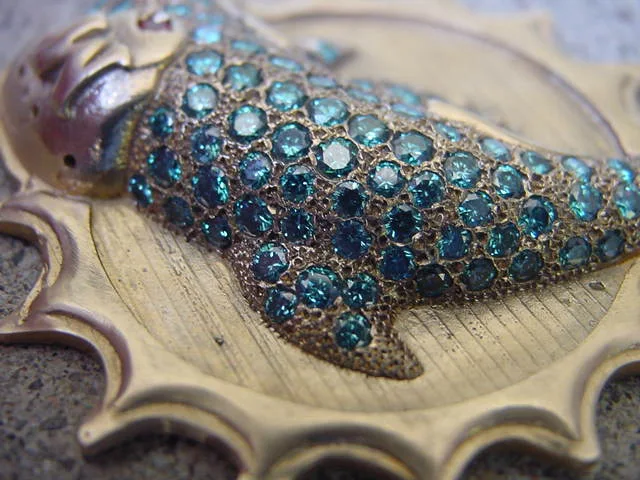
As this was a body of a Dolphin laying on a plate, I had to inspect and as well figure out "how and where" all of the Diamonds could be mounted. This was no easy task.
.JPG)
.jpg)

.JPG)
In this photo, I approved of using a soft-holding, leather-inlay ring clamp. This is also for the "vertical" sections when (laid down) on the Dolphins' Torso.
.jpg)
WOOPS! You can see one hole that wasn't drilled sufficiently. I inserted a larger stone to offset this problem.

By holding this item, you can figure out the size of this item. THIS WAS JUST ABSOLUTELY ENORMOUS.

I didn't have enough Diamonds of every size. I requested the client to ship me more large, small, and very small for the awkward process of filling in the spacing.


There was no intention for me to do any long lines of Bright-Cutting.

My client shipped me an extra number of BLUE diamonds to fill in the empty spaces in the tail. He (they) also sent me more white stones for the head and beside the letter "M".


If I drilled a hole out of place, my off-site jeweller had to assist me in (soldering) filling in the hole again.


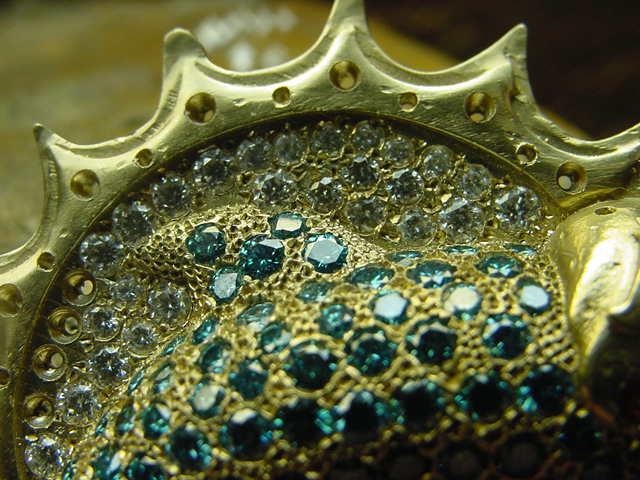
Now comes the work of spacing. As you see that there are spaces between the row of white diamonds. The spaces provided are for me to allow for the drilling and also for bead-raising.

If I had to juggle the spaces allowed to me, I would do this NOW. There was always a plan and a revised plan on which size to use, when & where.
THIS WAS A MIND-NUMBING PROJECT.


Concentration was paramount in every aspect of "Spacing of the Diamonds". Mistakes were NEVER allowed or EVEN permitted, every diamond was expensive. Breakage was not even thought of.

Before any Diamond was set, I decided to examine the thickness of the metal for every stone. Why was this? If the diamond was larger, therefore the Culet would protrude through the reverse.

Those "blue" spots on the reverse were my idea of self-examining the thickness again, or if the hole wasn't counter-sunk accurately.
If my deep concentration faltered, I'd have to stop, have a cuppa tea and take a 'mental break'.


I am now preparing holes for more diamonds. I pre-drilled before I actually opened up the holes for the medium-sized stones.


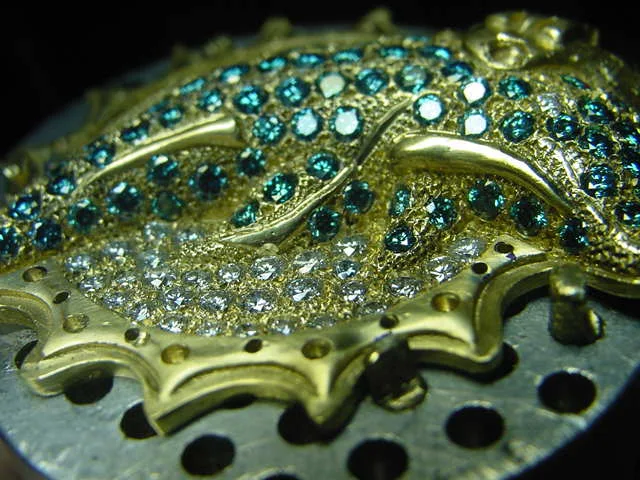
In this photo, you can see an assortment of white diamonds around the letter "M".

In this photo, I examined where the next series of drilling would take place.
I'd fill in with Pave-beads where extra spaces are in between any of the diamonds.

Those "blue" spots are where the Blue Diamonds are showing from the top.

My "off-site" jeweller was always asking me how I was managing with this project? Sometimes he would fill in some of the holes that were not to my liking.

Here is a good close-up of the back side of this project.


Under close scrutiny, I will endeavour to fill in any unwanted spaces with adding Pave bead-raising.

I placed a white diamond in between the many facial Blue diamonds, why?
Do Dolphins have eyes? You betcha they do, and that is what I created.


I'd run my fingers along the back surface to 'feel' if any hole was giving me problems. This procedure was 100% necessary and required. If I didn't do this, my client wouldn't be happy with my 'finishing'.


The white spot (on the Dolphin's Torso) was a reflection of sunlight.


In this interesting photo, you can see the many angles I had to work with just in holding the frame I had a leather-tipped ring clamp. I also had a portable vice-clamp, I improvised every subtle way to secure during my stone settings.


This wasn't Tripoly & Rouge polished yet, but still, it looks spectacular, agree?

You can see the many sizes of Diamonds that I had to deal with. If one stone is missing, that is because the size was wrong and it had to be removed as soon as possible.

The size of this plate was enormous, and it made my hands sometimes tired from holding the metal clamp for long periods of time.

I had to modify the little pegs to grab onto the disk. Again, you see the many angles that I had to do my Diamond setting. There were horizontal (Flat), to a 45degree, then to a near vertical.
I don't remember the number of days this project took me.


I used different background views, here but are a few. I enjoyed using different colour schemes and contrasts.


I initially wanted more stones around the "M". I had to have my jewellery fill those spots that were originally allocated for them. Ask me about being '100% stressed'.

Oh, I wished that I had one size smaller of the Blue diamonds as spaces on this particular item, was my ongoing enemy.

Gerrylewy18@gmail.com
No comments:
Post a Comment