Wednesday 19 June 2024

'Bead Setting' photos from an exclusive manufacturer - 11 photos

 A noted jewellery company posted their photos into a fantastic book and here they are with my individual notes explaining the gem-setting details. 


The bead-setting appears to be hand-crafted and not CAD created. The diamond setting skill is just SUPERB. All of the metal cutting was completed before any stone was set.

 The skill involved in diamond setting is just one word 'WONDERFUL' (but not perfect). I will explain further into this essay.

 The 'separation of the beads' around each stone, is a testament to the high quality of gem setting of the manufacturer.

 The 'wavy lines' displayed here, was from another stone setter. There is a modicum of graver skills involved in the cutting, there mustn't be any 'extra' metal around any diamond.
 

 I enjoy seeing the gradual shading of gemstones from dark-blue to deep yellow. This like a painting on a canvass. Then the center has another strong colour of green, "Bon Gout" aka good choice!

 This Diamond Setter displayed absolute quality in the craft. Each bead stands like 'a little pillar' securing every diamond. BTW, all of the metal cutting was completed prior to the final stone setting.

 As in a 'swath of colour' these gemstones were specifically contoured to fit into the Channel Setting. Even the diamonds were specially made to fit the ends of each channel.

 There was much planning as to where each size of diamonds was to be placed. The larger diamonds 'were prepared in metal' just to be seen at the center of the many curves.

 
 It's great to see that the corners of each section are cleaned and having a good range of diamonds being set throughout.

 The many variety of colours gives credence to the designing ability of the craftspeople.

                    I have just one word to describe these jewellery photos "SUPERB".


Tuesday 18 June 2024

Bracelet pattern created with ONLY claws. 3 photos

 What a wonderful design isn't it? But look closely, the stones are all set in claws. 
I call this a "Work of Art". (I could look at this for hours.) There is uniformity in the size and colouring of all of the 100's of gemstones.
 You can see that the 'Designer & Diamond Setter' selected a Flat graver to GENTLY move each claw tip over the Girdle.
 I repeat 'move, but not push the claw' against and over each stone. 
The reason was only not to have any marks remain on the metal. I inspected the many stones and there is an abundance of colours and subtle shades of each colour used. 
If you look closely, you will see a Cabochon stone set into the bezel on the 'locking device', how wonderful to see accuracy in the thinking. 
 I'd rate this design at '100, out of 100' with congratulations to the jewellery manufacturer and stone setter.
Gerry Lewy!


'Square-cut design' with 4-corner beads - 12 photos

 While working as "Second-in-Command" as a Diamond Setter in a major jewellery company in Toronto, Canada. I was fortunate to learn all the intricate styles of "Bright-Cutting"
 One of the most elaborate metal-cutting designs was making patterns on a flat plate.
 In those earlier days, we never had CAD (Computer Aided Design) as it was totally unheard of during the 1970's. Every pattern had to be created with a high level of proficiency. As we are all human, there were some errors in the cutting, but that was our ongoing training. 
===========================================

I scribed with a marking pen a pattern which would become the basic overall design.

From each corner, I envisioned where each bead would be. This is like having 'a map of instructions' on the metal.

 At each corner, I will cut a triangle, but why a triangle? Lets just say that this triangle will be where each bead will be then 'saved, created and used'.
 Along the scribed line I will start a 'Rough shape' of a square. This square is the beginning of the overall pattern in the metal.


 This is square is now nearly ready to proceed onward in creating a second 'outer' square. This is now where this cutting stops and gets ready for further metal designing. Being a master at using an Onglette graver is essential in this pattern. 
 The "Level of Difficulty" is (in my own words) at 15, out of 10. This pattern is not for the beginner in sculpturing metal. 


  A second square is marked in ink as a 'second guide' for the second 'outer pattern'. Please keep the inner square exactly as a "square shape", any touch-ups could be well advised. Keep your Onglette graver always in pristine condition, as no graver-slipping should occur.
 
 There MUST be a separation of metal in between the two squares, the reason will be shown in the next photo.
 Keep the inner corners clean and well cut. Spend extra time in this metal cleaning & sculpturing.
 If you need to use a Flat graver for this inner cutting do so now with a #40 Flat graver. Don't always depend upon your Onglette graver, I use both graver shapes when needed.

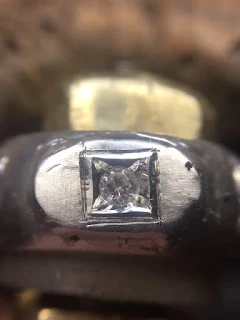
 That 'space' in between the two squares, that I was mentioning previously will be easily explained with this one photograph. Once that the inside of the inner square has been sufficiently cleaned and it meets your approval. =>LEAVE IT ALONE!

 I have 3 sides "Bright-Cut" as the reasons are many. This is the literally the "before & after" cutting. Are you finally getting the idea of cutting two squares at once?
With your Onglette graver #2, just go over the 'corner-cutting' and touch-up the minor slipping. Don't worry, these 'slipping' do happen (occasionally).

 Now is the time to create a bead to secure this large stone, but how? 
 I will round the bottom point of a wide Onglette #2 or #3. This is how the steel graver will dig in at the point of triangle 'we' prepared and carefully created a while back.
 You should just 'dig in and push' the metal triangle over the Girdle of the stone'.

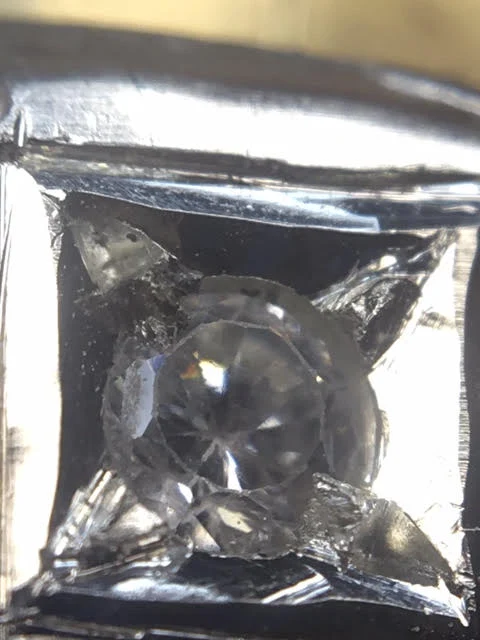
 Examine that the new beads have metal well situated OVER THE GIRDLE. This metal IS NOW YOUR 4 BEADS. All you need now is to 'burnish these beads' with some strength in your hand. You are pushing loads of metal.
 
 Here is a ultra-close-up of the process of 'creating beads'. Examine that every Bead is over the stone. You can view and understand the "how & why' the 4 triangles were so important in the beginning of this design.

  This is the epitome in using the Onglette and Flat gravers in this project. 
BTW, this simple cutting process took me literally months, if not years to perfect. With grinding wheel-shaping, polishing the gravers. Learning all of the aspects and subtle nuances in this Square Pattern.
 I think that this 'Level of Difficulty" of 15 out of 10" should be put at "20+, out of 10".
 
  This is one of the challenging 'metal sculpturing' in my 'library of patterns'. So much can go wrong and you should practice these cuts before starting to your own project.


Monday 17 June 2024

Which gemstone gets set FIRST? => 7 photos

 In the photos that I've collected, some rules need to be answered. These rules ask the simple question, "Which gemstones get to be set first and how?" 
==================================
 I saw this ring sitting in a jewellery kiosk with no information supplied except for the price. My mind began to think how was this ring put together? With my 65 years of experience, I formulated a plan on 'how would I assemble this ring'?
=====================================
 From what I see is that there are 5 sizes of diamonds being used.

1) The first diamond size is in the engagement ring. These stones will circulate around the finger.

2) The next size of diamonds are the stones that are sitting ON the band. At least two sizes are been shown in this photo.

3) The largest diamonds being shown are on the top level laying flat.
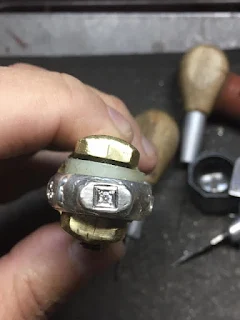
4) In between the Pink stones and the Engagement ring stones are those that are from another separate casting. This ring was manufactured in (estimated) three pieces.

 EACH SECTION MUST BE THOROUGHLY 'CLEANED & POLISHED' BEFORE BEING SOLDERED TOGETHER.

5) The pink stones are to be gently set. The ring must now be polished and made ready for the 'Yellow' centre stone.

1) This Beaded Set of earrings is quite awkward to manufacture. The centre section has to be placed into a holding device, namely on a Shellac stick. But it should not be soldered to the yellow frame just yet. 

2) There is no, or little "Bright-Cutting" necessary for this 'curved plate'.


  This photo is only a close-up

 The shoulder Diamonds have 3 sizes of stones. The largest 4 stones are situated on the top and bottom sections and then 4 more on the corners. The remaining 6 stones are on the sides. If you don't plan ahead, then this expensive ring will look 'just average'.
===============================
 This cluster ring is been displayed in full Ruby or Emerald stones. It is an amazing "Piece of Art" worthy of being shown in my blog. Although it is composed of multiple sections I was awestruck by its complexity. I believe it contains 7 sections of claw-setting. Each section is made for each separate size of stone.
 Just an amazing choreography of sections.


   I'm hoping that when you see such artwork as seen in these blogs, try and take a few photos of them for your archives like I do.

How do you set gemstones into (ultra small) CAD-created claws? => 12 photos


 These photos were from some of the past setting jobs that I encountered. On a "Scale of Difficulty" many of them rate at 7 on a 10 Scale.
-----------------------------------------------------------------------
  I selected from this group (pile) of diamonds, the largest and then the smallest. The largest stones were for the top of the letter "T" and also the downward sections of "B" & "O". The remainder were put anywhere I could find easy access to the mini-claws.


 Another setting project required (again) two groups of stones. I set the largest stones as seen in this photo on the curves and the 'joining of lines'.

 Basically, the 'rule of thumb' is to place the largest stones around the curves. The remainder could be set near the end of each row of the claws.
 
  These mini-claws have just one problem, the "Double Claws" are too close together. For this reason, I chose to use my bud-shaped bur to remove some of the metal with this design. => :O: :O: :O: <=

  The same (repairing) process needed to be used before setting any stones with this same problem.

    It is more difficult to grind away any metal  ONLY IF THE STONES ARE ALREADY SET.

 The setting process starts with the inner section then followed by the outer circle of claws. This method prevents any damage to the teeth of the burs.

  
  This finished pendant has been completed. Each stone is sufficiently secured by only two claws

    The larger diamonds MUST BE SET FIRST. The two claws should be set with the corner claws being moved over the Girdle of the stone. For this reason, there is greater security in holding the stone in place. 
Another reason is that the 'hand-pushing' won't interfere with the two claws belonging to the stone.
 
   
  The first series of stones to set is the outside and inner ring of claws. It is advisable to grind a space with a tapered 'bud-shaped bur' in between these 'tightly knit' claws. This leads to sufficient space between the claws.  

   Please first set the stones in the mini-claw setting. Have the mini-claw setting polished first and then solder the main 4-claw Oval Setting & Pear Shaped setting into the centre cavity. 

   The largest (3 diamonds) series of stones on each side should be set initially. Once this is completed, then follow through with the series of smaller stones.
 
  Draw a pattern on paper as to where the many series of stones will be set. This will act as a guide for you! With this ring, there are many sizes to consider in a stone setting. After each series, please make sure that all of the 'polishing and cleaning' have been done.

  The gemstone setting process seems tedious to the uninitiated, but it's necessary to 'think and plan ahead', lest you run into problems.