The "Difficulty Scale of Baguette Setting" is off the scale at about '50, out of 10'.
Either you take your time, or you can just ruin the ring and stones or your future ability in doing this again. I'm being very serious as this should be left to the professionals (like me!)
At first thought, I was wondering if I should go ahead and write this tutorial essay. This type of setting is not an easy project, why is this? There are so many chances of making gross mistakes.
Why should I show a style of ring that is 100% easy. With this style of ring, there are many problems fraught with errors.
========================================
When you are hammering the Baguette bezel, you should use both sides of the anvil. The "Thin Anvil" section will help you to move the metal in smaller increments.
The "Wider Section" of the anvil will move a greater area of the Bezel, agree? Please don't let the anvil get too close to the Bezel. You are to "push over the metal", but NEVER 'pound the guts out of it'.
But don't allow the metal hammer anvil to TOUCH the stone, if you do...just say "Goodbye to your delicate stone".
If there is a little space between the stone and the end of the Bezel, for convenience, I'd put in a little round stone, just to fill in the little space.
Where the two Bezel-ends are converging together, the stones should come together and leave NO SPACES. As this would look unattractive to the viewer.
Here is a close-up of how the two stones should not look. The Upper-Facets should blend in with the shape & design of the ring. There should not be any spaces between any of the stones, as there are being seen in this photo.
I would be so happy in starting the Reciprocating Hammering process on this ring. Everything is just 100% for me to start.
The design of these facets leaves much to be desired, they are all not evenly contoured.
Even though that many of the side-facets are not inline, just understand that the "Table-Facets" are needed to be themselves, to be in-line.
Here you can see that the "Pavillion-Facets" are very deep, then you, the setter must account for this ongoing stone error in its basic shaping.
When you have a very deep Pavillion, please contour the inside bearings to account for this problem in your preparation. Literally, EVERY STONE MUST BE MADE FOR THE RING.
The Table-Facet looks great, but the Pavillion that is underneath, needs to be altered greatly.
Once the stones are gently secured with a pair of pliers, I would gladly use this "unorthodox tightening" process.
This process is only for holding the stones in place but not permanently. This is only to enable me to start the Reciprocating-Hammer permanent tightening.
Here you can see how different the stones look from underneath. But eventually, I got these stones set.
I'd be very selective and return the 'Inferior Stone" to the gemstone dealer. Don't waste your time and to ruin the ring for some poorly cut stone, it isn't worth it!
In this photo, you can see where and how the bearings were cored out to receive the Baguette stones. All of the bearings were in line.
Continue to core out the bearings until each stone is sitting in its space in the ring. I'd use a bud-shaped bur to core out the inside area of the Pavillion. PLEASE ALLOW FOR A THICK GIRDLE, better yet, don't use it.
This round-shaped bur is too large for this thin Pavillion stone, eventually, this stone will never get tight.
This bearing cut is not acceptable, why? The coring is not inline, it looks "horrible". NO LONG-SHAPED BAGUETTE STONE WILL SIT CORRECTLY. I did this on purpose just to show how mistakes can & will happen. 100% YUK!
Core deeply the corners of the Bezel, you want no corners of the stone to come in contact with any metal. If you are hammering and the metal touches or hits any part of the stone....AGAIN, "GOODBYE STONE".
Open up the deepest part of the Baguette channel with your Bud-Shaped bur. This particular area of the ring is solely for the deep Culet area of the stone.
The next important area that has to be opened up and cleared, is the Pavillion area.
Pick and then choose which stones you are going to use in the setting. If the stone is too thick, don't use it, many problems WILL OCCUR .
The ring is now ready for the finishing stages, HOORAY!
You can see that the left side of the Bezel was hit too "heavy and hard". This is now being shown on the left side of the Bezel.
ERRORS in setting these stones; Not all of them are sitting in alignment. Mistakes like these cannot be corrected, so sorry! I could just very easily scrap this ring, why? There are too many mistakes and almost very difficult to correct at this stage of setting.
I would use a Pilar file #4 and take long filing cuts on the outside of the long Bezel frame. That is the very last thing I would do in completing this difficult setting.
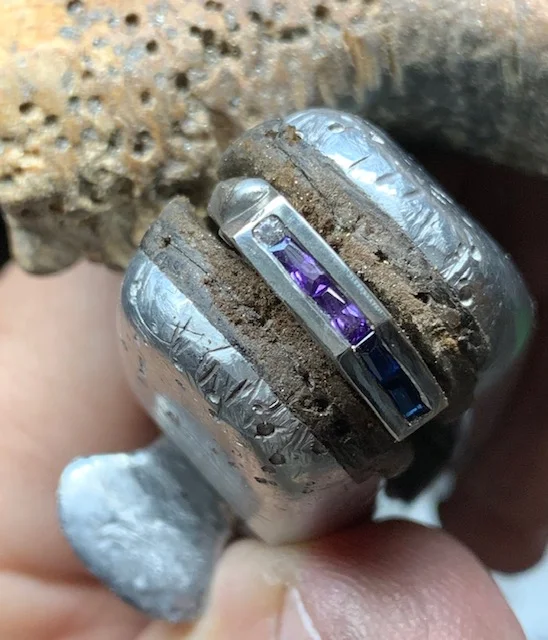
This is exactly what I want to show you. This Baguette-Setting will become a ring of beauty after all of the trimming and metal filing have been completed.
Don't get too concerned when the little white stone sits on the side of the Baguette.
I would finish off the trimming aspect with a FLAT-GRAVER, #40. Then you can easily smooth the "Hammer Hitting" areas at a 45-degree angle and with your #4 grit Triangular file along the bezel corners. You can see that there are no spaces being shown.
There are many times you might just stop and give up on this gemstone setting project. Then you will not find any solace in learning a new skill. The second ring will be easier, and the third Baguette ring "will be a piece of cake".