Thursday, 21 November 2024

(IN-DEPTH STUDY) Why use an "Adjustable, graver handle"? - 12 photos

When I first found these remarkable handles at my Toronto tool supplier, I was mesmerised by what they could do for my old gravers. 

 They extended the life of the blades that were about to be thrown into the 'Metal (collecting) Recycling Bin'.


 This little hexagon key holds the (unseen) base of the graver securely.

 No matter the shape or length of the graver, these blades now will have a longer working life.

 Here are my very own gem-setting blades. These blades no matter the length, now make them return to their original purpose. That purpose is to Bright-Cut,  and to create Filligre engraving.

 I must tell you that there are two kinds of adjustable handles. One of them might not be to your liking, why? If that one screw gets worn out from being tightened too often, it won't be good to keep.
 I suggest that you BUY A HANDLE WITH TWO SCREWS. All of my handles have two screws as seen in the next few photos.

 This is the exact paper box that this "Adjustable Handle" is being shipped in.

 No matter the length of the blade, this handle will suit you and your engraving and gemsetting needs. (I'm writing this with experience)


  I know that some setters will gladly throw away these shortened blades. This "Adjustable Handle" will avoid this opportunity.

 The "one-screw handle" is shown beside the "two-screw handle". From my own experience in not tightening the screw too often, I'd leave the 'working blade' for just one purpose and that's for "Bead-Raising".
 "Colour identification" is another reason for keeping two handles, during my busy time at the bench, I can't waste my time looking for that important blade.
 I decided to buy a handle (with a different colour) and keep that important blade separate from the rest of my other gravers.

 No matter the length of the blades, these "Adjustable Handles" will now accommodate any length of blade, new or old.


 As you can see these old-fashioned wooden handles are 'relics' of a bygone era. The well-used handle shown below was split due to the different thicknesses of the blade. I only keep these three solely for posterity, but I no longer use them.

 I will buy as many of these handles, as I feel that this will avoid the constant changing of blades. These 'multiple handles' give me a greater opportunity to save precious time during my intense Diamond Setting sessions.

 
  I only hope that this essay guides you in being more selective in your handle-buying experience.


Tuesday, 19 November 2024

How to repair your defective "Onglette graver" => 23 photos


 The "Onglette" gravers are one of the most well-used metal cutting blades any Engraver or Diamond Setter has in their inventory. 

 The "Rate of Difficulty" in this program is 7 on the 10 Scale.

This Onglette graver is looking like it hasn't been cleaned in years. 

 This is an Onglette grinding process that is now taking place. We will now turn the graver on its side and we will then see a 'magnitude of defects'.

 
 Here is a collection of various shapes of gravers. Each of them has seen many months of metal-cutting. Basically, each of them needs to be totally refurbished (again) before being used in Diamond Setting, or Engraving.

  These polished gravers seem to be well-cleaned under 'normal' viewing at 10x power Optivisor magnification. The keywords are "seem to be", and the high polishing is adequate, but not fully acceptable for any metal cutting in Gold, or Platinum.


 These Onglette gravers look bright, but in some instances, we ponder the fact that some of them need to be 'polished' further.

  From a distance, the graver brightness is really great, but let's look closer. Just because each of them is shiny doesn't mean that they are good to use! 
 We are "dedicated to perfection" and this includes our tools of every kind.

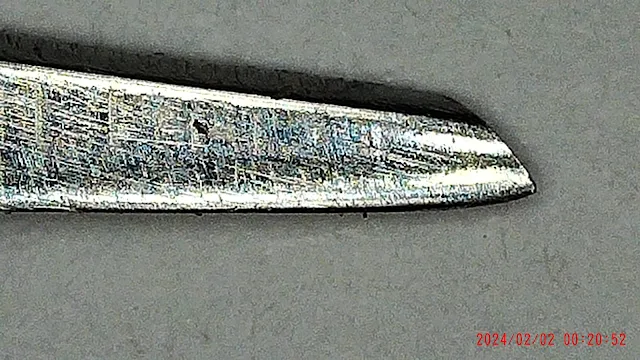
 The following 7 photographs were taken with my 500x power digital microscope. Those 'little lines' will cause any setter to ponder "What has just happened with my graver cutting?"  


  Why would anyone want to use this graver for their Gold-cutting? For sure I wouldn't.


  No matter how clean it looked, even I was amazed at the rough textured results. YUK!
 
 This graver looks great, but under closer scrutiny and magnification we see many aspects of poor cleaning that has just taken place. The graver operator hasn't seen this 'engraving tool' up close as we are doing right now. HELLO!

 With my 500x power digital microscope, I can see how difficult it would be in 'Bright-Cutting'. Those rough spot lines should not be there. The final 'Bright-Cutting' could be quite a mess, the rough texture ceases to amaze me how any 'fine cutting' be established?


  This particular graver was used primarily for moving 'beads' over the stone, hence the "uplifted" point.


  Can you believe that this graver was used in specific areas in specialized metal carving? 

 How many of us who use this blog have seen their Onglette blades look like these in the beginning? 


     The question now is 'How to polish the defective graver' (again)?

 These are the actual 'polishing papers' that I use on a regular basis. They are used in sequential order, and these will give you a very highly polished surface.

 The side of the Onglette graver must LAY FLAT at all times. 

 To have a smoother surface, gently apply a layer of soft-core lead pencil rubbing to fill in the pores of the paper.
 This simple act will increase the 'grit' substantially from #600 to #1,000 grit without buying extra papers.

  If there is a slight bevel created for the side of the graver, then gently rock the blade to match the surface.

 If you have a high-powered loupe, please examine continually how the progress of polishing is coming along.

  I would place the blade on the two surfaces of the same paper. One section of the paper will be without any 'rubbing' and the other section will be with the 'rubbing'.


 If the paper has #1,200 grit, we can increase the grit to approximately #1,600, or more with the pencil rubbing.