Friday 17 May 2019

Onglette #2, or a Flat #40 graver which to use, When, Where & Why!

  This is my 100th essay on Diamond Setting.

 "To use either an Onglette graver or not to use a Flat graver, is that the question?" The answers are answered in this essay, (to the best of my ability!)

 This is one of the most troubling questions to enter the mind of the jeweller and maybe a diamond setter, as well.

The Difficulty Scale can be measured at 7.5 out of 10!

 The final choice all depends upon what style of a setting you're working on, at that moment!

 These are the basic gravers that I use on a daily basis. I like to keep an 'extra set' just in case I need to modify one (or all) of them extensively at a moment's notice. Is this an expensive inventory? I can't imagine if  I didn't have this extra group of gravers on hand!

  I keep my Flat graver (always) in a wine-coloured handle, I use it for easy identification while working. In the background is my #800 grit Polishing paper, although the papers come in #1,000 and even a #1,200 grit. When the paper gets worn down it reverts to a higher grit number by being used often.

  I'm going to explain MY results in this essay. Let me first state that no one is perfect, but after 6 decades of setting stones, I have some interesting ideas! You might beg to differ with my choices, I'm always open to suggestions!..:>)

 Here is my rough diagram showing how light is generally reflected on either of the cutting surfaces. On the Onglette cuts, there is really more surface to be reflected, just like a Parabolic mirror.
 The Flat graver reflection is good at times, but never to be used on curves that are shown in this essay.


  These following photographs are using the Flat Graver #40.

 Many of these photographs have been seen in previous essays, but now you'll understand why, when & where I chose them!

 In this picture of the "Cut Down", you can see why only a Flat graver can make this kind of cut. No other blade has the shape to accomplish this effect.

 Here is another view, this technique allows me to make a series of little horizontal cuts. The Onglette graver hasn't the physical properties to achieve this!
 

 The Flat graver also allows me to make four twisted pieces of metal to hold the stone in place. Then immediately after that, I can start the 'lateral cutting' on the metal.

 On this demo-piece, I can actually use both gravers. One for the inside angled cut, I can use the Flat blade. Then on the outside, I can use as well the Onglette. Two gravers on one piece of metal.
Interesting?

 I experimented (so should you) with the Flat and the Onglette gravers. The Flat graver gave me the satisfaction of mini-squares and the Onglette guided the Flat graver for its interesting cuttings!

 The "Fish-Tail" only had the use of a Flat graver for the final decorative cutting. But the fine-width Onglette # 5/0 made the initial guide-cuts easy for me to start my cutting.

 I chose to use both the Flat & Onglette gravers for this project. I always use the Onglette for the long cuts, the small cuts are made with the Flat blade

 Same silver-demo but using a different view.

    These photographs are showing only Onglette gravers!

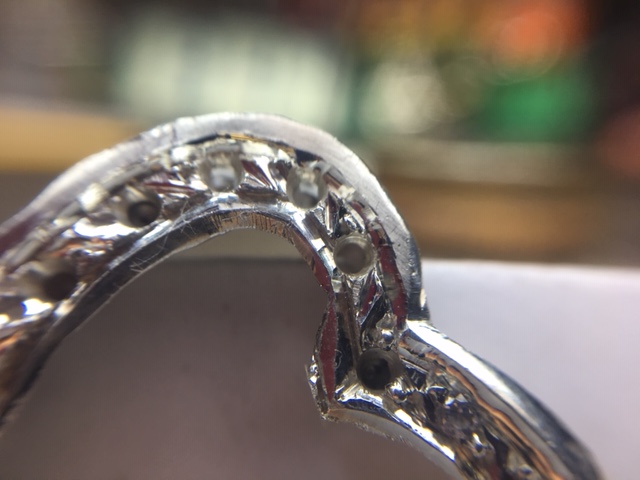
 There is no possible way I could carve this curved metal with a Flat graver!!! 

 On the curve, a Flat graver would be totally useless, don't think of using it on this pattern.

 All of these following four Azure patterns were done by (my) hand and not using any CAD  (Computer Aided Design) program. These were cut using only an Onglette graver.

  I used only an Onglette #1 and a #2 in this particular photograph.

 Trust me, that in these photos no Flat graver was even thought of being used. I modified 4-5 extra Onglette gravers to achieve the desired patterns.


 On this pattern, only an Onglette graver was used in this very small cutting area. I used both the narrow and the wider blades.

 The outside lines used an Onglette, but I used a fine Flat graver only for the little 'inside square'.

 A Flat graver is the only blade that can carve these inside "angled-cuts". I need a very reflective surface that circles the stones before being set!


  You can now see how the reflective surfaces that are now appearing against the inner wall beside the 'beads'.

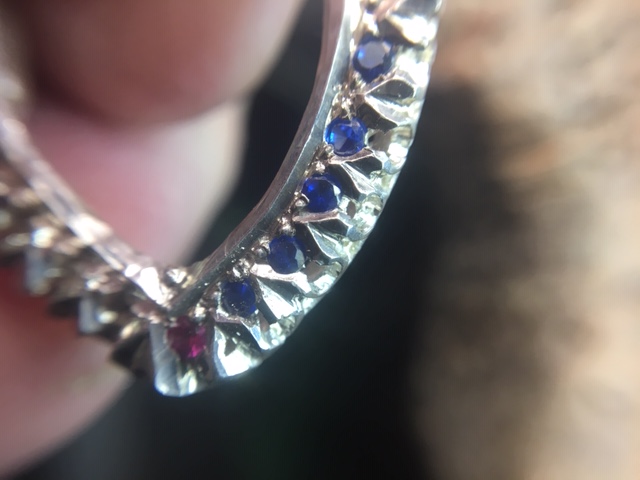
 Only an Onglette graver can carve a very 'smooth surface' as it's rounding the tight curve of this heart-shaped pendant.


  After Gypsy setting your stone, DO NOT USE ANY FLAT GRAVER. you will for sure get little rippled or faceted cuts all around the setting.

 The Onglette graver is the ONLY tool you can use on these kinds of settings. I don't burnish any of my Gypsy settings, as this is the quick way to this kind of setting.

 When I set a Gypsy-Set stone, I want only a (near) perfect finish, not some cheaper way of doing these kinds of settings!
 I've seen many instructors never get near any Onglette graver, or know how to use one!..:>(

  Here you can see how the "Onglette, Bright-Cutting" technique is nicely finished!

  A "Star-Set" pattern is only accomplished by using an Onglette graver, no other tool was even thought of.

 If I had to use a Flat graver in this exercise, I'd be seeing multiple series of "Facets in the metal" all around the circle. (This would a sign of poor workmanship!)

 The only desirable shape of graver is an Onglette, why? I wouldn't be hitting and destroying any of the newer beads as I cut in a forward cutting action.

 Even the little curves were formed by using a 'left or right-sided' cutting graver. A Flat graver just doesn't TURN, it cuts & hits everything in its forward cutting path.

  Show me how you can graver-cut an 'inside curve', it just doesn't happen with a Flat graver. The Onglette is the ONLY tool that can be used without causing any 'grief' while finishing the cutting of the curves.

 This is called an "outside curve", I wouldn't let my Flat graver come anywhere near these delicate curves. If I did, I'd literally ruin the precise cutting-effect.
 No Faceting is seen on these cuts. Apart from having a few decades of experience in graver usage, the angle of holding the graver must be continually held in one position. I rely upon the natural shape of the graver to determine what the cutting angle will be.


 I keep my Onglette graver in an upright position which allows me to achieve the correct reflecting surface of the metal.

 Only an Onglette graver will give me the "uniform & smooth finish of the continual cutting.
If I used a Flat graver, there would be a series of faceting & cutting errors all over this ring, not nice to see!..:>(

 There you have it in this one essay. I tried to explore different problems with each graver and what would happen if one graver was used where it shouldn't.

 I have my own preferences of gravers, but sometimes I might change my mind and use one instead of the other. It all depends upon what my project is needing at that point in time!

Contact me anytime at "gerrylewy18(at)gmail.com".

Wednesday 15 May 2019

"Angled Cuts" used in Bright-Cutting!"- Diamond Setting

 I learned this technique many decades ago, circa 1968 AD! It was a very common practice to use only "2 beads" with angled-cutting in between the two stones.

 Bright-Cutting was so essential that I had to learn all of the subtle aspects of how to use an Onglette & Flat shaped gravers!

The Difficulty Scale is about a 6.5 out of 10!


 Why do I like using this 'heart-shaped' pattern? It allows me the opportunity in preparing to cut as many as 18=>22 setting holes without changing the "demonstration pieces".

 On all, and every cutting, the process MUST BE REPEATED 3 TIMES to get the desired depth that is needed. Don't be shy and settle with one or two cuts. Use the "Three Rule, 3 cuts and you'll succeed" No matter which pattern you use..three cuts to get desired effect & depth.

 In this photograph, you can barely see that I used my bud-shaped bur #006 to remove any unwanted metal that is remaining along the long cutting edge/line! This is so darned important.

   You can see just where the Onglette graver should be positioned to make the 'corner beads'.

 This diagram is showing you the Onglette graver at work. Then  you can use the Flat graver to  start it's great Bright-Cutting work!


  If the Onglette graver makes a large Triangle-bead, You'll be having a very large mound of metal to clear away..Too much time wasted, and this is not on your immediate "bucket list".

 I'm trying to show you just what size of new bead you should be making. If you select a large amount of bead-metal, you'll never get any good results. (But, this can easily happen.)


  Certain cutting techniques need to be followed in preparing to make room for your '2-beads'.


  Here is the Flat #40 graver starting to make the Bright-Cut.
 Here you can see that the triangles are 'almost' too large, these are 'just borderline' acceptable!

 With this great looking and as well a deep cut, your Flat graver will get beside your triangle and give you the results that you need.. a nice clean cut at the proper 30-45 degree angle!

 What would happen if you only cut the line only once? You'd have a very shallow cut and the results will...look...just...mediocre.

 Now you can see why this 'heart-shaped' pattern can offer me many chances for a decent demonstration of 'angled-cutting'.

 Here are the finished Bright-Cuttings for this project from a distance. The wine-coloured wooden handle in my desk-bench always hold the Flat graver and never any other blade. I use it for easy sight-identification while I'm at my setting bench and I don't have to take my eyes off of my work, good idea?


 "WEDDING BAND", setting!
 Once you finish with the stone setting, I suggest you not to touch anything afterwards why? As you might ruin the final finish. Once my stones are in, I'm done!  


 All things considered, this cutting pattern is the same as the 'heart-shaped pattern', but the cutting is in one straight line,

 You can see the cuts are all in the same angle in the metal, no deviation from one hole to the next! This is definitely a "learned, graver-skill".

 I'm more interested in how the inside reflecting surfaces appear to me! No where should there be any striations caused by the Flat Graver #40, just a nice & clean metal surface.

  Don't worry, or be concerned if the 'line-cutting' looks like a disaster, this will be cleaned up in a few moments! This where your "Right-Sided, Onglette graver either #1 or maybe a #2 will start to clean a nice bright line.

 I apply a downward finger pressure constantly to make my cut look like it is being shown in the last photograph in this essay.

 Graver-modification is another "learned skill", this process took me about 3 years to master.
You will notice that I always have my polishing paper near my hands in case of needing to quickly refurbish the 'cutting face' on either style of gravers.

 If I didn't have my 'knife-edged" graver with me, I just couldn't attempt this style of cutting. You just must have the right selection of tools, or you're in the wrong profession.

 Here is "Right-Sided, Onglette graver #2", but it has been greatly modified solely for this purpose. This graver only cuts on the right side, in my mind, the left side just doesn't exist!!!

 Is this difficult to cut? YES, it will take you many months of training to keep your fingers and hands from not deviating from the desired angle that you need to keep.


  I Bright-Cut every side of the angled pattern. It is not desirable to have any flat or uncut surfaces, anywhere!!!


 By drilling the hole and inserting your stone, you will be then reducing the 'triangular' shape metal and making it easier to push over with your Bead-Burnisher.

I used a Bead-Burnisher #11 or #12, the size is very important, as you don't want any 'dish' effect around the base of each bead. (aka yuk!)

 Contact me; 'gerrylewy18(at)gmail.com".