How do you find if the diamond is correctly in the 4-claw head & well-centred? This is quite easy, as the Culet of the stone MUST BE IN THE CENTER OF THE FOUR CLAWS.
I suggest that you use a FLAT graver with a #40 width and cut the areas where your "HSS" bur was cutting into the metal. This flange of metal MUST BE REMOVED NOW, DON'T USE A FILE, as a file will leave a serrated edge where the file was trying to clean.
A FLAT GRAVER WILL 'CLEAN & CUT' both at the same time.
I might suggest rotating your ring just to make sure that your stone is sitting in the centre of the 6 claw head.
All of the '4-claw' settings MUST BE EUALLY SPACED. These claws must be in a vertical position and not tilted or crooked. Another point is to use your #77B Cup Bur to shape your claws as shown here.
WOOPS! These girdle seats were drilled too high against the claws. Because of this major error, there won't be enough metal to go over the Girdle of the diamond.
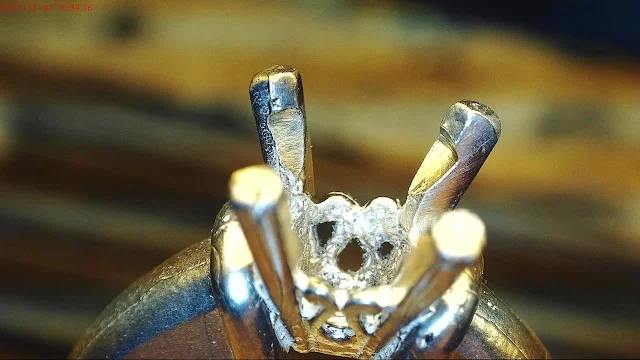
To repeat, observe the 'rough texture' on the side of the claw. These bits of metal will be on ALL OF THE 4 CLAWS.
This is a close-up photo of the "HSS 90-degree angle" cutting bur. These teeth will cut into the metal and leave shards of metal mainly on one side of each of the 4 claws, this is due to the rotating bur.
These are two results from the bur-cutting. The claw on the left is just a very mediocre example of preparation of the cutting.
The claw on the right claw is a fine example of what the inside of each claw should look like. You can visualize that the Pavillion will lay against the inside of the claw without any open areas.
I cannot over-emphasize what the 'pieces of metal' will look like. GET RID OF THESE PIECES OF METAL NOW!
Let's discuss the correct 'filing technique' from this one photo.
1) The tip of each claw must be filed flat.
2) There must sufficient amount of metal holding down each section of the stone.
3) The front section of the claw must be filed straight across as seen on the left claw.
4) The sides of each claw should be parallel to each other.
5) The rear of each claw could be half-rounded with the Triangular file of #4 grit.
6) The easier method is to use your #77B, Cup Bur. There must be 50% amount of more metal on top to allow the Cup Bur to be used.
This stone is set too high in the 'low-profile' claw configuration. PLUS the stone is grossly crooked because the Girdle bearings were not correctly drilled at the same depth.
Examine the depth of the Girdle and Pavillion seat, if there is a minute discrepancy the stone will be set tilted aka crooked.
This is my specialized selection of gem-setting tools. If other jewellery tools are occupying the same bench tray, get rid of them as you don't want unnecessary tools lying askew.
I always initiate cutting a little groove into each claw with a bud-shaped bur. If I didn't use this technique, the 156C bur would surely run amok around each claw. This action will endanger or ruin the claws.
It is advisable to examine the height of the claws to the size of the stone. Any last-minute preparations should be done at this stage, if one claw seems to be too high, you can make the immediate corrections NOW.
Once the Girdle indentations have been created, you can spread out the 4 claws to accommodate the large gemstone. This manoeuvre is only temporary as it will give you much freedom in setting the stone.
REMEMBER TO CLOSE THE CLAWS UNTIL THEY ARE IN A VERTICAL LAYOUT.
After all of the cleaning with Pumice Wheels and FLAT graver shaping, there will be a need to 'pre-polish the claws' prior to the final stone setting.
If you decide to do this after the stone has been set. "Good luck" Your ring will not look professionally manufactured.


.jpg)


