This is an unusual style of setting, in my ongoing series of "ring tops", that could appear at your bench. This essay will describe the "rules and the many techniques", in sequence.
This was a basic wax that I had and it appeared to be quite interesting. I removed the little claws in between the holes but retained the outer walls. Needless to say, it appears to be quite useful.
"The Difficulty Scale" is a 20 out of 10! Why is this so difficult? Let's now find out.

I picked only a few of these burs, but more are shown below!

Here are both round (#1) & bud (#6) burs in their own little containers!

Here is another little assortment of both MORE bud and round shaped burs. You just don't have enough of them. I keep another 'extra supply' off of my bench, just in case!!!

For the tapered-edge bur, I'll be using it just to carve out the centre of the channel. I'll do this 2-3 times to get a 'new depth' that will be equal to the depth of the stones. At some time further on, I might even fully remove that inside area!

At the preliminary stages of opening up the metal channel, I'm first gauging the depth in relation to the depth of the pavilion of the stones.

Instead of using a bud-shaped bur to shape a new seat at the Pavilion area. I chose to use my Flat Graver #40, as it will give me one...continuous... 'long & smooth' cut. Rotating (round or bud) burs don't offer me this 'cleaning solution' in carving out the metal..:>(

Just get the 'ledge or step' removed with your sharp Graver as shown.

Make that long cut right to and beyond where the Baguette stones will be sitting.

If I didn't use my graver, I'd still be having a "ledge, or step" that is not needed. The stone wouldn't be sitting correctly, the stone would be sitting on a very sharp pointed lip! OUCH!

Keep looking at this sharp lip with your 10x power loup and make very sure that it has been totally removed.


'BEFORE' any angled cutting!

'AFTER' the angled cutting. Can you now see just how much of the metal has been removed?
The stone is now resting its Pavilion 'against' this new angled ledge.

I like to mark with an ink-marking pen as to where these stones should be sitting!
There should never be any spaces as shown below in between the two stones.
Get them much closer!

This opening is 'almost' acceptable. When you are using your Reciprocating Hammer, any slightest movement of either side might vibrate against the "neighbouring stone" and both could get broken!

This photo shows just how good the spacing is.


I'm showing you just where the corner of the stone is now resting. I call this "the point of the stone is floating" and making no direct contact with any metal.

I now have a large space at both ends of the two Baguettes, I'm now going to set two round stones. I prefer to use a 'bud-shaped' bur to excavate the metal for these to sit at both ends!

At both ends, I'm now using my"156C" undercutting bur, or as it's also known as a 'bearing cutter'. Whatever the name you wish to use, its a great bur to use!

The Culet & Pavilion area must be fully drilled out before setting.

Here you can see that the round stone was touching the Baguette and it broke! Remove that stone and redrill the bearing further 'away' from the Baguette. When the stone is reset, it won't come in contact again with the Baguette, simple as that!!!


You can see that one stone totally sitting on its side, take it out!!! Why did this occur?
There might have been a little sliver of metal remaining underneath one side of the opening. When you remove the stone, there might have been an obstruction for the stone to sit correctly. That little piece of metal is right underneath the 'high-point' of the stone.

The ink-mark on the metal lets me know where my hammer is touching the corners.

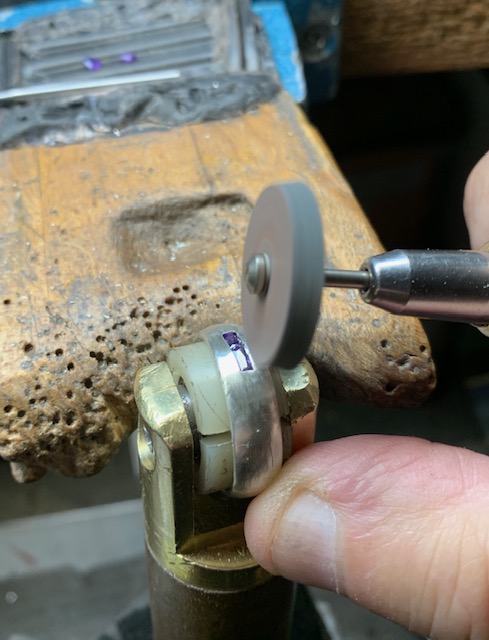
When you are hammering the metal is being displaced and it will appear to leave a little ridge on the outside of the channel wall. This is quite a common thing to see and it can be removed with your emery wheels.. there is nothing to worry about!


Now you can see just why I gave this essay a "20, out of 10" on my Difficulty Scale. There were many little problems and it was my duty to help in guiding you through them all.
This was a basic wax that I had and it appeared to be quite interesting. I removed the little claws in between the holes but retained the outer walls. Needless to say, it appears to be quite useful.
"The Difficulty Scale" is a 20 out of 10! Why is this so difficult? Let's now find out.

The selection of tools can be very interesting as many shapes, sizes and the style of burs! This demo-lesson needs all of them and at a moment's notice.
I picked only a few of these burs, but more are shown below!

Here are both round (#1) & bud (#6) burs in their own little containers!

Here is another little assortment of both MORE bud and round shaped burs. You just don't have enough of them. I keep another 'extra supply' off of my bench, just in case!!!

For the tapered-edge bur, I'll be using it just to carve out the centre of the channel. I'll do this 2-3 times to get a 'new depth' that will be equal to the depth of the stones. At some time further on, I might even fully remove that inside area!

At the preliminary stages of opening up the metal channel, I'm first gauging the depth in relation to the depth of the pavilion of the stones.


Just get the 'ledge or step' removed with your sharp Graver as shown.


If I didn't use my graver, I'd still be having a "ledge, or step" that is not needed. The stone wouldn't be sitting correctly, the stone would be sitting on a very sharp pointed lip! OUCH!


I'm using #007 both round AND bud shaped burs in this instance, why both? One bur (bud) will give me a nice clean & uninterrupted bearing cut. The round bur will give a "corner hole" just for the square stone safety. Those four stone corners MUST be free of ANY contact to any metal!

Here's a "close-up photo" of the same action just being taken. Those ink-marks let me know exactly where the stones' corners will be situated in the metal.

For three (3) stones, there are now 6 corner-drilled holes. Get those 6 holes dug deep into the metal! If any of those 6 corners touch the metal, "good-bye stone, or stones"!
This is a very delicate area.

'BEFORE' any angled cutting!

'AFTER' the angled cutting. Can you now see just how much of the metal has been removed?
The stone is now resting its Pavilion 'against' this new angled ledge.

I like to mark with an ink-marking pen as to where these stones should be sitting!
There should never be any spaces as shown below in between the two stones.
Get them much closer!

This opening is 'almost' acceptable. When you are using your Reciprocating Hammer, any slightest movement of either side might vibrate against the "neighbouring stone" and both could get broken!

This photo shows just how good the spacing is.

The stone positioning is now just great!!!
Everything should look like a 'one continuous flow of white stones'..:>)

With using the bent-shaped plier nose, just slowly and very carefully bring the two channel-walls together, but NOT TIGHT!

This method will not hold the stones tight but allowing you to proceed to the next step for hammering.


The Reciprocating Hammer can now be used, but also never allowing the hammer-anvil to touch the front edge of the channel wall. In this procedure, all of the stones must be properly aligned and fitting close together.

I'm showing you just where the corner of the stone is now resting. I call this "the point of the stone is floating" and making no direct contact with any metal.

I now have a large space at both ends of the two Baguettes, I'm now going to set two round stones. I prefer to use a 'bud-shaped' bur to excavate the metal for these to sit at both ends!

At both ends, I'm now using my"156C" undercutting bur, or as it's also known as a 'bearing cutter'. Whatever the name you wish to use, its a great bur to use!

The Culet & Pavilion area must be fully drilled out before setting.

Here you can see that the round stone was touching the Baguette and it broke! Remove that stone and redrill the bearing further 'away' from the Baguette. When the stone is reset, it won't come in contact again with the Baguette, simple as that!!!


You can see that one stone totally sitting on its side, take it out!!! Why did this occur?
There might have been a little sliver of metal remaining underneath one side of the opening. When you remove the stone, there might have been an obstruction for the stone to sit correctly. That little piece of metal is right underneath the 'high-point' of the stone.

The ink-mark on the metal lets me know where my hammer is touching the corners.


Here is the finished ring top. As this was created by finding a wax pattern and made it ready for my silver casting demo. Nothing is ever thrown away or discarded in preparing for my ongoing essays!
For the inside of the two channel walls for cleaning you can use two methods! I prefer to use my Flat Graver #40 or if you wish a Triangular file #4 cut. Either method is suitable