44 photos of iPhone covers.
iPhones are a spectacular invention as they have changed our world. Some of these covers are the topic of this essay, I've recently seen some interesting and dazzling covers.
The two covers seen here (with prices) are nice, I'm going to create some interesting gemstone inlay features on a few. YOU MAY COPY THEM (if you wish).
All of them are in a wax form, as casting even in silver, these large pieces tend to be expensive just for picture taking. My sincerest apologies!
These two store covers looked appealing and I was thinking of this essay. As where the series of white dots are being shown, gemstones could be inserted. Why not, eh?
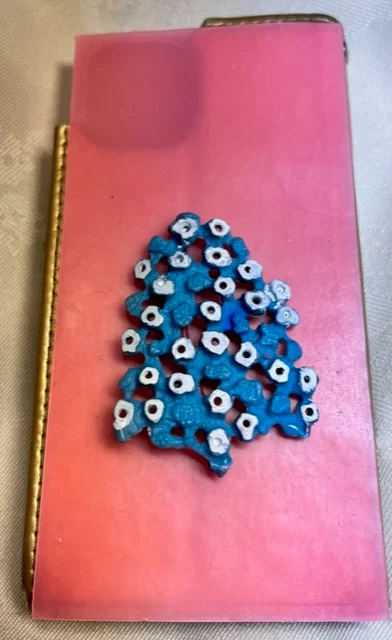
These white spots on the wax, would be where gemstones would eventually be located. I'd name this as "A Tree of Life".
All along the neck and face will be any smaller stones. The red lines signify the 'halter & bridal' location.
When you are deciding to place various sizes of gemstones, I make it a rule to put the largest series of stones in the 'middle & corners' of the plate.
If there are any spaces, it is advisable to place the smallest stones in between the larger gems. There is still loads of room to set smaller stones similar to the next photo shown below.
This (bracelet) display looks great and has a 'creative aspect' to the layout. The setter and designer had the same thought processes as I do.
They filled in all of the available spaces and wanted to have only diamonds and beads showing, nothing else. THIS WAS NOT A "CAD" DESIGN.
As you can see that I found the centre of the plate by scribing an "X" on the wax, this gave me the center of the plate. I placed all of the larger stones in the centre of this plate.
When you are contemplating to use this on your iPhone cover, every pattern must be laid out in an orderly fashion.
Here is a collection of waxes that I found in my storage container this afternoon. I thought how would they look if I placed them all on iPhone temporary cover plate. Over an hour later here they all are and evenly spaced.
----------------------------------------------------------------
The empty space on the top left hand corner is where the iPhone lens will be situated.
Here is a mixture of colours and sizes, I avoided having any spaces in between any of the stones.
It would be advisable to set the stones individually then solder them onto the iPhone plate. If you have an access of a Laser, this form of soldering would be much safer. If you decide to use this pattern, you can then set Genuine, Semi-precious stones.
I've given you many options in creating new iPhone covers, it's up to you to use any of them for yourselves.
These are just my own ideas, "your own creativity rules the best route to take".


.jpg)
.jpg)
.jpg)
.jpg)

.jpg)


