Friday 7 June 2024

"REVIEW" => Using a NEW engraving tool - 16 photos


This essay is an important REVIEW of what takes place to make NEW engraving tools.

This photo displays a FLAT graver as all of my gravers are composed of "HSS" (High-Speed Steel). The number #10 signifies the width of the blade.


This is an Onglette graver (#1) thickness, that was just bought from a tool supplier


 For your information, this metal cutting was done with an Onglette graver. As one side of the graver was highly polished on soft emery paper, only one side of the blade can Bright-Cut as shown. Because of this, you can easily see a reflection on the metal.


    I use only two styles of blades to cut into any metal, an Onglette and a Flat blade.

  Once the beads were created, I started to set a few of the synthetic stones. The process is named 'Pre-Cutting' where all of the metal shaping & carving was done long before the various stones went in.

  My bench-grinder has its own set of rules, here they are for everyone to read before turning on the "Start" button. In Canada, we use both English & French for instructions.

 When the blade is finally shaped, then comes the polishing of the blade, which is so very important. I rub a soft pencil into the pores of the paper just to give the steel a higher resolution in the steel.

 This oilstone must be kept well lubricated with oil at all times. It's important to run your graver on a lubricant and never have the oilstone get dry.


 The little remnants of steel from the blade need to be removed continually. I use a fine liquid that keeps the steel held in suspension and then removing it with a magnet.


  The long shaft of the blade is nicely fitting into the handle. Only the exposed blade is used in metal cutting.
 

 You might think that these 19 blades are now useless. This is not true, as once the blade is in the extended handle, it can be used for many weeks or months to come.


 The right side of this graver is now named "Right-Sided, Onglette #2, Bright-Cutting blade". This is a long name, but the work that it does is just phenomenal. I know!

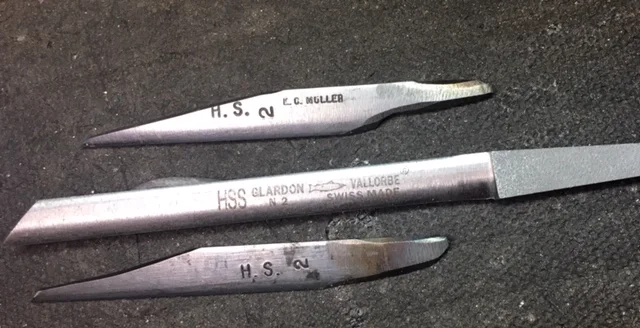
   These are my 'metal cutting companions'. I work only with these 3 styles of blades.

 The Onglette #2 blade has a greater curvature to the blade. Because of this, there is a greater curving effect given to the metal line of cutting.


  I am reluctant in using a thick Flat blade as seen in some videos. For the past 65 years, I prefer a blade shaped similar as seen in this photo.

 This is the epitome of a correct "holding technique" given to the blade and to the Polishing paper. You can see that I never use any rotating blade to polish my gravers.  There is absolutely no need to spend mega-dollars on something so unnecessary. 
My 'polishing sticks' do all of the work for me.


Thursday 6 June 2024

Which "Optivisor" is best for you? - 8 photos


 I've used this particular "Optivisor #5" for my Diamond Setting as long as I can remember. The magnification strength is less strenuous on my eyes as well. I can wear them literally for hours with no strain on my eye. Of course, it's imperative to take them off once in a while.


 There is a head-band that sits against the forehead of the wearer. It fits so smoothly and is totally soft to the skin, these can be bought separately, if needed.


 This is the magnification of about 2.5x power just strong enough to have the setter see his stones.


 I saw that some of these lens come in 'sets' and can be purchased as a group. All the wearer can do is to unscrew the side bolts and insert a different lens. GREAT IDEA!  
 

 For a different option, is that a lens can be attached and swung into place in front of the Optivisor on either side. When not in use, it can be rotated away from being used. WOW, I wish that I had these years ago.


 In my estimation, the magnification of #7 can be a bit too powerful for continued use. That is why a #5 lens 'is the best'. But it is there, ONLY if the need arises.
 Please excuse the glue as the screw got lost and I reattach the lens quickly, then I had to buy another #7 lens.

 In previous years, the jeweller or setter fitted their own 'prescription lens' inside the frame. If the magnifying lens wasn't needed, all they would do is to just lift up the attached lens.
 BTW, these glasses belonged to my Dad and his 'hand-held' weigh scale shows the size is in the background, circa 1940's.

Nice pair of glasses, but there is little option of inserting any prescription lens, pity!


Wednesday 5 June 2024

Which (hand-held) Loupe is best? - 18 photos

The 'hand-held' loupe seen in this blog has many advantages, (with very few disadvantages).
 These comments are my own, and not from any tool supplier. I shared these photos with you from a few tool suppliers, but for privacy, I think it's best not to use their names in this blog.
=============================================
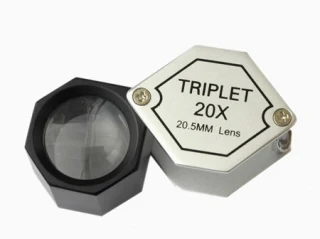
The "Triplet" lens IS THE BEST TO BUY, why? It actually has 3 lenses in the compartment and there is no aberration, or defects in the viewing. The 10x power is best under normal viewing, but I prefer a wider scope as what you see here is of limited viewing.


 This is another inside lighting system that has an 'off & on' switch, great idea!

 If, and when you are in the market for an 'L.E.D.' loupe, get it you will thank yourself, as this is the new loupe series that is on the market. There is a little powered lighting system inside for easier viewing. 

  
 These 'stick it in your eye' loupes are hard to keep against your eye socket. Plus the magnification is rather poor at 5x power. Think twice, if you need these.

  For short-time viewing, these are easy to hold and fold away. But, the viewing scope is too small for long-term viewing. (Just my thoughts).
 I'd use this loup for gemstone examination, 30x power is extreme, but it's very useful with gemstone and diamond dealers.


This  'multi-lens in one' is a good idea, actually, you now have two lenses in one compartment.


This loup is good but the viewing-scope has a 'very limited' viewing. When you are in the market always pick one up and examine each for your viewing needs.

This is the first loup I've seen, with its own carrying case. Wonderful idea!!!
 I have a similar Digital Microscope in my 'setting bench' for the past 5+ years. As for me, I can retrieve the photos from an attached internal USB module and put them into my computer for my 'blog writing'. In fact, the images can be downloaded to your large monitor for your clients to share.

"Bausch & Lomb" is a great brand name in optical lenses, 10 power lens is adequate for the average user.


 The inside 'LED' lighting system is a great idea in subdued office lighting or bench work this is a fantastic idea.


Monday 3 June 2024

Where would you use a "wire-brush"? - 21 photos

 A 'wire-brush' is not for your personal 'hair grooming', it's only used for cleaning files. Now that we got this sorted out, let's proceed onward, agree?


 This is a 200power enlargements of a wire-wheel. I think that this photo gives in greater detail what the wires look like.

 This photo is only a 120x power enlargement.


 From the slightest granules that are embedded into the pores of the file, these MUST BE REMOVED, NOW! But how are they captured and then removed?

 The files must be cleaned as much as possible to continue being a good cleaning tool.


 This is a file in "pristine" condition, there are only a very few granules remaining. But even those have to be removed.


 I'd be very happy to use this file under normal circumstances. The cleaning was apparent in viewing the collection of metal particles.

 The lines in these files are too fine to be cleaned accurately. There is a limit on what the wire brush can clean.

 These Triangular files are as well, too fine to be cleaned with this coarse wire brush, pity!


 It's very easy to remove the collection of wax that got collected within the pores in the file.

  Here is a closeup of the wax that got caught within the sharp teeth on the wax file.

 
 This metal file is just 'borderline' in being able to be cleaned with this wire brush. The teeth are just barely been able to get the little particles removed. 


  This coarse file can still be cleaned with little problems. But this is the limit on the separation of the teeth. A wire brush can only do as much and then it's not usable.

 Here are the wires of the brush starting to do their work in cleaning. If the wires are too thick, then the brush can't do anything.


  If the wax is too deeply embedded into the file, I suggest carefully using your steam machine and blowing out the wax from the pores of the file.


    This file is good for many more applications, as all of the teeth are nicely cleaned.

  There are still some particles remaining within the teeth. I'd use my brush once again.