Tuesday 20 June 2023

"Red (Ruby) Stone" Bezel Setting. Review of notes. (19 photos)

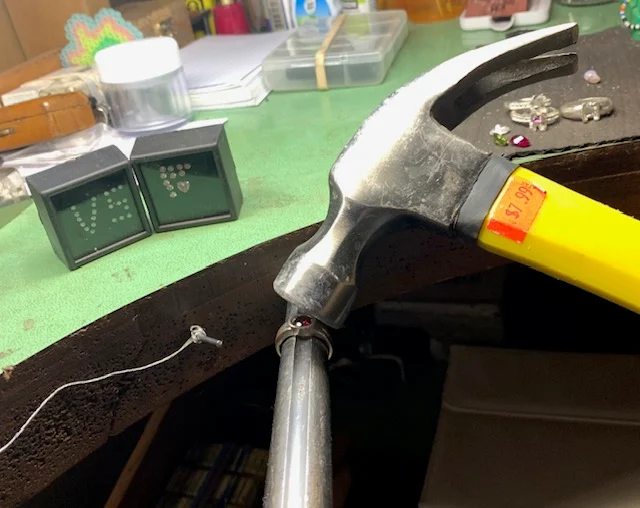
    This photo shows the "Reciprocating Hammering" process being displayed. 


This Ruby stone has yet to be hammered, but it is correctly placed into the bezel.


 This 'round bur' preparation is used as a guide for using the HSS (High-Speed Steel) bur. 


 In a full review of the Ruby (Red Stone) setting there are many details that MUST be followed and carefully adhered to. The very first is to make sure that the stone is sitting flush with the bezel.


 In this photograph, you (and I) can see that the stone in conjunction with the bezel, is slightly 'crooked'.

 The Culet of the stone appears to be protruding from underneath the ring. Therefore it is incumbent on me (the setter) to place this Culet in the recess in the mandrel.
 
 You can easily see the 'slanted-crooked' oval stone. Once the stone is set, there is no way the stone to be altered.

 I enjoy using this "Inside, ring clamp". Instead of gripping the sides of the ring, the inner clamping plastic literally expands and locks the ring TIGHT.

 In using the rectangular-shaped "Reciprocating Hammer Anvil" I purposely used the narrow edge. The reasoning is that all of the hitting power is going to a small spot.

 This second option is to use the same anvil but to turn the anvil 90 degrees to 'spread out' the hitting action.
 
 With your Onglette #2 graver which is polished and made smooth with "Polishing Paper" of #800grit, Bright-Cut the inside of the Bezel

 Please don't use any Flat graver in this important process. You need a smooth surface all around the oval circle.

In keeping with a smooth angled surface, it is advisable to use your Pumice Wheel of #180 grit.
 

  Once the #180 grit wheel has been finished, then and only then should you use the #1,000 grit (PINK) Pumice wheel. This process overrides the need of using cloth-polishing wheels.

 In my vast array of 'finishing wheels' here is my finished ring.

    I prefer to stabilize my ring in my fingers and against my bench peg. (Sorry for the blurred photo.)

 I use a "Medium grit, Emery "Snap-on" disk to remove any defects from the casting process.


 As an afterthought, I nearly forgot to show you that all marks can be removed by using a 'wide shaped', "Pillar File" #2 cut.

 In this diagram is the sequence, or a guide, in the hammering process.
 If properly followed, no Oval stone will ever get set 'twisted. The numbers 1-6 in this diagram are an absolutely accurate method in having any oval stone set perfectly. THERE ARE NO SHORT-CUTS in this 'sequence of hammering'. 
 
 After spending 65 YEARS of gemstone setting, I do know a few techniques to help you.


"MINI-BEZELS" (Worth viewing again) (18 photos)

 These are the assortment of burs that could & might be used for this essay.
I use my "1/2, Round" bur to create a seat for the stone. Sometimes, if the stone is too large, I will use my HSS (High-Speed Steel) burs instead.


Once you place the stone into the 'mini-bezel' the hammering then starts in earnest.
As I've written before, I specifically use an 85.0-gram hammer to do the required hammering.
 You can easily notice that the stone is lowered into the bezel. I will explain further.

 You can see the smooth and shiny surface on the hammer's face. This is so important as there must not be any defects on the hammer face. Those defects will be transferred to the bezel and we don't want that, do we?

 The 'angle of hitting' is as always at 45 degrees. Another note is to use your steel mandrel as the steel will allow the hitting to be directed to the ring. In a wooden clamp, the wood absorbs all of the momentum and pressure of the hitting.

 Here you can see the direct hitting starting to take place.

 Always keep your mandrel secure and direct the hammer face to the bezel.


 If you use your 'hitting anvil' please don't let the stone be touched.

 Keep the anvil away from any stone facets. If not, there will be broken pieces of stone everywhere.

 Here you can see that there is space between the inside lip of the bezel and the stone. This is so very important.

 Here is the completed Bezel top, isn't this nice? Yes, this takes much practice.

 In using your hammer, don't let there be any spaces from the tip of the bezel to the stone.


 I will be using an Onglette #2 graver, thus enabling me to carve a shiny circle all around the inside bezel.

   Please don't have any defects in the cutting to occur.

 When you are cutting in a small area, please don't use a FLAT graver. You will have metal facets during the cuttings.

  Kindly use your Triangular file with a #4 grit, a #2 cut is too coarse. This is the correct filing angle that is required.

 Here we can use a Pumice Wheel of #180 grit to remove any stirations from the filing.

 I now use a #1,000 grit (PINK) Polishing Pumice wheel. This 'wheel polishing' gently cleans the surface.

                                      THIS RING IS NOW COMPLETED.


ONLY (Oval Bezel) HAMMERING (9 photos)

  This essay is about "OVAL BEZEL" hammering, nothing else!


 In this simple diagram, I chose a lightweight hammer weighing only 85.0 grams. As you can see that the receiving angle is at 45 degrees. Therefore the Bezel will be pressed against the stone.

 Please observe that there are no spaces between the inside Bezel and the stone. The hammer will move the Bezel against the stone. Don't allow the hammer face to come in contact with any stone facets.


 This is the wrong size and type of hammer to use. It is too heavy and when it is hitting the bezel you have no idea where it's landing.

This is my favourite 'gram and size' hammer to use.


The hitting angle is almost flat to the Table of the stone. The problems will be "stone shattering"

Always keep your hammering angle at 45 degrees. You are hammering 'against, but NEVER on' to the stone!

 After you use a round bur to initiate the bearing cut. Please follow with the HSS (High-Speed Steel) bur, with this bur, you will have a uniform bearing.
 The width of the edge MUST be the same width as the girdle-thickness of the stone.

 
 This photo details the 'teeth arrangement'. A 156C (Carbide steel) bur will have teeth that are too close together. 
 This HSS bur has the correct dimensions and angles to successfully give you what is required in Bezel Setting.

 This bur has shallow angles for a deep Pavillion stone. Please be careful in selecting the correct-sized bur. There are no 'shortcuts' in the gemstone setting.


What size of burs do you need?


  When I was sitting at my setting bench, I'd be so pleased if I had this guide within 'hands reach'. This guide was created by 'many trials & some errors'.

 The 'small & large' numbers will give you a range of burs to work with. Your tool supplier range of burs is enormous, but keeping this 'range' within certain parameters, I think that this list will be 'good to go'.

 For example, if you are working with a 'round' bur and needing '2.08 mm' you can use anywhere from 2.05 up to 2.15 mm's, inclusive. You might add other sizes as a guide.