Saturday, 24 December 2022

"MIAMI-Dolphin" pendant. Spacing & setting of Diamonds.

 I was given the honour and privilege to turn this "undrilled, piece of gold" into something very attractive, as well as being so very ultra-expensive.
 
 These photos are 'out of sequence' but that is due to my wanting to capture every aspect of the 'drilling & spacing' sequences.

(The actual Pave setting of each stone can be viewed in other of my "blog essays").

  On the Difficulty Scale, this project is about "50-75, out of 10".

The importance of this essay is to give a greater understanding of all the spacing techniques that were involved.
======================
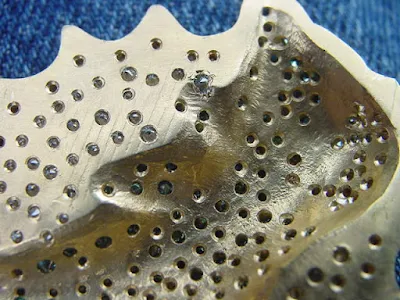
 Underneath, each hole had to be 'countersunk', thus enabling me to have a smoother surface. Not to mention opening up each hole to have as much light to pass through.


 This was not a flat plate to work on, there were flat, vertical, angled sections, and Pave sections just to set these diamonds.

 As this was a body of a Dolphin laying on a plate, I had to inspect and as well figure out "how and where" all of the Diamonds could be mounted. This was no easy task.


  In this photo, I approved of using a soft-holding, leather-inlay ring clamp. This is also for the "vertical" sections when (laid down) on the Dolphins' Torso.


WOOPS! You can see one hole that wasn't drilled sufficiently, I inserted a larger stone to offset this problem.
 
 By holding this item, you can figure out the size of this item. THIS WAS JUST ABSOLUTELY ENORMOUS.

 I didn't have enough Diamonds of every size. I requested the client to ship me more large, small, and very small for the awkward process of filling in the spacing.

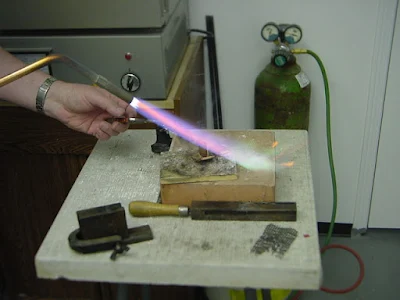
 If I drilled a hole out of place, my off-site jeweller had to assist me in (soldering) filling in the hole again.


   There was no intention for me to do any long lines of Bright-Cutting.

 My client shipped me an extra number of BLUE diamonds to fill in the empty spaces in the tail. He (they) also sent me more white stones for the head and beside the letter "M".

 Now comes the work of spacing. As you see that there are spaces between the row of white diamonds. The spaces provided are for me to allow for the drilling and also for bead-raising.

 If I had to juggle the spaces allowed to me, I would do this NOW. There was always a plan and a revised plan on which size to use, when & where. 
 THIS WAS A MIND-NUMBING PROJECT. 


  Concentration was paramount in every aspect of "Spacing of the Diamonds". Mistakes were NEVER allowed or EVEN permitted, every diamond was expensive. Breakage was not even thought of.

  Before any Diamond was set, I decided to examine the thickness of the metal for every stone. Why was this? If the diamond was larger, therefore the Culet would protrude through the reverse.

 Those "blue" spots on the reverse were my idea of self-examining the thickness again, or if the hole wasn't counter-sunk accurately. 

  If my deep concentration faltered, I'd have to stop, have a cuppa tea and take a 'mental break'.
 
  In this photo, I examined where the next series of drilling would take place.
 I'd fill in with Pave-beads where extra spaces are in between any of the diamonds.

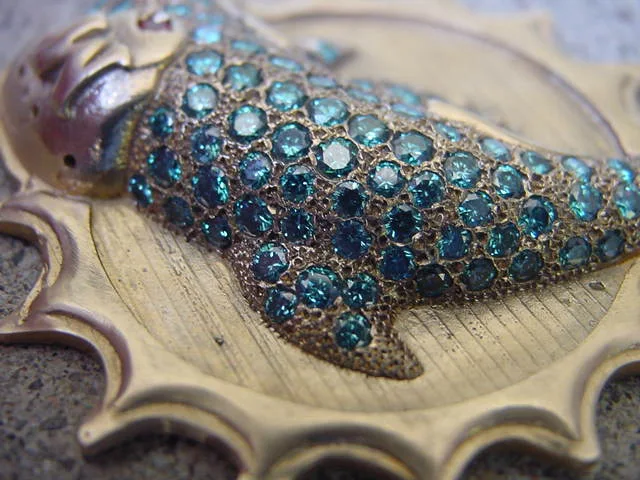
 Those "blue" spots are where the Blue Diamonds are showing from the top.

 My "off-site" jeweller was always asking me how I was managing with this project? Sometimes he would fill in some of the holes that were not to my liking.


Here is a good close-up of the back side of this project.

  I am now preparing holes for more diamonds. I pre-drilled before I actually opened up the holes for the medium-sized stones.

 Under close scrutiny, I will endeavour to fill in any unwanted spaces with adding Pave bead-raising.

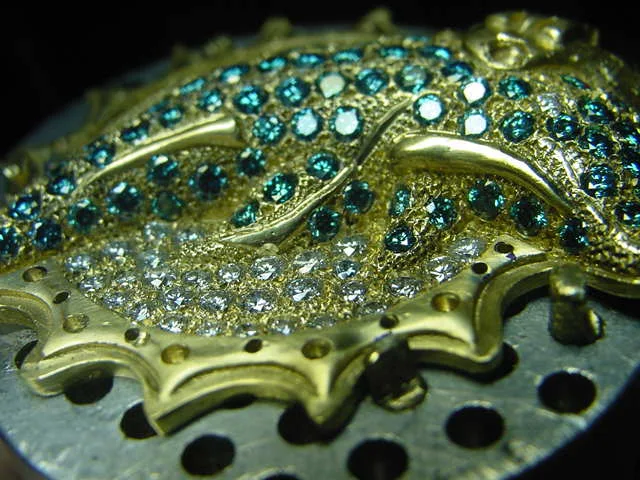
  In this photo, you can see an assortment of white diamonds around the letter "M".

 I placed a white diamond in between the many facial Blue diamonds, why?
 
 Do Dolphins have eyes? You betcha they do, and that is what I created.

 In this interesting photo, you can see the many angles I had to work with just in holding the frame I had a leather-tipped ring clamp. I also had a portable vice-clamp, I improvised every subtle way to secure during my stone settings.


 I'd run my fingers along the back surface to 'feel' if any hole was giving me problems. This procedure was 100% necessary and required. If I didn't do this, my client wouldn't be happy with my 'finishing'.

 This wasn't Tripoly & Rouge polished yet, but still, it looks spectacular, agree?


  You can see the many sizes of Diamonds that I had to deal with. If one stone is missing, that is because the size was wrong and it had to be removed as soon as possible.

  The size of this plate was enormous, and it made my hands sometimes tired from holding the metal clamp for long periods of time.
  
 I had to modify the little pegs to grab onto the disk. Again, you see the many angles that I had to do my Diamond setting. There were horizontal (Flat), to a 45degree, then to a near vertical. 
  I don't remember the number of days this project took me.

 The white spot (on the Dolphin's Torso) was a reflection of sunlight.

  I used different background views, here but are a few. I enjoyed using different colour schemes and contrasts.


 My client didn't send me enough of any smaller Blue diamonds, hence you are seeing an inordinate amount of spaces. I had to deal with what he sent me!

 I initially wanted more stones around the "M". I had to have my jewellery fill those spots that were originally allocated for them. Ask me about being '100% stressed'.


 Oh, I wished that I had one size smaller of the Blue diamonds as spaces on this particular item, was my ongoing enemy.

 Hoping that you appreciated my labours in Diamond Setting this somewhat challenging and difficult project.
 Gerrylewy18@gmail.com

Friday, 23 December 2022

(Advanced) Techniques in setting your "4-Claw/Prong" ring.

 In the many tutorial essays on "4-claw, Engagement ring settings. There have been numerous articles, posted in many magazines.

 With this blog-essay, there are more photographs taken from my own bench and not by way of drawings, or diagrams from other sources.

  I need to make sure you, the viewer, understand this very important setting process.
==================================
 Here are my favourite "High Speed Steel", 90degree angle burs. With out any of them much of the Engagement rings just couldn't get started, let alone be accurately finished.

 Here is a HSS bur that is 80% the size of the intended stone that has to be eventually mounted. You can see the beginning of the bearings taking place. 


   The angles of this bur are to the exact proportions of any Diamond, or gemstone.

 I just can't imagine if I lost any of them. To prepare a new full set of these HSS burs, are well into hundreds or thousands of dollars.

This one 8mm HSS bur, is equivalent to $45+.00 (plus 13% taxes)

  I want you the reader to see that there are two methods in finishing the claw-tops. One of them is a straight-forward "Cup, or Ball" shaped bur.
 The other is a Triangular #4 grit 'file to finish' the top. I prefer the exacting process of "filing by hand."


 Here is the HSS bur starting to create a bearing in the claw. But first  used a bud-shaped bur to carve out a line for the widest section of the HSS bur.

 If I didn't do this preliminary carving, the bur would go wild and rotate around the claw, this would cause me tons of problems in the filing to repairing,

This is result of having the HSS bur making a clean and distinctive bearing-cut for the Diamond.

 These are the selection of my gem-setting setting tools. I have all of them in my bench, within fingers and hand control, not something that I have to look and search for at a moments notice. They are so close to each other.

You have a good choice of how the claws should be finished. 
1) Either a #77B-cup bur to create a ball effect. 2) To file the top flat, but the rear of the claw should be having 3 sides filed and at the rear (outside) smoothed into a curve. YOUR CHOICE, either one is nice and with total security.

 The needs to have the bearings cut and shaped is paramount in setting any large size Diamond.
 
 BTW, always remember to file-trim the claws and polish prior to any setting of any large (or small) stone. Once the stone is in the ring..."too darned late" for any major cleaning. 

  You can see the level of the bearing-cut, it should not be as high as shown, why not? The answer is very simple BUT MUST BE EXPLAINED. 
 
 If your bearing is made higher as seen, your top of the claw will not have enough metal to file & trim accurately and not have enough metal to be needed for wearing the ring for decades to come.
  
 Place your bud bur at least 1/3 of the distance DOWN FROM THE TOP.
 Don't forget to polish the inside of the claw-cage and around the claws before setting.

 The claw tip should well above the "Table" of the Diamond, but not at the same level. The difference of height is where you must do all of the cleaning and alterations. Without this extra metal, you are prone to many setting problems.

 This is the optimum level of metal for correct filing. This will give you a good amount of metal to work on.    

 To have a uniformed flat surface on all of the 4 claws, I'd use a "Snap-On" Emery disk of "Medium" grit. This is to reduce the height on all 4 claws the same time.


  Here is a good example of showing the 1/3rd height from the top of the claws to your working area. 

 This height is not adequate as there is not enough metal to File, Emery paper and Polish on your cloth polishing wheels.

Please FILE,  EMERY clean and POLISH all for the sides of the claws prior to start the setting process. Once the stone is in the ring, it's to then too late for these very important steps.

 What happens if the bearings are not matching the Facets up from the Girdle?


  I use a very good opportunity in using a #4/0 Saw-blade to have the saw blade rest against the "Star-Facets". Let the saw blade cut an extra groove INTO THE CLAW. 

 Then the claws will be against the stone. How far into the claw will you go? Just enough for the blade to be at the girdle of the stone, not one millimeter further into the claw. This way the claw will be nestled securely and holding the stone in place.

 After your HSS bur has made its cutting, there will be a sliver of metal on each of the 4 claws. DON'T USE A FILE TO REMOVE THEM. This will leave a textured surface along the one side of each claw. 

 The only way to remove this sliver of metal is to use your FLAT graver and cut from the tip of the claw down towards the bottom of the claw. End of this unusual problem. As the bur is rotating in one direction, then this extra metal will be only on one side of each claw, not all four.
 
 In this photo is the application of the FLAT graver to the claw. You cans see where the cutting starts.

  Here are the 4 graver-cutting results, nice and clean and no additional cuttings are required.

  On a Difficulty scale of 10, I'd place this exercise at a definite 9 out of 10.
  This has been extra notes in the series of setting a "4-Claw Engagement ring."