I've had these many (65) hand-drawn diagrams sitting in my archives for many years and periodically they have been displayed in this gem-setting blog.
I thought that it would be prudent that they all be shown to you. None of them have been plagiarised from other sources as they are all original.
As these are a 'gift to you' you may do as you wish. But I prefer it if you could give them to your friends and jewellery associates where ever they live. These are all FREE.
=> My drawings are not perfect but they represent skills that I learned 65 years ago.<=
=====================================
First series of diagrams.
1) I use a Flat Graver #40 to carefully 'slice a wafer of metal' down over each stone. These slices would secure each stone.

2) The four Princess-cut stone claws MUST be made equal in all respects 'width and thicknesses'.

3) The '45 degree angle' of these burs is created to be the same angle as of the actual stone. "Bearing Cutting" burs have a shallower angle, (please don't use them).

4) You may use EITHER your HSS (High-Speed Steel) bur or your "156C" (Carbide) bur to make the correct shape in making the 'stone angles'.

5) When you are preparing to set ANY STONE, avoid having your Culet shown below the metal. If you don't, the client will rub that sharp point against her skin. OUCH!

6) When measuring the heights for setting any stone, kindly use the "Table to bottom of the ring", this will avoid any false (or incorrect) readings.

7) Your new measurements are being displayed as shown.

8) Here are 3, of the 4 claws that are seen as 'poorly created' in wanting to set this "Princess-Cut" stone.

9) When you are needing to hammer a bezel against the stone, there are some important notes to remember. The hammer must not be in excess of 85 grams, therefore the stone will get damaged in the 'hitting'. The side of the bezel should be at a 45-degree angle.

10) The contours, or 'facet angles' are designed to allow light to bounce from the top of the Table down =>through the diamond => and then be reflected back to the viewer.

11) A synthetic stone does not have the capability to reflect light as with the contours of the Diamond.

12) When you are needing to secure the bezel, you must be rather careful in having the bezel tip be against the stone. If it is a 'soft' stone, please don't 'hammer hit' the stone, just 'push' the metal against it.

13) Keep the bezel 'tips' at the same height as the top of the Cabochon.

14) It is advisable when you are finishing your setting to have the claws slightly 'rounded to conform to the shape of the stone. I never use any 'flat' surfaces on the Cabochon stone.

-------------------------------------------------------------------------------
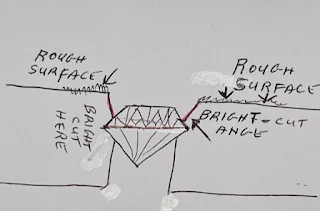
Second series of drawings.15) When you have completed the setting process in "Gypsy Setting" always try to keep the metal slightly higher than the stone. This will prevent any wearing, or hitting of the surfaces on the facets.
I ALWAYS BRIGHT-CUT, around the stone as this will make the 'stone look larger than it really is'. Plus it will give the setting a brighter sheen to the completed setting process.


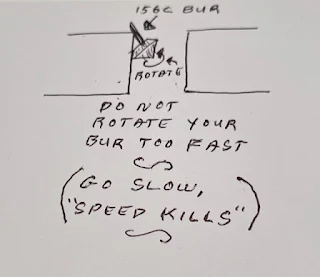


.jpg)


36) This is how the Milgrain Wheel appears, I'm showing my very own wheel and the many details.


16) All 'cluster setting' tips of the claws should be finished higher than the stone being set. This prevents any damage to any soft stone (Blue Zircon, Turquoise, that you are setting).

17) All stone bearings must be at the same depth, if not, the stone will appear to be crooked.

18) Just a few words for this diagram DON'T HAVE THE CULET OF THE STONE PROTRUDE THROUGH THE BOTTOM of any setting.

19) Be careful as you slide your stone into the new bearing that you just created.

20) Here I'm using my Flat graver in creating the 'slice of metal' that will secure the newly set stone.

21) Remove by 2 methods to remove any 'extra' metal on a Gypsy-Setting process. You may use a File, Pumice wheel #180 grit, or the most commonly used "Snap-on" Emery Wheel of 'Medium' grit.

22) As mentioned previously, DON'T LET YOUR CULET (of your stone) PROTRUDE THE BOTTOM OF THE SETTING.

23) When you are creating the bearing for your stone, don't let the cutting bur run too FAST. If you do, the cutting will ruin the new bearing.

24) The new bearings for the Girdle of the stone must be equal all around the opening, if not the stone will appear to be set crooked.
Another point is to keep the pavilion angle as close as possible to the angle in the metal.

25) Hold your bur at a 45-degree angle, this will maintain the correct angle for the stone setting.

26) Maintain a moderately thin appearance after setting your Princess-Cut stones. The method is to file the outside claws AFTER the setting has been accomplished.

27) These many pen colours represent Ruby, Blue Zircon, Emerald, and Blue Sapphire, Yes, these can be set in the same ring if needed.

---------------------------------------------------------------------
Third Series of Drawings28) On the inside of the Gypsy setting, it is advisable to Bright-Cut the metal around the stone. This will make the setting more uniform in its appearance and remove any unnecessary metal that has been worked upon. I use my Onglette Graver #2, but shying away from using a flat Graver. The Flat graver might leave little 'facets' in the metal. I use this method all the time and so should you!

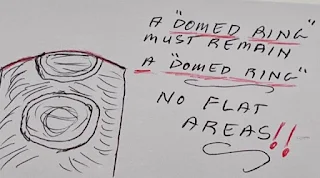
29) A "Domed" ring must keep its shape when completed.

30) For your basic information while choosing a different style of stone. A "Rose-Cut" diamond or other gemstone similar to a Cabochon stone. They are flat at the bottom but with multi-facets on the top surface.
.jpg)
31) When you are using a pumice wheel with flat edges for Gypsy-setting. The vertically held pumice wheel will only clean as to the width of that wheel.
If it is held flat, then the wheel will remove much more metal than is expected.

32) Always make sure that there are no little pinholes near the Gypsy Settings. These might occur by way of having the metal being unclean from the casting process. Once the stone is set it is difficult to repair these holes.

33) I use my Onglette #2 "Right-Sided" graver (as shown in my blog) to Bright-Cut the inside of the completed setting.

34) Pave' Beads are either over the stone or not! I use my Onglette graver with the point of the graver rounded to form these small metal round beads. The Beads MUST ALWAYS BE OVER THE GIRDLE OF THE STONE.

35) This is another viewing of how the Pumice Wheel looks as it is cleaning the metal surface. I have more control if the wheel is held 'vertically' and not 'horizontally'.


37) Here are the many angles of Flat and Onglette gravers during the cutting processes, here are the many reflective surfaces that are being seen.

38) "The Rule of 1/3's" is a very easy phrase to remember.
The depth from the top of the claw to the "bearing" is 1/3 the depth.
The "metal cutting" into the claw is another 1/3.
The remaining metal that is from the bearing cut and must not be any deeper into the claw is another 1/3.

39) "BENT NAIL or BUR" In my blog will describe what a bent nail looks like. It's so easy to create, but it works like a charm. As the nail of newly formed creation, by way of heating it, Red-Hot will literally 'move' metal over any hole in the ring.

40) I haven't used this style of bur for Pave-Setting, I use only Bud or Round shaped burs. If you decide to use this straight edge, there is one inherent problem. If the bur is not held vertically, the hole will be lightly oval in the opening. So why use them?

41) Oval Setting via Hammering processes. This sequence of hammerings will avoid any sort of oval stone from being slanted. Please, please use this sequence as if you do, there will never be any need of ruining the bezel to fix a slanted stone. There will never be any more slanted stones in your ring.

------------------------------------------------------
Fourth Series of Drawings
42) In this 'repeated' photo, you can again observe the bearings that are made for the bearing of the stone as well. There is a hole where the two bearings merge, this is where the corners of the stone will be situated.
.jpg)
43) Instead of using any metal file (that will leave striated markings) it is prudent if you used the Emery disks instead.

44) Why is an Oil stone used? It refines the edge of the graver to a sharp point as this is where the metal cutting is then to take place.

45) I prefer to create a round indentation at the joining of the two metal bearings. I don't want any metal to break the delicate corners of the stone while pressure is being applied.

46) A "metal pusher" is a great tool to have, but it must be given a deeply cerated edge. This tool MUST NOT BE ALLOWED TO SLIP and give any damage to the claw.

47) How can you remove gemstones with the 'greatest of ease' and not damage any soft stones? I prefer to use a 'separating disk' and grind away much of the metal as possible. This will allow these stones to become loose.

48) To repeat this important Princess-Diamond setting notice, all of the four claws MUST BE CREATED EQUALLY. Uniformity is paramount in this setting exercise.

-------------------------------------------------
Fifth Series of Diagrams
49) An easier process of creating bearing cuts inside a claw is to allow the H.S.S. aka (High-Speed Steel) to permit the bur to create the four bearings. Thus having all of the angles of the stone sit into the grooves without any undue extra labour.

50) Once the four bearings are accurately created, I use a round bur of the same size of the Girdle of the stone to rest into the metal of each claw.

51) A Cabochon stone with a flat surface will never sit accurately, no matter how you try!

52) The end result (from #51) is a totally crooked stone.

53) Once the Cabochon is levelled (I will discuss this very soon). I would like you to start the trimming and filing process, these steps are now shown below.

54) Very gently, again very gently press the metal over and towards the stone.

55) File to initiate the trimming process, either a Triangular or FLAT with a file #4 grit and reduce the overall height as shown in this photo.

56) I would ask you to use a Pumice wheel of #180 and then #1,000 grit and therefore removing any file marks everywhere.

57) Never have any flat surfaces on a Rounded, Cabochon stone. These rounded surfaces must conform to the Bezel and to the stone.

58) In my uses of setting tools, I find that many of them cannot be bought from any local tools suppliers. For that sole reason, I'm displaying one of the many tools that I made.
This tool that I created can be used solely with Cabochon stones. When the semi-round bur is used inside a Bezel tube or even a Gypsy-style setting it allows for the flat bottom of the stone to be created EVENLY. One of my 275 tutorial essays goes into this process with the greatest detail.
59) On June 26th, 2023 I wrote an essay just on the topic. Here are the photos I copied from it to this 'diagram essay'. I'm showing just how easy it is to create this interesting setting tool. The only tool that you need is a 'bench grinder' to make any bur that you need, I have well over 50 burs of all sizes for various stone sizes.
%20(1).jpg)
%20(1).jpg)
.jpg)
%20(1).jpg)
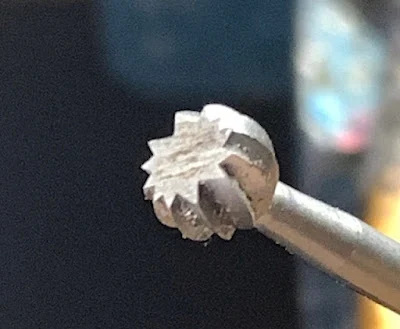
64) If the teeth wear down from constant use, just replace it with another round bur of the same size. The next option is to regrind the worn teeth on your bench-grinder, VOILA new modified bur.
======================================================
I never keep anything private. One Diamond Setter in this city, 100% refused to share his skills. When he died, he took his skills to his grave, such a profound loss to his community.
gerrylewy18@gmail.com