Friday, 10 January 2025

How was this 'Diamond & Gold' studded brooch created? => 16 photos

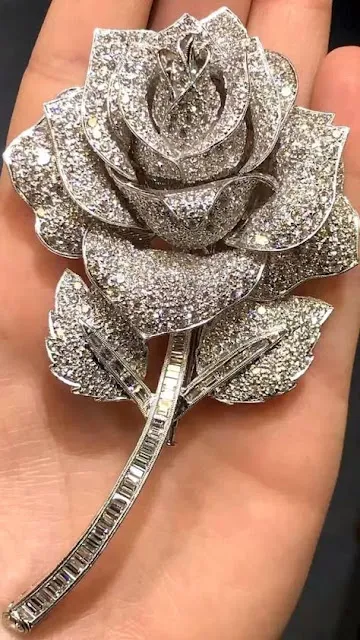
 I've been thinking 'Why should I wait for days to answer my question 'How was this beautiful brooch made?" I had only one photo to describe this process, but after spending 65 years in Diamond Setting, I did find this quite 'easy' to explain.

 It is 'easy for me' but for the vast majority of the blog readers, this might be a real challenge, or literally impossible to say the least.

 When I was writing this essay I was thinking about what techniques would I use. It was like I was setting this brooch myself, the time in his essay was easily measured in DAYS.        

            ======================================

1) There will be no large metal 'round-ball clamps' to hold the individual (estimated) 19 pieces. I would use my shellac stick as my first and only choice to hold each section. I want my 'hands and fingers' to have full access to the setting processes. 


2) What tools would I use? The answer is just the basic Onglette-shaped gravers #1 and #2. The right side of this graver is meant to be used to create a sheen in the cutting. This is the reason why I name this a "Right-Sided, Onglette Graver". You can't buy these, but they can be made only on your bench.


 On the sides of the graver should be well polished to a very high lustre. This will necessitate bright engraving all through the metal carvings.


 THERE SHOULD BE NO "FLAT-SHAPED" GRAVERS NEED TO BE USED ANYWHERE. 


3) How were the precious multitude of diamonds set into the metal? I would fashion the tip of an additional Onglette graver to be rounded. This rounding allows the graver to be fashioned into a "Bead-Raising tool". This prevents the tip from breaking when forming the gold over every diamond.

4) The jeweller and I will act as a 'TEAM' in the soldering together the many pieces. This discussion is about which section goes where and when.

5) The decision as to which size of diamond goes where is also very important. At each point, the 'leaf' will have one diamond. That one stone must be slightly larger than any others in every section.

6) The Baguettes are another (minor) problem. All of them are 'Straight Baguettes' which means that all of them are sitting in the main stem of the 'flower'. There will be very few 'tapered stones' except for 'the point of the stem'.

7) To avoid a wide stem of Baguettes, this setter chose to engrave a 'double line' along the full length of the brooch's branch. The diamond setter even (very carefully) Milgrained the long metal stem


This showed me that he had a very delicate hand in using his Onglette graver #1. It was a good choice for the setter's hand dexterity.


 In this exquisite metal cutting, accuracy is paramount in shaping and forming the graver blades.

8) There was a fair amount of time spent choosing which Baguette went where. 

9) The largest of the Baguettes went into the long stem. The largest of the stones were first set at the base of the long stem. Gradually the smaller stones were next placed into the metal.

10) The 'eye of the wearer' gravitates towards the larger of the 'leaves'. Then the largest of the small diamonds goes into these two leaves. NON-STOP PLANNING AND CONTEMPLATING. Which diamond goes where, when & why?

11) There would be no time spent to think of doing a fast setting. I, or another setter would contemplate spending two weeks or three on this project. 

12) Which of the diamonds would get set first? I, for one, would find the largest of the diamonds and place it at the 'tapering of the leaf'.

13) Have each diamond lowered gently into the metal. The 'girdle' of every diamond MUST NEVER BE AT THE SAME LEVEL AS THE METAL. The deeper each diamond is set in the 'Beading Raising' process, the more metal will hold each stone.

This is my Bead Raiser, which shows the slightly rounded shape of the graver's front, or point.


 The well-prepared Bead can now be seen as it is well over the edge of the Girdle of the gemstone. The bead MUST BE PERFECTLY CREATED, if it isn't then the stone is not secured.


14) 'Burnish each bead' after every stone is set! This is what a 'Bead Burnisher' looks like.


 DO NOT ATTEMPT TO LEAVE ANY FLAT SPACES IN BETWEEN EACH DIAMOND.


15) If there are any spaces, I found that "nature doesn't like to see flat spaces in ornamental flowers". I used a simple method of 'raising decorative beads' and just then 'brushing, or rubbing' all of those beads smoother. The results are just fantastic!!!


 There are times when too many beads are used & created. The next alternate step is to use a mini-round bur and make 'little shallow recesses' into the metal. (as shown)
 
 All of the intricate metal cutting was done with using only the Onglette gravers #1 and #2. This is one of the most intricate setting projects that I have come across.


Wednesday, 8 January 2025

"Rose brooch in Diamonds" ? layers

 Looking at this photograph, be honest and using your experience, I have a question for you. 

 "How many pieces of 'gold with diamonds' were used to create this adorable and beautiful brooch?"


In my recent essay on "Pumice Wheels", I described how this spectacular item was cleaned. 
(The 'total number of pieces' is only a rough estimate.)
(19 pieces)
In the next week or two I will give details of how the diamonds were set.

"PUMICE WHEELS". WHY do we need them? => 19 photos

 (This essay is a 'repeat' but I've used a few extra photos to prove my point.)

              ========================================
 I've written about these phenomenal 'lifesavers' many times. These little wheels are what make the 'finishing process' so important. They are used in either 'Gemstone Setting' or of course, jewellery production. 

 Let's write about the 'grit and shapes', they can come in many grades of textures: #180 and #1,000 grit just to name a few. The variety of shapes is good to know, 'TAPERED' & 'FLAT' there are other shapes as seen in this photograph, my own preferences are the 'Flat & Tapered'.

 These sticks are good to use but they can't bend to the shape of the contact, if needed. If used often, the paper on those sticks just wears away FAST. The soft-bending wheels are inexpensive plus they will bend to the shape of the piece of jewellery.
  Here are additional grits of wheels as no grit was mentioned, I suppose (by the colour) they are #240 & #400 grits.

 These are pre-formed and made just to be made to the metal shaft, but what happens if they get worn from constant use? Your guess is easy to understand. I've seen these many times and what I saw is that they are rigid and not able to bend to the shape of the detailed curves of your intricate design.

 These emery wheels are not the 'Snap-On' style. They are made to be screwed to a mandrel and reversing the cutting face leaves time being wasted.

 These particular wheels are tightened & secured with a screw-type mandrel.

 These mandrels are the shapes that I 'would & could' like to use. The one drawback is that the holes of these Pumice Wheels do get worn and made unusable over time. It is best to leave them secured to the metal mandrel.
 This wheel's name "Adalox" is synonymous with emery wheels as well as "Moore". If and when you are interested in either, experiment and enjoy their continuing excellent results.


  Once your delicate hammering has been completed, it is still imperative to finish the surface by using a Pumice wheel. PLEASE DON'T USE A FILE. 
Start your smooth cleaning by using a #180 grit followed by the extra-smooth #1,000 textured wheel.

 With your 'Flat Edge' pumice wheel put the wheel along the surface of the bezel wall. Remember not to touch the stone as the pumice will surely scratch the surface rendering the stone 100% unusable.

  I saw this absolutely fantastic breathtaking brooch on the internet. 
1) The only way that this pendant can be hand-polished is to GENTLY let the #180 grit wheel remove & smooth any sharp corners.
2) Then follow with the PINK coloured Tapered, Pumice wheel of  #1,000 grit to (again) GENTLY apply very little pressure to the metal. 
 All of these 19+ sections must be "surgically cleaned" before soldering together to be made into a brooch. 

 The fine edge of the pumice #180 wheel should cleanse the deep recesses of any casting remnants. Try to avoid any metal filing as this will remove too much of the metal.


 With the fine edge of the #180 grit wheel, just let the wheel justify its sole purpose in improving on the deep areas around the claw basket.

 
 When the pumice wheel is showing signs of wear and getting 'rounded', then the wheel has another 'life'. That 'life' is to lightly polish the inside of the ring as being shown.

 With the Flat edge of the "Pink" coloured soft #1,000 grit of a pumice wheel. You can then GENTLY allow the wheel to polish the ring around the Flush settings.

 If a cloth wheel is used in polishing this ring, one thing will happen "The claws will get worn and lose their sole purpose in holding the stones".

 This is where a 'Tapered, Pumice Wheel' works best, why is this? The shape of the claws is paramount in gemstone settings. If the required metal is removed by
accident, then the stones will get loose and fall out.

 The next reason for using pumice wheels is the in-between areas. DON'T USE A CLOTH POLISHING WHEEL You should maintain the design and patterns of the ring.


 Everywhere the files or Emery disks have touched the metal, they MUST BE MADE AND LEFT SMOOTH to be worn on the finger.
 The ring's multitude of deep crevasses must remain in pristine condition at all times. Please don't rely on the 'cloth wheels' to polish the claws.


Sunday, 5 January 2025

Where would you use the "Emery, Snap-On" Disks? => 16 photos

 There are many reasons for these Emery Wheels; here are a few of them. First of all, the grit texture that I constantly use is "Medium grade." They also come in "Fine" and "Course." 

 Your needs may be different from mine, but each jeweller has their own specific 'grit' requirements.  

 The diameter of these wheels is "7/8th of an inch" and always keep a vast supply on hand. 

 The nice part of these disks is that I can turn the Emery buffing to the reverse side. This is only if I need to be more comfortable in holding the Emery wheel.


In this photo is a group of Emery wheels that are Coarse, Medium and Fine grits. Instead of removing every wheel from each mandrel, I suggest buying one mandrel for each disk. 


 The very popular brand of Emery wheels/disks is "Moore". 


 When I need to buy a few months' supply, I won't buy a dozen of them, I'll buy a hundred at a time. I don't want to keep running to my tool supplier and wasting my time for a few disks.


As you can see those numbers are the grit, as in "P-220".

 This is a photo of a new and untouched disk and ready to be used.

 This disk is ready to be discarded, it's done its hard work...' good-bye'
 
  You can now hear the mandrel that will give you the 'snap' tightening sound caused by the quick 'tightening & locking' of the brass centre piece.

                Various opportunities for using these EMERY disks.
 1) Many times I'd use these wheels to recut a 'twist drill' that has become badly worn. In this situation, keep the rotating speed to a minimum. 'SPEED KILLS'.

 2) I use these disks to refurbish the tip of the 'Reciprocating Hammer' anvil.

3) Instead of using a 'needle file', I always allow the Emery disk to do the filing. If I used my file, the claws might move and loosen the stone.

4) When the hammering on a Channel Setting has been completed, I prefer to remove any indentations with this Emery disk. But NEVER allow the disk to touch the stones.

5) After the 'Flush Setting' has been finished, I'd again prefer the soft paper disk to smooth the metal. As a rule, never permit the Emery wheel to come in contact with the centre stone. The rotating disk should bend during the 'finishing'.
 =>I inked the TOP of the Bezel to let me know where the Emery wheel had touched.

6) Keep the grit/texture ALWAYS at 'Medium' grit. Here you can nicely smooth the main area of the ring. The 'bending of the wheel' will easily conform with the angles of the ring. Good idea?


7) The Bezel is the most delicate area in using a 'Snap-On" Emery wheel. Why is that? One bad move with a metal file will leave 'flat spots' on the sides of the Bezel, we don't want this to happen, do we?
 As I mentioned above, the 'bending of the paper wheel' will give you the desired angles in the finishing of the bezel top.

8) No matter where on any part of the ring you are working with, stay with the same grit, but never any coarser. If you need a 'Fine' grit, so be it.
 WE ARE DEALING WITH VERY SOFT MATERIALS, keep this in your mind at all times.

    PRACTICE OFTEN IN USING THESE "SNAP-ON, EMERY DISKS". THEY WILL ALWAYS GIVE YOU A FANTASTIC FINISH.