How are our diamonds "Faceted" before they are given to us, for the task of Diamond Setting?
What you see in the following photos are the "Polished Diamonds" these are ready now to be made into fine works of art. But how do they get to this stage?
Many years ago (circa 1930) my Father lived in Antwerp, Belgium, it was there he learned his profession as a Diamond Polisher. (Before my Parents deaths, due to a car-truck accident in 1968) he had the foresight in letting me know of some of his Diamond Polishing techniques.
A few of his "Diamond Polishing" tools, were left to me, through this essay I am showing them to you. Although I didn't have many to show you, these photographs are enough for me to create this "teaching-essay". The tools have changed, here are some of the 'basic tools'.
I am a Diamond Setter for the past 60+ years, we use the same tools today as the setters did from the 1930's. (I know this for a fact)
From two hundred diamonds given to me, I created something beautiful, as shown below.
This gentleman's 2.75 inch diameter pendant had only 40 diamonds in it initially and then I gave it an additional 239 MORE DIAMONDS.
This gave it much more lustre through my designing, it now has 19.18 carats of diamonds. All of this work took almost 2 weeks of constant setting. Why am I writing this? This Diamond Setter transformed this disk into a "Wearable, Piece of Art".
My client had no idea what I was going to do with it, all he wanted was "ALL DIAMONDS" all of those diamonds in that black tray, were eventually used.
All diamonds are still using this method of holding larger stones with these "two arms" that hold the large diamond.
Does this diamond look unsightly? This diamond is the original stone that my Dad practised his new skill on. He had to learn "How to Facet Diamonds" and this is the very stone that he used circa 1931 A.D.
In this photo, you can see the very FIRST diamond he ever polished. Today, every Diamond Polisher uses the same method & still uses these same clamps. Nothing has changed in over 93 years.
In this photo you can see the "Pavillion Facets" being polished just above it is an "Unpolished Girdle". That white spot is called a "Window", when the Polisher looks through this window he can see where the "grain of the stone" is being located.
Here is another view of the starting of the "Upper, Girdle Facet". From here, he or she, will continue to cut & facet all around the stone until there are multiple facets all over the stone.
The Culet of the stone will be situated INSIDE the "Tube", this will 'secure & protect' the diamond for any aggressive polishing. As the Culet is the most delicate spot of the stone, no harm must come to it!!!

You can see where the "Table" of the diamond is now being seen.
Here you can see that there has been no "Faceting" being done at this point. Its still a very rough untouched stone amd no "Girdling" or Polishing on the Girdle of the Diamond.
Basically, its still one step from being a "Boart", or a diamond that is just taken out of the ground.
I'm using a large Cubic Zirconia, just to let you see all of the many facets that have being polished. Now you can see the "Culet" where it's sitting safely in this Tube holder.
I used a green stone to make your viewing more possibile. I placed the "Table" of this stone laying flat as to make the Pavilion to have easier access. These "two arms" are carefully holding the stone inplace, (but not squeezing it), lest it might break.
In these groups of fantastic photo's, I'm showing you something that not too many folks have a possibility of seeing, what is that?
This is the method of having the "Dobb" holding the stone in place while the polishing is in process. The stone is held tightly against a rotating circular metal disk while the faceting is starting. BUT HOW DOES THIS HAPPEN?
Supposing that the diamond is against the disk, what cuts & polishes the diamond? The answer is so very easy...only another diamond can do the cutting or polishing. What does that diamond look like?
The only cutting action is to take place, is another diamond, but it's in a form of DIAMOND POWDER, as shown here. This POWDER is so very fine, as it's measured in MICRONS.
Remember this, this vial of Diamond Powder is 93 YEARS OLD. I've kept it secure for all of this time, I've never had it opened, even in this form, it's very expensive.
This powder is applied to a rotating metal disk that is in the shape of a 'Long-Playing Record", but how does it stay on this disk? The Diamond Polisher uses (sticky) Olive Oil and he/she applies this DIAMOND POWDER against the rotating disk. Then that diamond powder-dust will 'cut & shape' this diamond ...interesting process isn't this?
Even if the "Table" needs to be repaired, "Only A Diamond (dust) can cut & repair another Diamond".
If the polisher needs to examine up close what is needed? How can that person see the problem?
He will use either a 10x power, or even a 15-20x power Loupe to examine every inconsistancies with that stone. This polisher MUST OBSERVE EVERY DEFECT. If the stone has a defect, it muct be corrected before it's "sold", or released to the wholesaler.
ALL FACET EDGES, OR CORNERS, MUST BE IN LINE WITH "THE THOSE ABOVE THE GIRDLE, AND AS WELL AS BELOW".
That square looking "Upper Girdle, Facet" is named as as "Kite", why this name? Look at a kite that you play with, in the air.."Kite" is an easy name to remember. Simple?
If this girdle being shown here was indeed a diamond, it wouldn't be released for sale. It would be fully repolished as there are 'numerous errors' on that polishing surface.
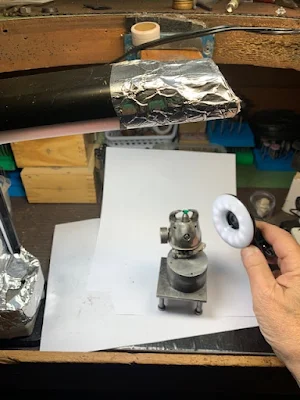
Just for this essay I used my "GRS-Vise" to hold & secure the "Dobb" for this demonstration. Apparantly, this technique worked perfectly.

What is this little "brass & steel" gadget for? If you don't know, let me tell you. The diamond-polisher MUST place his diamond inside the opening and make sure the diamond is at "41, or the 40 degree angles".
If not, back to the polishing wheel and recut the "Pavillion" angles, AGAIN!!!
All diamonds MUST have all of the correct angles and now be labeled as having an "Excellent Cut". If it is 39, or 41.5 degrees, it will (immediately) loose much of it's value on the stone.
But why is "40, or 41 degree angles" so very important? The light will reflect at that angle back to the viewer and give a diamond a"brilliant" shine to the stone. Anything less, or more, will turn the stone into a black colour. Another thing is that the light will not return back the persons eyes, it will look very dull.
All diamonds MUST have one of these two angles, either 40, or a 41 degree angles. If any of angles are not accurately created, problems will defintely occur. Please excuse my rough drawing, but this is the best that I can do under a tight time schedule. (Please don't laugh, it was nearly my time for dinner and my wife was asking me to get ready for dinner.)
This is what can happen if the angles are not met. The light entering this diamond can get bounced all over the place and not back to the eyes of the diamond wearer.
It won't be a good thing to see, either the stone looks BLACK, or even partially transparent if it was turned over. Accurate Diamond Polishing is so very important, all of this depends upon the hands of the Diamond Polisher.
As its known, a Diamond Polisher himself "can make, or break a diamond" he has to be well trained and have great eyesight and fingers that can handle any size of stone.
This 'upclose' of view of the (unfinished) diamond. You can see how the girdle of this stone looks. The many facets have not being completed, you can see the initial "girdling" that has just started.
This is just another view showing a coloured, synthetic stone. The "Table-Facet" is nicely protected, now the Polisher can cut any section of the "Pavillion", where needed!!!
My setting-bench was turned into a mini - "photo-studio", just for this tutorial-essay.
I used a white paper for a good background, plus overhead and side-lighting. You can see this holding device, it's called a "Dobb" even after 90 plus years, these are still being used today.
These weights were good for 'metal & diamonds', but these days, I'd shy away from using them,
My diamond dealer showed me his "travelling scale", he told me that this scale is accurate to maybe .01 to .02 points. But this scale that my Dad used is almost as good, but I'd use an "Electronic Scale" to be 100% sure of any stone weights.
Hand-Scales are good, but as I mentioned above,
I would still use the 'electronic version' best. When you are measuring hundreds of carats of diamonds, these "hand-held devices" leave less for any accuracy.
My diamond dealer has a scale that is accurate to 1/10th of a point, or .0001 of a carat, either way, I will trust his scale over what I use.
This is my small portable travelling diamond scale. I'm using my loup to show how small it is in reference against other less accurate 'hand-held' scales. But this scale is accurate to 1/10th of a point. As a Diamond Setter, I sometimes need to reasure my client that the weights are, what they are.
These 'weights' (being shown here) are not all that accurate. I'd only use these as "demonstration" & not for selling. Just too much guess-work involved!
My very good friends, here you have an essay that I enjoyed writing, I planned this essay after many weeks of thinking and examining many of his "Diamond Polishing" tools.
These tools were that my Father used continually in his Diamond business in London, England. My next essay is even more interesting, as this was his favourite business. He was one of the first person in Canada and North America to manufacture "Industrial Diamond Tools" circa 1947 A.D.
If you have any questions, please don't hesitate for a moment. You can email me at
"gerrylewy18(at)gmail.com".
Regards to you and everyone, I hope that you learned a few things. Remember, none of these facts were copied from any other source.