Channel Setting is a relatively quite a simple task! But if the stones are (sometimes) too large for the required length & width of the channel opening, problems 'sometimes' arise. I encountered a few of them and here is what I did a few minutes ago to rectify this problem.
The Difficulty Rating on this project is an easy 6, out of 10.
The size of these stones in this one ring range from 1.70mm's down to 1.41mm's. I could have set or used smaller cz's, but you wouldn't have been able to see how these stones would be set.
Pumice wheel of #180 grit & #1,000 Pink wheel (this is a mini 'at the bench' Polishing wheel)
What do these #'s really represent? "#007" is the name for a 0.07mm bur, "#010" is actually a 1.00 mm bur.
Just how can a bur 'slice through the metal' without running in different directions?
Just by accident, I found a way to avoid this ongoing problem. I 'rested' the "rotating & cutting" bur against the edge of the channel hole and it promotes stability with the rotating bur...a great idea? Indeed!
This keeps the "bearing & carving process" bur where it's needed, it really steadies the bur!

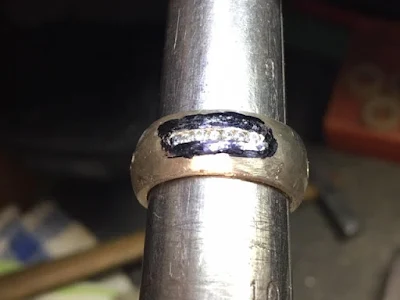
After fitting & setting the 'main & center grouping' of stones into the channel, I took some photographs from different angles. I then noticed something quite odd!!!

I had to select smaller CZ's, as I went along 'fitting & securing' process of the stones. The stones here are just being 'held into place' and ready for the hammering next to follow.

These 'main stones' are only 2.50mm's, but the 'end' stones are only 2.25 => 2.35mm's. I needed just a little smaller size of stone as to have them fit in! The difference in size is almost negligible.

The end stones are 2.35mm's (measured prior to setting). But after some radical burring and attempting to fit in the smaller stones, these 'end stones' finally fit in. I initially tapped (lightly) the metal just for stone stability & security.

Once the hammering was started, I easily maneuvered the hammer directly over the 'table' of the stones, as I hit the metal. These stones are now lower than the metal and subsequently, the 'table' of the stones won't be touched or even damaged.

How do I know just where the hammer is touching? I don't like guessing at this point..(look below!)

I like to have a 'visual' on where the hammer will now be touching or making direct contact. I'll now lightly 'tap' all around the channel layout. BUT, I'll hammer at a 15degrees (or less) angle, that is hammering away from the stones that were just set.

I can now observe just where the hammer is making direct contact or just touching. As the coloured ink will be removed from the ring and now be fixed to the hammer face. Interesting idea?
You can here understand why I use the 'coloured-ink' marking. BTW, you will notice that all of the stones are 'almost, girdle-to-girdle' in their new resting place!
I'm not too concerned if there is a little space in between some stones, why so? Read further!!!

In the process of hammering, there will be some vibration going on with the stones. Some of the stones might be moving due to some hammering.
This simple hammering action can cause damage to the two stone-girdles. Therefore two stones could be totally ruined and have to be removed. I try to simply avoid direct stone contact, I like to see some 'little spaces' in between the stones, that can be only seen with a 10 power loupe.
Problems can and do arise in this hammering process. Great care in preparation will avoid any stone damage that can cause you to remove stones & ruin the ring or setting. 'Light tapping' is the only way to hammer, not heavy pounding on the metal, as the results can be literally horrific!
Why must the ring be put on the ring-mandrel? If you hammer on your 'regular' ring clamp, the hitting-power will be absorbed by the leather. The results are 'little movement' of the metal over the nicely set stone waiting to be finished.
A steel mandrel is the 'best' holding device for channel-hammering, there is no other way!!!

I used here at this point a Flat Graver of #40, or Glardon #12. I Bright-Cut the inside metal! Remember, don't use a Triangular file to clean up the inside channel wall as there will be a rough-texture, you need a 'smooth & shiny' surface. ONLY A FLAT GRAVER CAN PRODUCE THIS CLEAN EFFECT.

Upon the finishing with my Pumice wheel of #180 and Pink Pumice of 1,000 grit, I noticed a few pin-holes. I went over again with my Pumice wheel of #180 grit to remove any slightest mark that I can find.
Then afterwards, I repeated the previous Pumice wheel cleaning! I don't want any pin-holes remaining and again showing for the final "Tripoly & Rouge" polishing.


If you have any questions, don't hesitate in contacting me "gerrylewy18 (at) gmail.com".
The Difficulty Rating on this project is an easy 6, out of 10.
The size of these stones in this one ring range from 1.70mm's down to 1.41mm's. I could have set or used smaller cz's, but you wouldn't have been able to see how these stones would be set.
Tools that are needed here are; a Round bur @ #007, Bud bur @ #008 and a 156C #010 (undercutting) bur.
This is including a riveting hammer BUT (Please) NO Reciprocating Hammer!
I need to 'tap' on the metal, but not to smash the metal down over the stone!
I use a Flat Graver #40, or Glardon #12, this is only used after the setting.
I need to 'tap' on the metal, but not to smash the metal down over the stone!
I use a Flat Graver #40, or Glardon #12, this is only used after the setting.
Pumice wheel of #180 grit & #1,000 Pink wheel (this is a mini 'at the bench' Polishing wheel)
What do these #'s really represent? "#007" is the name for a 0.07mm bur, "#010" is actually a 1.00 mm bur.
Just how can a bur 'slice through the metal' without running in different directions?
Just by accident, I found a way to avoid this ongoing problem. I 'rested' the "rotating & cutting" bur against the edge of the channel hole and it promotes stability with the rotating bur...a great idea? Indeed!
This keeps the "bearing & carving process" bur where it's needed, it really steadies the bur!

After fitting & setting the 'main & center grouping' of stones into the channel, I took some photographs from different angles. I then noticed something quite odd!!!

I had to select smaller CZ's, as I went along 'fitting & securing' process of the stones. The stones here are just being 'held into place' and ready for the hammering next to follow.

These 'main stones' are only 2.50mm's, but the 'end' stones are only 2.25 => 2.35mm's. I needed just a little smaller size of stone as to have them fit in! The difference in size is almost negligible.

The end stones are 2.35mm's (measured prior to setting). But after some radical burring and attempting to fit in the smaller stones, these 'end stones' finally fit in. I initially tapped (lightly) the metal just for stone stability & security.

Once the hammering was started, I easily maneuvered the hammer directly over the 'table' of the stones, as I hit the metal. These stones are now lower than the metal and subsequently, the 'table' of the stones won't be touched or even damaged.

How do I know just where the hammer is touching? I don't like guessing at this point..(look below!)

I like to have a 'visual' on where the hammer will now be touching or making direct contact. I'll now lightly 'tap' all around the channel layout. BUT, I'll hammer at a 15degrees (or less) angle, that is hammering away from the stones that were just set.

I can now observe just where the hammer is making direct contact or just touching. As the coloured ink will be removed from the ring and now be fixed to the hammer face. Interesting idea?

You can here understand why I use the 'coloured-ink' marking. BTW, you will notice that all of the stones are 'almost, girdle-to-girdle' in their new resting place!
I'm not too concerned if there is a little space in between some stones, why so? Read further!!!

In the process of hammering, there will be some vibration going on with the stones. Some of the stones might be moving due to some hammering.
This simple hammering action can cause damage to the two stone-girdles. Therefore two stones could be totally ruined and have to be removed. I try to simply avoid direct stone contact, I like to see some 'little spaces' in between the stones, that can be only seen with a 10 power loupe.
Problems can and do arise in this hammering process. Great care in preparation will avoid any stone damage that can cause you to remove stones & ruin the ring or setting. 'Light tapping' is the only way to hammer, not heavy pounding on the metal, as the results can be literally horrific!
Why must the ring be put on the ring-mandrel? If you hammer on your 'regular' ring clamp, the hitting-power will be absorbed by the leather. The results are 'little movement' of the metal over the nicely set stone waiting to be finished.
A steel mandrel is the 'best' holding device for channel-hammering, there is no other way!!!

I used here at this point a Flat Graver of #40, or Glardon #12. I Bright-Cut the inside metal! Remember, don't use a Triangular file to clean up the inside channel wall as there will be a rough-texture, you need a 'smooth & shiny' surface. ONLY A FLAT GRAVER CAN PRODUCE THIS CLEAN EFFECT.

Upon the finishing with my Pumice wheel of #180 and Pink Pumice of 1,000 grit, I noticed a few pin-holes. I went over again with my Pumice wheel of #180 grit to remove any slightest mark that I can find.
Then afterwards, I repeated the previous Pumice wheel cleaning! I don't want any pin-holes remaining and again showing for the final "Tripoly & Rouge" polishing.

I want every mark on this ring to be carefully removed. Can you notice just how clean the"Bright-Cutting" is now appearing?
At the 'ends' of the Channel, I decided to cut a 'semi-circular' curve as to give a clean 'finished' effect to this stone-setting project!

There are still some very small marks that are only visible with my close-up "iPhone" lens and it's magnifying-attachment. My 10x power loupe even missed these little 'defects & indentations' that are just left of the end stone.
These marks are so very slight, but sometimes the polishing wheel might just make them more visible during the polishing process, as the cloth-wheel might just bring them to the surface!


