Pre-Amble:
One of the very first things I had to learn (during my 9-year apprenticeship), was "How to Grind a Graver"! But once learned, this new skill was not so difficult to learn
Is this process difficult to learn? This learning process is "8<->9, on the 10 Scale". There are so many times this bench-grinding process can give you stress during this 'learning curve', I actually burned a few..;>(
In my beginning years, it took almost 1/2 hour to fashion a decent cutting blade. Today, this process takes now only 7 minutes from start to finish. (This does not include time in preparing the 'Paper Polishing').
I've seen many videos on setting and the setters gravers are so darned (face of the graver) wide & thick, I wonder how these tools actually move while cutting the metal.
I make each of my gravers with a 'thin profile' & this makes it easy to navigate around the gemstones.
I use gravers for the following patterns:
1) Bezel-setting: Using a 'modified' Onglette #2'
2) Princess & Pear shape"Vee" shaped claws: Flat graver #40, or the Glardon #10.
3) Gypsy & Flush settings: Using a 'modified' Onglette #1.
4) Channel Setting: Flat graver #40, Glardon#10.
The word "Modify" means having the graver to cut on (only) one side!
(N.B. This process will be explained in another essay shortly).
What are the graver-shaping problems might you encounter?
1) Not wearing protective eye-glasses. (This is so very important!)
2) Not removing the "Tang" or back end of the blade.
3) Not correctly fitting the blade into the handle, for the proper hand-length.
4) Not having a little jar of water, used to cool the graver during the grinding.
5) Not dunking the hot graver into water enough..heat can 'soften' the steel.
6) Not watching the 'grinding', I always look at the blade & not be distracted.
70 Not making sure if the 'angles' are equal on both sides of the Onglette blade.
This 'grinding of a graver' process will stay with you for decades, it must be learned...NOW!
On the front of my bench-grinder is posted a 'little message to the operator'!

As these photographs are usually a 'staged display', I might be holding the graver with both hands (fingers). Can you see the 'gentle curve' on the blade taking shape?
I have a few droplets of water sitting on the blade, as it starts to 'heat up' the water evaporates! Then I know the steel is getting warm to the touch. It's now 'Dunking Time' at Gerry's Bench-Grinder!!!

Always, again always dunk your warm/hot graver into a beaker of water. There must never be any discolouration on the metal, what does this really mean? This indicates that you're actually 'burning' (or softening) the metal. We won't go into how to correct this major and far reaching problem in this essay.

Here are two of my gravers from my inventory. Even if the gravers are very short in length, but I can still use them. The wooden handle allows me to extend the graver further for continuous metal cutting.

These are the exact gravers that I'm going to be using in this essay.

On my Flat graver #40 or Glardon #10, you can see the gentle curve in the metal don't need so much metal to push, as the hand gets tired after a while.

There are so many uses for this finely contoured blade. It all starts during these initial stages of shaping/grinding. I could make this graver last for at least
2 YEARS of continuous use!

I'm resting my right hand on the 'tool rest' (as shown) for security reasons. I will use my left hand for added balance to the right hand & fingers.

Even when the grinding 'starts', you can see the 'gentle curve' starting to take place. As you are continually grinding your graver you are slowly contouring the grinding wheel and each subsequent graver shaping will nicely shape for the next gravers to cut.
REMEMBER this; "Grind, Grind, Stop & quickly put it into the water!"...(repeat until finished!) Three (3) grinding to one (1) of water!

Keep your little beaker of water well within finger reach. Make sure your 'dunking' is done very fast, as the heat will quickly affect that steel. Not nice!

You can see a little discolouration as this is due to some very quick heating of the steel blade. Where this 'burning' is occurring is no concern, even if this was my Onglette blade, this will still be a very useful tool.

Observe the close proximity of the grinding wheel to the water..the beaker a mere 4-5 inches away?

The correct graver length is shown here. The length of any graver blade should not extend any further than your middle finger, at this first joint. I check this important length, even today.
This is how important the length should and must be able to sit in your hand, you must be totally comfortable to cut.

Even before you start to shape the graver, place it in your handle & have it tightened (finger tight) securely and resting up against the first finger joint.

This is the exact shape I'm looking for. I call this shape a 'sword face'! You can see how evenly on both sides of the graver, as it's being fashioned.

In this photograph, the grinding wasn't sufficient for some very detailed cutting! The cutting is too w-i-d-e, hence this is the reason why I use my #1 Onglette.
For those very narrow cuts, I will have three gravers of each width, just in case. This means for the two Onglette gravers; I have three #1 and another three of #2, for a total of 6 blades. Then I have multiple Flat blades as well as of they are all in different lengths, interesting?
As of today, I have in my inventory, almost 20 Diamond Setting Blades.

This exactly is the size and width of the Flat gravers I keep seeing in some tutorial videos. The 'face' is too darned thick (height) and as well in its width.

In this hand position, I need to have an 'unobstructed view' of where the grinding wheel is making contact to the blade. I usually reposition the blade in this 'unorthodox' holding pattern.
When the graver is starting to get an extremely thin 'face', the 'steel burning' could start almost immediately. Keep YOUR graver COOL at all times!!!

This is a 'normal' thickness of the graver tips. I feel that these narrow shaped blades will serve me 'best' I don't want to have too much of metal on the top of the cutting face. I get rid of it now!!! Pushing the graver is difficult, why to make it more of a problem by having a wide & thick face?
The measurements of the Flat face is usually at about 0.45 millimetres in height and the Onglette #1 is 0.65 mm x 1.05 mm. The Onglette #2 have measurements of 1.42mm (width) x 1.75mm (face height).
Are these very small measurements? Yes is my answer, but these are so necessary for Diamond Setting. Many times even in Gypsy/Flush setting these special blades are just great!
If another Onglette in a different width is required, then if you have multiple blades, you can make another blade just for wider cuts...Interesting?

This photograph just shows the side-views.

Another view from the top of the 'tips/faces'.

In this interesting photograph, I spilt a few drops of water unto the graver and left them there, why So? When I'm grinding, if I see the droplets evaporate what does this mean to me? One thing and one thing only is that the graver blade is starting to get very HOT and very FAST!

When you are buying for the first time a bench-grinder buy your new tool with two lights shining on the wheels.

I'm not a salesman for "Glardon" or any other manufacturer! Make darned sure you buy graver handles with two screws to hold the blade in place. The reason is, if one screw gets worn down from the constant use, the second and remaining screw 'takes up the slack' and holds the graver still in place. Great buying ideas?..:>)
 Finally, we've done it, Hooray! ..:>)
We've actually mastered the difficult task of grinding a graver. Now you can start to sharpen the graver point/face always at a 45-degree angle.

In the next few essays on graver-cutting, I'll be repeating the many 'cleaning' and preparations prior to the Bright-Cutting.
Each of the next few essays will have their very own list of tools to use & why? Doing so, as when it is necessary, I'll be discussing these many topics.
I'm going to discuss & explain what 'Modifying a Graver' means and why it is so darned important. But it only adds more fun to this project.
Please bear with me, as this extensive "Graver Uses & Bright-Cutting" project will take many essays to explain! Contact me at "gerrylewy18(at) gmail.com'.
One of the very first things I had to learn (during my 9-year apprenticeship), was "How to Grind a Graver"! But once learned, this new skill was not so difficult to learn
Is this process difficult to learn? This learning process is "8<->9, on the 10 Scale". There are so many times this bench-grinding process can give you stress during this 'learning curve', I actually burned a few..;>(
In my beginning years, it took almost 1/2 hour to fashion a decent cutting blade. Today, this process takes now only 7 minutes from start to finish. (This does not include time in preparing the 'Paper Polishing').
I've seen many videos on setting and the setters gravers are so darned (face of the graver) wide & thick, I wonder how these tools actually move while cutting the metal.
I make each of my gravers with a 'thin profile' & this makes it easy to navigate around the gemstones.
I use gravers for the following patterns:
1) Bezel-setting: Using a 'modified' Onglette #2'
2) Princess & Pear shape"Vee" shaped claws: Flat graver #40, or the Glardon #10.
3) Gypsy & Flush settings: Using a 'modified' Onglette #1.
4) Channel Setting: Flat graver #40, Glardon#10.
The word "Modify" means having the graver to cut on (only) one side!
(N.B. This process will be explained in another essay shortly).
What are the graver-shaping problems might you encounter?
1) Not wearing protective eye-glasses. (This is so very important!)
2) Not removing the "Tang" or back end of the blade.
3) Not correctly fitting the blade into the handle, for the proper hand-length.
4) Not having a little jar of water, used to cool the graver during the grinding.
5) Not dunking the hot graver into water enough..heat can 'soften' the steel.
6) Not watching the 'grinding', I always look at the blade & not be distracted.
70 Not making sure if the 'angles' are equal on both sides of the Onglette blade.
This 'grinding of a graver' process will stay with you for decades, it must be learned...NOW!
On the front of my bench-grinder is posted a 'little message to the operator'!

As these photographs are usually a 'staged display', I might be holding the graver with both hands (fingers). Can you see the 'gentle curve' on the blade taking shape?
I have a few droplets of water sitting on the blade, as it starts to 'heat up' the water evaporates! Then I know the steel is getting warm to the touch. It's now 'Dunking Time' at Gerry's Bench-Grinder!!!

Always, again always dunk your warm/hot graver into a beaker of water. There must never be any discolouration on the metal, what does this really mean? This indicates that you're actually 'burning' (or softening) the metal. We won't go into how to correct this major and far reaching problem in this essay.

Here are two of my gravers from my inventory. Even if the gravers are very short in length, but I can still use them. The wooden handle allows me to extend the graver further for continuous metal cutting.

These are the exact gravers that I'm going to be using in this essay.

On my Flat graver #40 or Glardon #10, you can see the gentle curve in the metal don't need so much metal to push, as the hand gets tired after a while.

There are so many uses for this finely contoured blade. It all starts during these initial stages of shaping/grinding. I could make this graver last for at least
2 YEARS of continuous use!

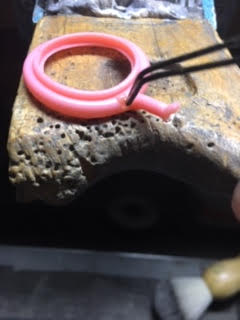
At the very beginning steps in this exercise, I will remove 1/2 of the Tang, or back-end of the graver, why is this? The remaining Tang must carefully fit into the handle if not, the whole blade will be too long. This resulting action is that it won't be good to use, or able to cut any intricate designs. The long Tang, when bought are all made to look like the one shown above.
I start the re-shaping or "cutting off ", at the mid-point, as shown here!

I'm resting my right hand on the 'tool rest' (as shown) for security reasons. I will use my left hand for added balance to the right hand & fingers.

Even when the grinding 'starts', you can see the 'gentle curve' starting to take place. As you are continually grinding your graver you are slowly contouring the grinding wheel and each subsequent graver shaping will nicely shape for the next gravers to cut.
REMEMBER this; "Grind, Grind, Stop & quickly put it into the water!"...(repeat until finished!) Three (3) grinding to one (1) of water!

Keep your little beaker of water well within finger reach. Make sure your 'dunking' is done very fast, as the heat will quickly affect that steel. Not nice!

You can see a little discolouration as this is due to some very quick heating of the steel blade. Where this 'burning' is occurring is no concern, even if this was my Onglette blade, this will still be a very useful tool.

Observe the close proximity of the grinding wheel to the water..the beaker a mere 4-5 inches away?

The correct graver length is shown here. The length of any graver blade should not extend any further than your middle finger, at this first joint. I check this important length, even today.
This is how important the length should and must be able to sit in your hand, you must be totally comfortable to cut.

Even before you start to shape the graver, place it in your handle & have it tightened (finger tight) securely and resting up against the first finger joint.

This is the exact shape I'm looking for. I call this shape a 'sword face'! You can see how evenly on both sides of the graver, as it's being fashioned.

In this photograph, the grinding wasn't sufficient for some very detailed cutting! The cutting is too w-i-d-e, hence this is the reason why I use my #1 Onglette.
For those very narrow cuts, I will have three gravers of each width, just in case. This means for the two Onglette gravers; I have three #1 and another three of #2, for a total of 6 blades. Then I have multiple Flat blades as well as of they are all in different lengths, interesting?
As of today, I have in my inventory, almost 20 Diamond Setting Blades.

This exactly is the size and width of the Flat gravers I keep seeing in some tutorial videos. The 'face' is too darned thick (height) and as well in its width.

In this hand position, I need to have an 'unobstructed view' of where the grinding wheel is making contact to the blade. I usually reposition the blade in this 'unorthodox' holding pattern.
When the graver is starting to get an extremely thin 'face', the 'steel burning' could start almost immediately. Keep YOUR graver COOL at all times!!!

This is a 'normal' thickness of the graver tips. I feel that these narrow shaped blades will serve me 'best' I don't want to have too much of metal on the top of the cutting face. I get rid of it now!!! Pushing the graver is difficult, why to make it more of a problem by having a wide & thick face?
The measurements of the Flat face is usually at about 0.45 millimetres in height and the Onglette #1 is 0.65 mm x 1.05 mm. The Onglette #2 have measurements of 1.42mm (width) x 1.75mm (face height).
Are these very small measurements? Yes is my answer, but these are so necessary for Diamond Setting. Many times even in Gypsy/Flush setting these special blades are just great!
If another Onglette in a different width is required, then if you have multiple blades, you can make another blade just for wider cuts...Interesting?

This photograph just shows the side-views.

Another view from the top of the 'tips/faces'.

In this interesting photograph, I spilt a few drops of water unto the graver and left them there, why So? When I'm grinding, if I see the droplets evaporate what does this mean to me? One thing and one thing only is that the graver blade is starting to get very HOT and very FAST!

When you are buying for the first time a bench-grinder buy your new tool with two lights shining on the wheels.

I'm not a salesman for "Glardon" or any other manufacturer! Make darned sure you buy graver handles with two screws to hold the blade in place. The reason is, if one screw gets worn down from the constant use, the second and remaining screw 'takes up the slack' and holds the graver still in place. Great buying ideas?..:>)

We've actually mastered the difficult task of grinding a graver. Now you can start to sharpen the graver point/face always at a 45-degree angle.

In the next few essays on graver-cutting, I'll be repeating the many 'cleaning' and preparations prior to the Bright-Cutting.
Each of the next few essays will have their very own list of tools to use & why? Doing so, as when it is necessary, I'll be discussing these many topics.
I'm going to discuss & explain what 'Modifying a Graver' means and why it is so darned important. But it only adds more fun to this project.
Please bear with me, as this extensive "Graver Uses & Bright-Cutting" project will take many essays to explain! Contact me at "gerrylewy18(at) gmail.com'.