Thursday, 13 February 2025

Engagement Rings for 2024 & 2025 showing 10 designs & WHY?

 I saw these 2024 &2025 Engagement rings on a jewellery website and I feel that I want to put some of my thoughts into what I feel towards them.

 I try not to mention the creator's name nor the costs for those diamonds but suffice it to say these are just spectacular and original. The jewellery site did report that "what was old, is now new again".

======================================

The ring on the left is an "Old Fashioned Cut" stone, how did I know this? The Culet point was removed. Many of the facets we not completed during the Diamond Polishing process, this shows that this diamond was from the last century (1900's).

 At each corner of the 6-cornered pattern, the designer chose to have a larger diamond. This was to give more emphasis to a 6-cornered design. Good idea!

  The other stone-setting techniques will be discussed further in this essay.

 I enjoy the thick and protective "V" shaped 2 claws as this gives maximum protection to the most vulnerable areas of the Marquise. The 'wide, side claws' also protect the widest part of the stone giving maximum security to this 3.25-carat diamond.


 The Blue-stone bezels were correctly Full-Bezel set and they were Bright-Cut. The four claws just seem to blend in towards the centre stone. Job well done!


 This Full Bezel seems to make the Marquise diamond look wider as well as longer. It also fully protects all areas of this precious diamond. The three diamonds were set in white gold, which is why the white gold ring is a perfect match for a 'near-colourless' diamond. The inside of the 3 Full Bezels were Bright Cut.

  All of the sharp corners of this diamond are fully protected by 18karat gold. There are no sharp edges anywhere to be seen.
 Even though the Engagement ring is yellow, the Diamond Bezel is white gold. It is an 'unwritten rule' never to set a white gemstone into a yellow bezel, why is that? The diamond will pick up the colour of the gold-yellow bezel, thus giving the diamond a 'false colour.'
 This ring totally fascinated me as all of the diamonds are of a Yellow tint. Thus having the diamonds blend in with the gold.
 Do you notice that there's a "Milgrain effect" around the Full Bezel of the large 3.25-carat diamond? A truly remarkable skill is keeping the Milgrain tool on the edge of the bezel wall. WOW!
 The claws that are holding the shoulder stones were split into two claws. Thus giving 'double security' to every stone.

 In keeping this insanely expensive Emerald-Cut Diamond safe and secure, the designer chose very wide claws. These claws give extra strength and protect the four corners. (I personally wouldn't choose yellow gold on a white diamond).  There would be a 'negative colour' reading for the Diamond Appraiser and the appraiser might even ask that the stone be removed to get an accurate GIA report.


Wednesday, 12 February 2025

What is a "Milgrain decoration" and how is it used? => 17 photos

 Any Milgrain decoration starts with the basic 'rotating gnurled wheel'. This decorating effect serves only one purpose and that is to enhance the overall 'Bright Cutting'.


 This essay is not a repeat of a previous topic dated Feb.3rd2024, but it's an interesting essay where this 'decorating process' can be used.
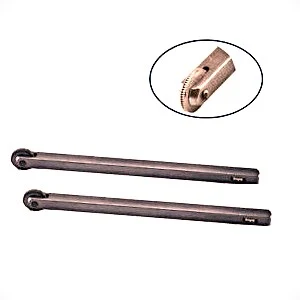
 This collection of Milgrain wheels was created if the need arose to develop more 'decorative patterns' in jewellery.
 This is the up-close view of the "Milgrain Wheel". This curved rod of steel has a decorating 'rotating wheel' located at the tip. 
 
 This is another version of a Milgrain wheel, you will notice that the rotating wheel indentations are closer together.
 Because of this, the Milgrain effect will be more precise and not so difficult to create. The 'Milgrain balls' will be quite small and closely knit. 
  When I chose to set these Emeralds on a yellow plate I wanted a touch of glamour. The answer was a Milgrain was the answer!
 But not wanting to use a rough-looking Milgrain tool, I chose to use only a gentle texture. Milgrain should enhance, but NEVER overpower the finish.


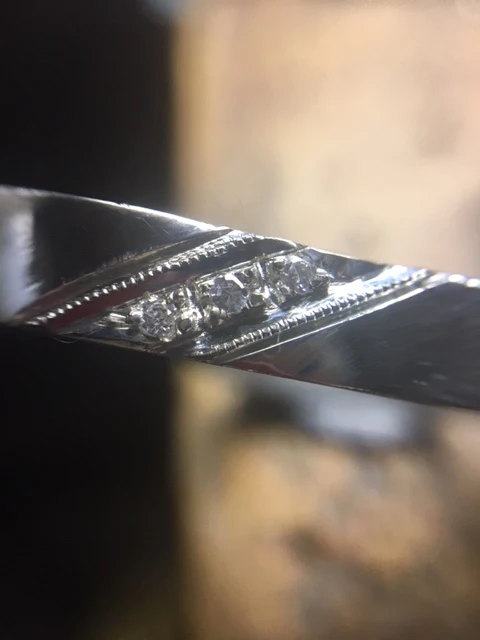
 When the rotating wheel is pressed against the edge of the metal wall then a series of 'mini-balls' is reproduced. This is the whole purpose of a "Milgrain Edge".


 In this collection of Milgrain wheels, there are 6 sizes of rotating wheels.

   All of these metal carving photos did not use any 'CAD' in their metal cuttings. 
 I chose to use a final decoration during my finished cutting namely just to enhance the pattern.
 

 Some of these patterns needed to be more visually enhanced, hence the Milgrain was used just to make the pattern more luxurious to the viewer.

This 'enhancement' effect is apparent in applying the Milgrain finishing touch.


  The Milgrain effect made this pattern look much more 'pleasing' to the eye.

 I found this pattern interesting and applied the Milgrain decoration during my apprenticeship years circa 1960+.

 I decided to do something novel to my ring by using the 'finishing effect' by applying the 'Milgrain' to the edges.

  I was asked to dismantle all of the diamonds, but I saw that there was a nice 'finishing touch to the edges'. I 'captured' this effect before it was destroyed. This ring was created in the early 1900's, it is the epitome of early luxury.

 I created this Pearl Butterfly, but to add a touch of beauty to the wings, I Milgrained the tip of the wire wings. Now the wearer can see each vein of the wings. This makes the wing much more visual and not just simple 'wires'.

 If I didn't put a little emphasis on the metal cutting, the lines would just blend in together. Only a Milgrain Edge can do the cutting justice.