Saturday 4 August 2018

Bezel Setting Diagrams.

"Bezel Setting, Diagrams! (4th in a series, of 8 diagrams!)

 To not include a "Bezel Setting" in this series, is a total mistake & an oversight!


One aspect of this setting is to understand that 10-15% of the stone will be covered by a metal-rim! I won't let that bother me, is that I will "Bright-Cut" all around the 'inner-bezel' frame. As you see that although much metal is covering all the Facets, just above the 'Girdle' of the stone.

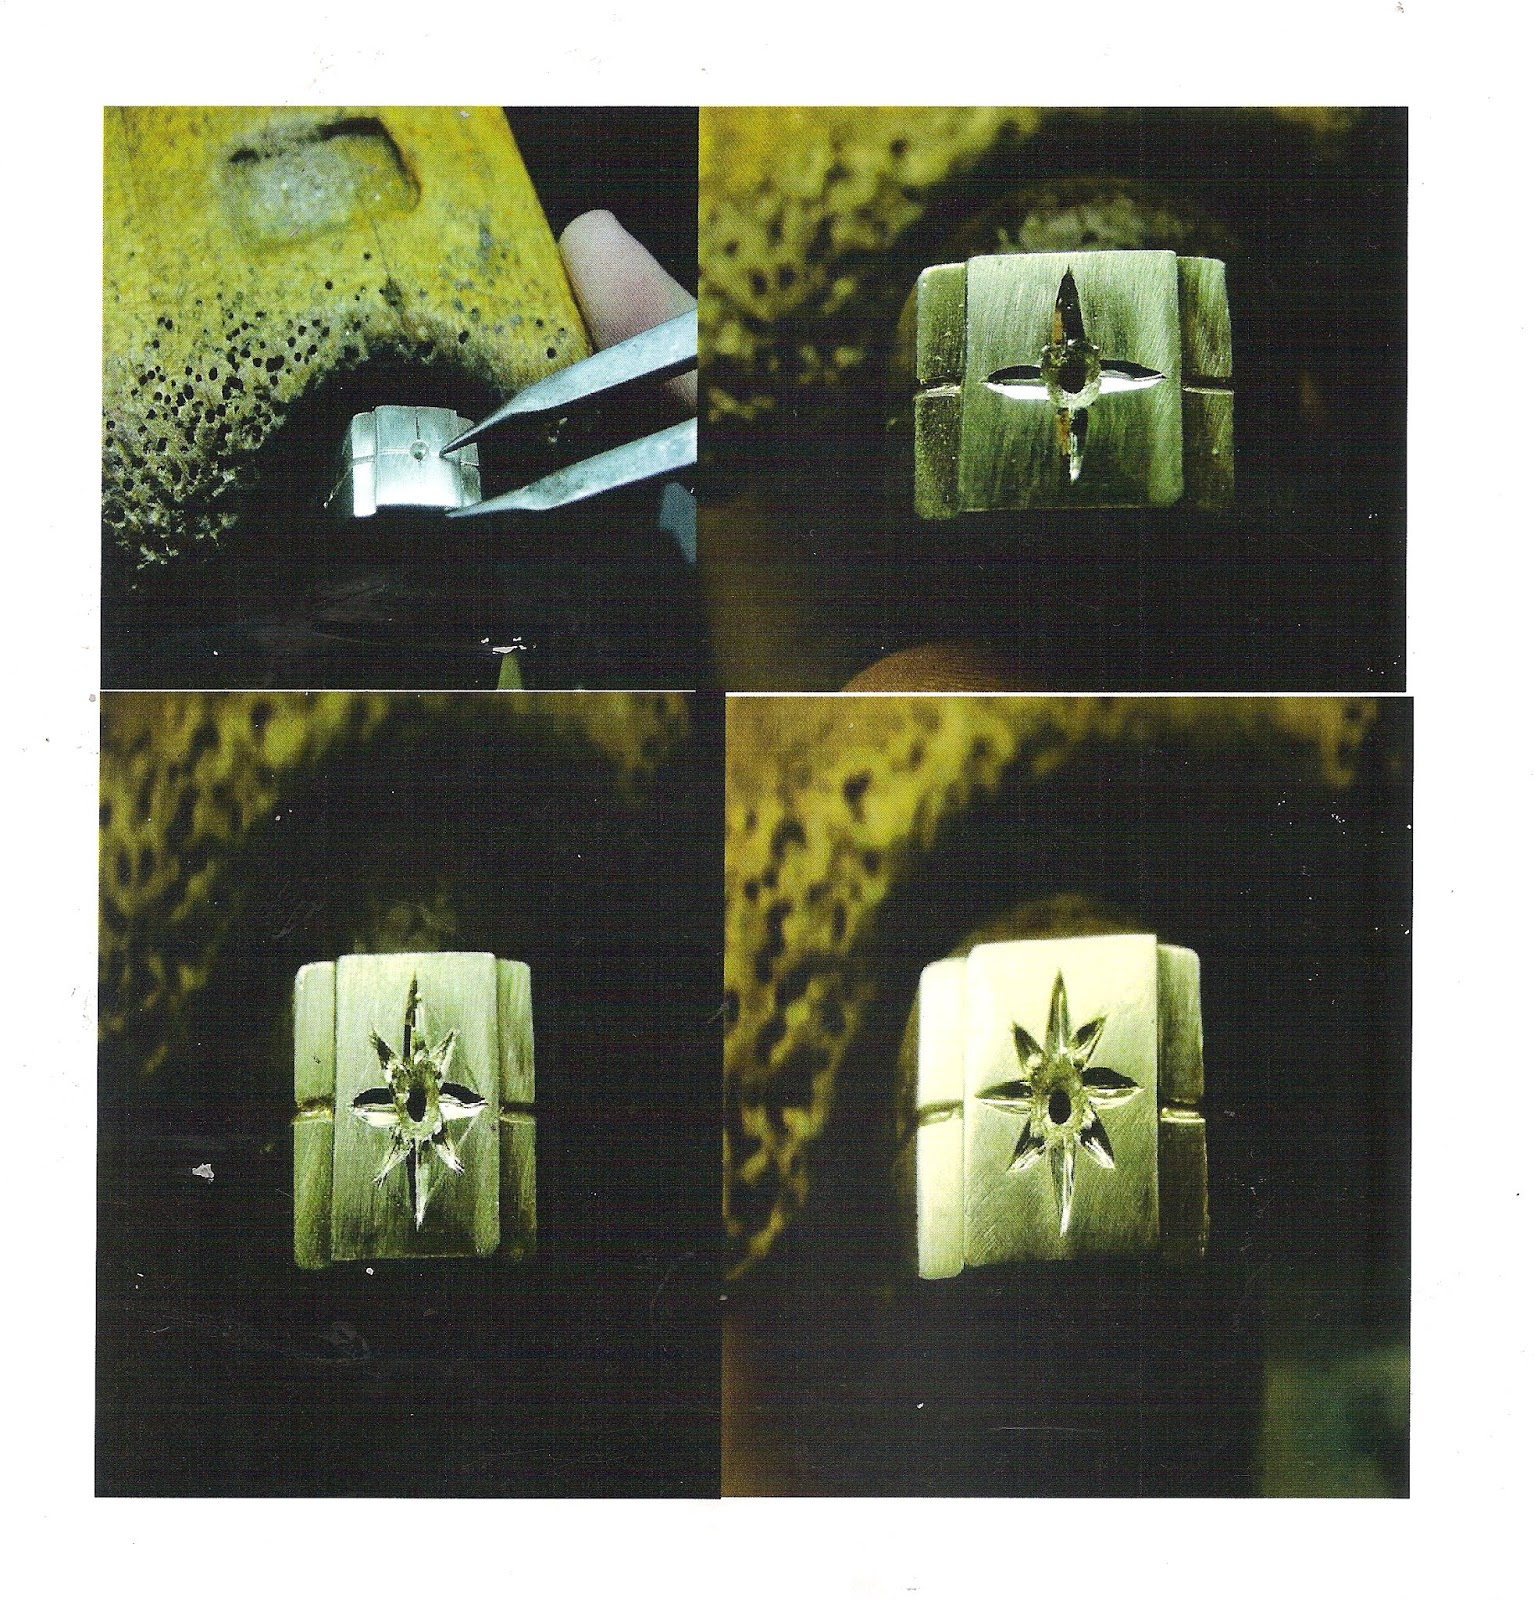
 "Bright-Cutting" is so very important and essential in achieving perfection, a very clean & highly polished graver surface is essential in Gemstone setting!

The hammer-face is critical as well in hammering metal around the stone, it must be perfectly flat, clean & with no telltale marks anywhere on the face while hammering. I won't use a light-weight hammer-head  & together with the handle.

 The appropriate "Complete, Hammer-Weight" should be (no less) than 85.0 grams. The 'hammer-face' should have a weight of 11.75 grams and size of square 68.50 mm's.  


The Bezel frame MUST be sitting against the stone...'all around'..with no spaces of any kind between the Stone Facets & the metal! Why is this so important?

 While you are attempting to "Bright-Cut", the curvature of "Cutting" must be uniform in its application at all costs!!!  

It will now appear to be needing of re-hammering if there are any spaces, (as shown in the first diagram)! 

 In the second diagram, the "Hammer-hitting" must be done in two separate stages. The first is to gently move the Bezel- frame or wall much closer to the oval-stone, kindly tell me how this is done? Your light-weight hammer will move the "Bezel-Frame" as shown, in number #2!

Once that is done, then you can now with 'great care' hammer the bezel over the facets. NEVER HIT DOWN onto the stone. But always hitting at an angle of 45 degrees and always with a more stronger downward force.

 If you hit 'downward strokes', your chances of "damaging the table-facets" are excellent! 

The 'hitting sequence' is important as this routine, as it will not allow the 'stone to drift, or rotate' while you are trying to secure the movement of the loose stone!

 What you are really trying is to prevent any sideways or twisting motion. This action "is like using a pair of pliers" as its holding the stone in its place!

I would (constantly use) a 10x loupe & examine for any 'open spaces' under the Bezel, to the stone. If there are any, repeat the hitting action until the Bezel is down & secure to the stone. While "Bright-Cutting", these 'open spaces' will look not look appealing & of course, just darned ugly! 
Contact me at "gerrylewy18@gmail.com" 24/7! 

Friday 3 August 2018

"Princess-stone, Setting Techniques"!

This style of setting is aptly named "Princess Setting". 

"Every Princess is high-maintenance!" The 'maintenance' is the need to follow the many & exacting rules in setting an expensive stone, without any chance of breakage!  

The most delicate section of this '4-cornered' stone are the four (4) corners! Even while travelling & training, the students were amazed just how simple this setting can be.

The "Scale of Difficulty"  on this type of setting is: 7/10.

(I might have duplicated some photographs from a previous essay on Princess stone a while ago!)
Where are the 'very delicate' areas? They are the 4-corners, I would be lax in saying: "Being exact in this profession is an understatement & it's very demanding 100% of the time!  
 BTW, as this is only a very well used & very delicate Cubic Zirconia, it shows many aberrations from previous setting jobs. If this stone came to me, either I'd 100% refuse it, or have the client sign that they saw, noted and then examined the many 'facet & inclusion' defects.

I would first widen each of the four 'vee' shaped prongs/claws, I need the space to access the handpiece to get in between the four posts.

I would first 'level off' all of the 'four posts' (for a better word) with a sanding disk of 'Medium' grit of a "Snap-On" Emery-wheel! I need to know just exactly where the metal is on the tip of the claws. In casting some of the claw edges sometimes get 'rounded' off and it gets a tad difficult to discern where the metal-edges are! I still do this today, as I have to be a very 'careful' setter.:>)

To literally 'save' each stone from being literally broken upon contact, is to drill a hole into the contact or joining of the 'vee-shaped' posts. I'd use a round-shaped bur of  #008. This is exactly where the stone-point will be resting, but not touching any metal!
  I know of a very true story, and it came from my own setting bench:
A client came to me and she was so angered, she 'gave' a Princess stone with two shoulder stones of .50cts EACH and as well as a Center stone of 1.25 Carat Princess stone. The 'setter' just drilled a hole for the 4-corners for each stone and as well as the centre prongs. BUT nothing else!!!

 The centre stone got damaged AND as well as one shoulder stone got all four corners broken. The setter blamed my new client for giving him broken stones. All three stones were examined prior to giving it to the setter and the company to where he worked. All he did was to drill out for the corners & no side, girdle-cuts in the metal.

That company where the setter worked had to pay full costs of complete re-faceting on all two stones, then repay for the reduced stone weight on both of the repaired Princess!
Moral of this story, there are absolute 'no shortcuts' are permitted when doing expensive Diamond Setting!  

The starting point is 33% from the top of the claw to the base. anything higher is my 'creative filing and cleaning areas'.


To set a Princess stone is to have only the top, or the tip of the 'vee' shaped claw exposed. 
Here is the 'head' of the same ring! It's like a 'Before & After' shot!


NEVER, NEVER bring in the "FOUR, cornered-claws" together, why so? This is because you will be having the 'inside of the claws' start to touch the corners of the stone..resulting will be a very expensive repair bill!


Wednesday 1 August 2018

Diamond Setting Diagrams, "Burs"

"Diamond Setting Burs & Diagrams".

 These numerous diagrams are used to aid your stone setting situations! 

Is this a long title? Yes, but it needs to fully explained, no guessing or leaving things for you to research on Google..:>( 


Please be aware where these 'contact' spots are located on each bur. Once you understand the rigours of cutting bearings, then you can appreciate just how these burs will work FOR YOU!!

I use a Bud-shaped bur to cut the 'Baguette-Gallery' angles on a shoulder stone, just from that bur using #006, or #007!

The Bud bur' #008 'contact spot' is too wide of a cutting bur as it isn't good for cleaning the small 90 degree corners just inside the Gallery!

While you are trying to ask how to do this or that, I'd ask you what burs are YOU using? If so, where do you use them & why? My next question would be: "How is this bur helping you?"

 When you have the "WOW proclamation", or the startling "Revelation" on just how important these burs can be to you while at your bench! Then you can finally understand just how important some of these burs can be..it's just so mind-boggling!

 I use the 'Carbide' and the 'HSS' bur sometimes in one ring or pendant.

We have to be flexible and keep our minds 'open' to many newer ideas & practices. This includes selecting the correct bur as this alone is a 'learning skill'.

 Each bur has it's very own subtle requirements. Many times I find myself using as many as 7-8 burs just to get one diamond set & then enjoy in how it looks after being completed...NICE!

 BTW, if you are using a Carbide bur & it's 'bur-teeth' seem to be just sliding along the metal, get rid of it!!!

 No way can you recut those Carbide teeth, BUT you can on a High Speed Steel bur. This easy demonstration will be shown in another essay on the 'many repairing tools & techniques to fix'.

 In the 'Gypsy/Flush' setting and if you have just no idea how deep to place your bur in the hole prior to starting the carbide bur to cut a bearing. If you look at this next diagram, your answers will be easily answered.

 When you are satisfied  that the "Table" of this  stone is at the level of the metal, thanks to this little diagram!  (apologies for my crude spelling)       
              

I just never expect a HSS bur to do what the Carbide bur can do. The same is for the Carbide bur, it just can not do what the HSS bur is doing now! Same shapes, but that's where the similarity ends!

No matter what you are doing in creating bearing grooves, keep a handy assortment of Pumice (180 grit & 1,000 grit) wheels at your bench!


Contact me for any questions; 
"gerrylewy18@gmail.com"

4-Claw, "Diamond Setting Techniques"

"Diagrams to assist in your Diamond & Gemstone Setting" (1-8)
(I am only explaining one topic at a time, the next topic will be only on "Burs")

 As there are a multitude of other Diamond Setting techniques, I am only preparing diagrams on the practices that are being used at your benches, continually! 

The techniques being shown here are well into the rating of '6' on my Difficulty Scale! Just sit back relax and let me do this 'setting & explaining' for you now!

These collected 26 pages of diagrams shown are really very easy to follow! If you need to reprint them for yourself, please do so at 'no charge', even give a few 'sets of diagrams' to your own friends.

The setting topics being explained are as follows:
Name of topic       Pages of diagrams:     
A) Princess Setting. 4 pages of instructions                             
B) 4-claw/prong setting. 8 pages..(just now done!) 
C) Burs. 3 pages.
D) Bezel Setting. 4 pages
E) Channel Setting. 1 page
F) Gypsy-Flush Setting. 2 pages 
G) Bead/Pave' Setting. 3 pages
H) Solitaire Setting. 1 page

Explanation of "4-Claw/Prong setting" diagrams!
(My hand-drawn diagrams may not be perfect, the setting techniques are what you need to learn!)

I use a High Speed Steel bur at a 90 angle while cutting a groove into the claw! Your large diamond must be sitting secure in and against ALL OF THE CLAWS!


You can see just how the 90 degree angle is measured! What you see here is only 50% of my collection of burs

I never use a HSS bur of 70 degree angle, the angle of the bur teeth must be at 90 degrees, ONLY!

I've never seen a stone with 70 degree angle...only buy the burs with the '90 degree angle'.

I use only a Triangle file with a number #4 cut! I use also loads of Pumice wheels of #180 Grit and also #1,000 grit (Pink wheel) these come in both Tapered & Flat Faced configuration


 There will be (trust me) many times your diamond, or even a gemstone may be not sitting into the crevices or grooves you made for your stone. 

Get your saw-frame with a saw-blade of #4/0 grit and slide the blade against the stone starting at the "Table" and cut (carefully) till your blade cuts and also against the 'girdle'.  If you use this saw as a mini-file, happily this is the whole purpose!

There is no need to remove the stone in this great little (repair) learning exercise!

On the last diagram. you will find a little sliver of metal sitting on just one side of EACH claw!
I have only four words for you, "GET RID OF THIS METAL" not after polishing, but...NOW!

When your stone is already in the 4-claw head, and you forgot to use your Flat Graver! I'd use a very narrow Onglette #0, or #1 & keep this graver for future cleanings alongside of the claws.

(I remember a story about a jewellery store owner on the West Coast of USA sent a setter in NYC 50 rings to have set!  Oh No! This setter forgot, or didn't know about this cleaning before the stone went in. He set all 50 large center stones in the 4-claws. He returned these mounts to the store-owner, who went totally ballistic, why? He had to send back to that setter(?) every ring just to remove every piece of metal, on all 50 rings and with now to clean all of the 200 claws!) "OY & OUCH!"

 This piece of metal will occur only 100% on all claws, all of the time, how do you clean this long extrusion of metal? DON'T USE A MINI-FILE, as this will leave striations on the claws. I use a Flat Graver of #40, or a Glardon #12 and from the tip of your bearing-cut,  just follow down to the base of EACH claw.

I like to use my Pumice wheels everywhere I can, even in front of the claw as it's laying on the Crown Facets. Moral of this: Where ever your file went, your Pumice wheels will surely follow!

Tuesday 31 July 2018

Creating a "Star-Setting" pattern

 Is it a “Star-Burst”, or a “Star-Setting”?

I've repeated some of the photographs, why so? Some of the views needed to be again fully explained, but under another sub-topic!


 No matter what name you finally give it, it’s a 'real challenge' to accurately cut this pattern.
 In my honest opinion, I’d place it an ‘9’ out of 10 on the 'Difficulty Scale'! I will show you a quicker route used in carving out this great looking design. Then the“Difficulty Level” will quickly drop to about ‘7 plus’.

Previously 'archived & saved' text pages. (please print these for your own permanent records)


 There is no C.A.D. (Computer Aided Designing) involved anywhere with this process. ‘CAD’ can surely help you, but you won’t have the Bright-Cutting features associated with any highly-polished, graver cutting!

What ‘setting tools’ should we be looking for? Onglette #1, Onglette #2, Flat Graver #40 (or Glardon #12) the width is imperative here! Bead-Burnisher @ 1.12mm's (diameter). As for our burs, we’ll just use a Twist Drill @ .90 >1.0mm and a bur of your choice to initially open the hole.


The very first thing we must do is to locate the centre of the item that needs to be drilled. Just use a little round bur of #008 to start the drilling of the hole. Oil your many burs, to 'lubricate the twisting action' until the twist-drill cuts through the metal. Oil cools the metal and prevents any binding of the ‘twist-drill’ bur inside the newly-formed, metal-hole.

Underneath, I would like to have a ‘recessed spot’ just where the drilling hole will be needed. If you don't drill a little surface, mini-hole. your twist drill will do loads of skimming around the ring or demo-plate. If your drill does skim on the blank surface, you might have to get another item to drill and set. The skimming just ruins the surface afterwards. 

If your twist-drill seems to just slide, maybe your drill is in the need of replacing, or just sharpen it again.


Before we attempt to start any cutting, we must prepare our precision cutting gravers. I modify every graver that I have in my inventory. On both of the Onglette gravers required is the skill to perfect the overall cutting areas just to cut the "Star-Setting" design or pattern.

 The Onglette #1 graver needs no such modification, as this one graver prepares for future pattern cuttings with the Onglette #2.
 With this Onglette #2 graver, I don’t want any contact with the left-side of the blade as it might prevent any unused lines or cutting! I will now call this Onglette blade, a “Right-Sided, Onglette #2 Graver".

 Now observe how the graver sits in my hands or fingers. This is the optimum position of any kind of graver, even if it's for this operation, or just enjoying your new skill in practicing 'line-cutting'! 

The desired spot to engrave determines how many beads are required! Either the Star-Design is on a thin wedding band or a large surface that alone is your guide. You must make your pattern just simply ‘aesthetically pleasing’.

  Four, or two beads must be gauged & sketched out on your item at this point. Once you start to cut your initial pattern, no way to repair this decision afterwards! “What’s done is done”! The reason being, is that every cutting process is decided right at this ‘planning stage’.

 Please determine now; EXACTLY where the 2, or 4-bead pattern is to be started. I just can’t emphasize this any further, BTW there are no 3-bead patterns, there are only 2, or 4-beads. Now let’s start this exciting process!


 To make your rough-pattern more easily seen, I usually paint with a black marker every section that needs to be better seen. (I still do this all the time) I will then very carefully 'mark the surface' with a fine-pointed scribing tool!

 Examine exactly just where the pattern will be engraved! Every rough-drawing you finally make is to be made with no changes afterwards! Am I very serious on this? YES!!

The very first cut is made with a shallow holding pattern with your graver! When you are making a long cut, do so with your graver, but holding the graver just at a steeper angle from the surface of the metal.

Each progressive cut and repeating each cut can you examine your long cuts. When you get to the point of each section, dig in .3mm deeper so your graver won’t skip & slide off and as it will leave an ugly line! You just don’t want this to happen!

As this is a 'skill of not slipping'! This sole skill is learned by practicing & more practicing! Each subsequent series of cutting, you may cut deeper.       I like to cut 3 times for each section and each section will require a deeper cut from the first!

Remember, that all of the 'unused metal' surrounding that 'new bead' must be removed before the stone goes in! The only metal remaining is the metal to be trimmed to shape of a little Triangle. THAT triangle is your 'new bead' being created!
 I always get my round bur of #006 and very carefully cut away the little pointed section of the triangular piece of metal. The 'remaining metal' located at the edge of the hole, will now be your new bead!!!


Basically this 2-Bead Setting (as being shown above) in this “Star-Setting” is not really that difficult. Practicing on flat, or curved items will greatly assist you in learning this new skill.

With all that you are learning in this essay, I believe you will now have more confidence and you should have greater control of using a graver.
If you use a C.A.D. as a pattern/designing process, knowledge of using your gravers is still so very essential. 

Please use your dividers extensively at the very beginning of the many Onglette cuts. You just gotta keep the center of the hole worked on to be in the centre of the plate. Always imagine where the Culet of the stone will be placed, these basic steps are so darned important!

After 'you feel' that each section now requiring you to cut further, you may use your Flat Graver to create a wider cut.

The Onglette-cuts make a deep cut with some degree of being cut wider. The wonderful Flat graver gives you a sustained cleaner cut. No file of any kind can you achieve this kind of carving ability!

“These gravers are your extensions of your fingertips!” Basically, what you see is what your fingers will now achieve.

The Onglette graver has a barrel-shape along both sides of the blade. Make use of this feature how? By keeping your graver in an upright or 'normal' position and let the original, machine-made curves give you exactly the correct angle you need for your Bright-Cutting!!!

 When you want to cut a sharp & nicely defined point on each section. What I prefer is you should start your cut at the joining of the two lines coming together! You are always cutting 'into' the center of the design!

If you decide to 'cut out or away' from the center where the stone will sit, you will for sure run into many problems. You will be sliding your graver all over the project you're working on, not to mention little chance of controlling your graver cuts!


Try & not let your graver 'slip' and keep digging your graver further into the metal, as it looks ugly & so very difficult to repair.

The only method in “repairing a slip” is to fill in the graver slipping with solder of your choosing. Even a Laser solder is still welcomed, as this is used to repair any minor cutting errors!

BTW, the very “first graver cutting & practicing” is done on a (sample) flat surface! Devise your own “demonstration piece of metal”. Once you are satisfied on your results, then you can continue on further to the item of your choosing.

When your stone is ready to be placed into the hole, I would use a #156C 'under-cutting' bur to make a seat for that stone. Then, and only then would I use my Bead-Burnisher (1.12mm) to 'roll-over' those little 2, or 4-beads to lock in the stone into the metal.

Let us suppose that your pattern that you are creating is difficult, I'd make two! Why? As if you can keep one 'sample' for yourself.  After deciding what pattern to cut, this will be now used as your 'experience' for many years.

Follow these six "Always":

A) Always make notes!

B) Always take photographs! (record your tools you used & where)

C) Always write additional notes on any new design that warrants "Star-Setting" patterns.

D)  Always keep your new skill information at your arms reach.” After a few of your 'cutting-demo' plates, this new skill will become much easier & almost natural for you in your future graver carving.

E) Always be creative in your reasons to cut a “Star” pattern: 

F) Always experiment!!! Never think that you’ve learned everything in "Bright-Cutting" in just one afternoon, this cannot happen.

Contact me at "gerrylewy18@gmail.com"