This detailed essay was printed in the "AJM" jewellery magazine many years ago. Only now have I had the opportunity to retrieve it from my PDF archives. The underlined text is from the magazine, since then I've added newer topics and photos.
Gerry Lewy, “Gemz Diamond Setting”, Thornhill, Ontario, Canada. Diamond Setter, Teacher - Author! aka “Gerry, the Cyber-Setter!”
=>"AJM" JEWELLERY MAGAZINE ESSAY. CIRCA (many years ago)<=
============================================
The next time you consider tossing one of your old burs in the trash think of Gerry Lewy's bench. This diamond setter reconditions all of his old burs, using a separating disk to sharpen each burs’ teeth. To avoid mixing old and new burs, Gerry keeps them separated in trays by shape and use.
"My primary business is Bead setting, Pavé, Gypsy setting, Princess stones, and Bright-Cutting. In a nutshell, all of the easy stuff," says Gerry.
"I don't do much production of four-claw work.
That's not my thing." Although Gerry’s bench could drive someone crazy, he can honestly say that he always has the right tools for the job.
Specific points of interest are described below.
===========================================
1. Burs in wooden boxes. I keep my high-speed steel burs against the back of my bench in four boxes. They are arranged by age, size, and function. My favourite bur for diamond setting is the 90° high-speed steel bur, aka “HSS” bur. This mirrors the shape of any diamond, it's great for cutting Pavilion seats in prongs. It also takes the place of a file when preparing for the actual resting place for the diamond. Simply use the base of the bur as a pseudo-file.

.jpg)
2. Modified burs. I keep one box for 'modified' burs only. For example, I will transform large round burs into cutting or shaping tools for Cabochon Bezel Setting by cutting off half of the bur to resemble an upside-down shape of the CAB stone.
This is the perfect tool for Cabochon setting, for the inside of a bezel. This re-shaping can be done with any 'Bench Grinder'.
My moto is: "it's not the bur you need, it's what you can modify that bur into?"
.jpg)
.jpg)

.jpg)
4. Wheels and discs. I keep all of my wire-wheels, along with the paper sanding discs in one 'easy to find' tray.
.jpg)


These blades are never thrown away, this is because I use an "Adjustable, Graver Handle" that will accommodate any length of blade.

6. Oil & OIL-STONE
Instead of using the (painful)"Oil of Wintergreen", which can irritate sensitive skin, I use ordinary machine oil with a 'light viscosity', I can buy this at any hardware store.
.jpg)
.jpg)
Even when the need to hold a "12mm x 16mm, Amethyst" from being dropped into your bench being lined with metal. This expensive stone won't get damaged.
.jpg)
.jpg)

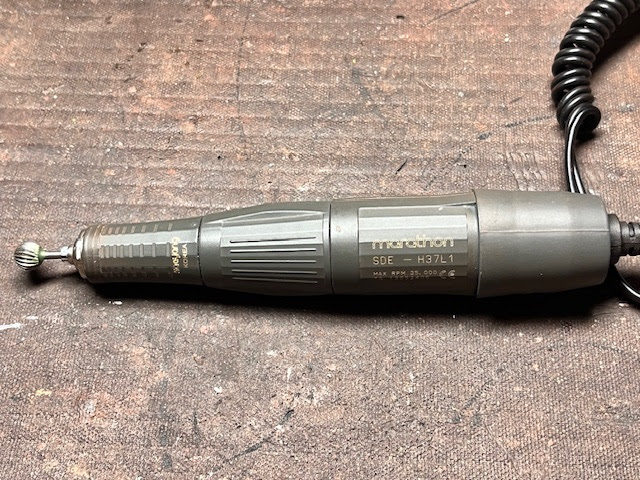
9. Handpieces. I enjoy & use my “Marathon" Micro-Motor handpiece—especially for Bezel Setting and subsequent “post-setting” cleaning, where manoeuvrability is necessary.
I can easily move the lightweight handle from vertical to horizontal during the setting process. This action cannot be done if the handle is tied to a thick motor cable.
.jpg)
10. Vulcanized rubber. I use this piece of rubber to clean wax off diamonds after setting.
.jpg)

12. Mini-container of OIL. I also put my oil into any little container that I can find. Two of them are 'make-up' plastic container that comes with its own lid, these were great when I was teaching out-of-town classes. I had my choice of oil and it's container always near my bench-peg.


13. Magnet. I use a strong magnet to remove any of the 'graver shavings' while I'm using the oil stone. This will prevent a 'build-up of metal' over a period of a few days.
.jpg) |
.jpg)
15. My Bench with all of "my friends".
"My friends" are what I call them. I respect what they can do for me and what I can do for them in having them 'modified'. The pile of mini-towels on the far left corner of my tray is where my elbow will rest.
.jpg)

.jpg)
18) "FLAT & ONGLETTE" blades & "Adjustable-graver handle"
My teacher gave me his own graver that he used in the mid-1940's, his initials were "S.L." Many of these gravers shown here are still being used today primarily for "Bright-Cutting" and "Cut-Down" which is a diamond setting design & pattern..

19) MORE GRAVERS!
These gravers can still be used in conjunction with 'adjustable graver handles' these can be seen (above) with the little screws attached.
.jpg)
20) GEMSTONE HOLDER

21) Digital Microscope
This microscope has an added bonus of storage up to 128 GB's of memory on a USB module. This microscope has a powerful magnification of 400x power. When I bought this microscope I wasn't into 'blog-writing', but I used it mainly for examining inclusions in diamonds & genuine stones.
I enquired recently that this 128 GB module that I bought 5 years ago now comes in a 256 GB's size. Technology has greatly improved in only 5years.
.jpg)

22) "Inside, Ring-Holder"
.jpg)
This 'essay-interview' appeared in the issue of the “AJM” magazine many years ago. This was circulated across the United States & Canada, as well as many other countries. I had to download the text PDF version, only today I posted this essay with newer photos.
.jpg)