Friday 15 March 2024

"Fish-Tail" design with Bright-Cutting & "156C" bur - 29 photos

 "Fish-Tail" gemstone setting is one of the most intricate designs that can be created without any CAD (computer aided design) program. 
 I'd rate this exercise at about "18+ out of 10". The only tools that I use are a Flat graver of #40 width that is used for Bright-Cutting (for a much required wider cut).
(This essay was originally dated Nov. 2023, I feel that it's necessary to review this again, but with many greater photo details.)

 WHY IS THIS NAMED "FISH-TAIL"? The two beads are the fish's eyes and the two curves are it's tail-fins.
=============================================


One of the many designs I use extensively is using solely a Flat graver #40 in width. To initiate the cutting, I start with the corner of the blade as being shown here.
 In one single cut, the whole blade comes into full use.

 I didn't (on purpose) burnish the 'beads'. I was more interested in getting the stones set that I had more things to do. For example Bright-Cutting the metal.....everywhere!

 My emphasis during this stage of metal-carving is to make sure that the beads are now 'rounded'.

How do I keep the stones in the 'fish-tail' design? This is so very easy, let's start to explain this interesting technique.
 I will carefully grab the Fish's curved areas and pull the curved areas together with a pair of fine-toothed jaws. If you wish to use your 'hand-pusher' that is another option.

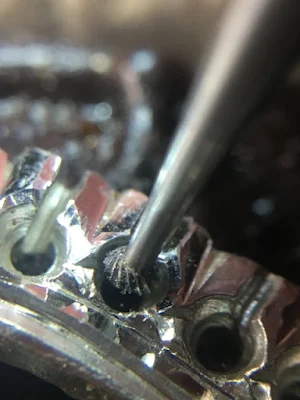
 On either side of the 'fish's tail' are these two seats. I will use my 156C (Carbide) bur and create two seats inside of the hole, this where the gemstone will sit, but not securely!!!

You can easily see the '156C' under-cutting bur making a seat inside the hole. This 'bearing-carving' must be formed all around the hole, as this is where the stone will sit.

      In this up-close photo shows the bur in action.

Long before any gemstone is set, much care is taken in cleaning all of the areas that is to shine from the "Bright-Cutting" processes.


This great photo is showing you some of the bearings where the stone will sit. With your bud-shaped bur cut at an angle in between the two beads. 
THERE MUST NOT BE ANY EXTRA METAL remaining in between the two beads. Get it removed NOW!


Don't be too cautious in using your 156C bur. Utilize the edges of the 'rotating bur' to navigate around the hole. From here you will have a nice seat for every stone.

"Bright-Cutting" is the most challenging aspect of this pattern. You are not removing or destroying any areas of the design, but enhancing the pattern many times better.
 The enhancing makes every metal angle 'bright and shiny'.

This sliver of metal is from the Flat graver doing what it's supposed to do. It's to give lustre to the 'rough-cutting', there must not be any lines in the face of the graver.
 If the graver face is poorly polished (on your polishing paper & oilstone) then those 'graver defects' will leave poorly created lines in the fish-tail pattern.
KEEP YOUR TOOLS CLEAN AT ALL TIMES.


This photo displays the bright cutting edges that we are all aiming for, agree?
 
 To review again, use your #004 bud-shaped bur and keep the metal clean of any extra metal in between those two beads. All that you should have are two little 'posts'. These two posts are your new beads.


Your Flat graver is again 'doing it's magic' on the metal. Keep your tools sharp!!!


        'Bud-Shaped' bur can do so much in this subtle metal carving.


The Bright-Cutting results shown in this photo, are only 'mediocre' but not very clean.

In this better photo, you can see how important a pristine looking Flat graver can be.

 With a Flat graver, every section of the front of the blade is doing wonderful things to the metal. By starting at the edge and slowly working with the center of the blade, every millimeter of the Flat graver is being used.

This is my epitome of a good polishing paper, I use any polishing paper from #800 grit all the way up to a #1,200 grit, why? I WANT PERFECTION, nothing else!

 My burs come in various sizes and shapes, eventually every bur will be used.

 I will place this setting process at "18 out of 10". But once that these techniques have been learned, then come the practising, this practising "Fish-Tail" took me 2 YEARS.


Tuesday 12 March 2024

"Princess-Cut stones" into a 3-stone-pendant - 18 photos

   This pendant was a gift to my wife and to display the design and techniques here it is. This design may be duplicated at no cost to you.


  All along the upper 1/3rd edge of the 3-stone bezel a Bud bur is used to create a bearing.
This bearing is where the girdles of EACH of the 3 stones will sit. 
Don't use any round bur, as the round bur just can't create a uniform (straight) bearing. So don't attempt it !!

   We aren't finished with the bearing just yet. There are more carvings to do before any stones go in.
With this setting, we can easily set any thickness of stone Girdles.
The next thing to watch out for is the bottom section of the "Bud-bur" created bearing. This image shows just how dangerous this 'lower lip' can be. This sharp edge must be removed NOW!

         There are two features of the stone-setting to watch out for:

 1) That the tapering of the lower-edge of the bearing should be carved at an angle to accommodate the Pavilion of the stone. (This carving is done with a Bud-shaped bur.)

 2) The Culet of the stone must never touch the bottom of the Bezel. Hence, a hole is drilled through the bottom, just under the stone.

 As the stone is about to be set, we can now start the 'setting processes', but how can we hold the stones tight from moving? 
 I used an Onglette graver #2 and created a little 'hook' just where the facets are located above the Girdle. When the top of the Bezel-lip is hammered over, these 'hooks' will be unseen to the wearer.

 This Onglette graver-created 'hook' will keep each stone from moving, while the Reciprocating Hammer-anvil is doing it's securing & tightening.

 From a distance and seen here, you can see just where these 'tightening-hooks' are located. These hooks are not on, or at the "Table facet".
 Once that these are created (on both sides of the Bezel) there is no chance that any stone will then move. The hammering process is quite rigorous and we don't want any movement of any stone.

   I prefer to 'gently' file the outside edge of the Bezel, as this is where the hammering will be done. I start with a rough file "OO" file then switching to a smoother "O" prior to any hammering.


  I never hammer ON THE TOP OF THE BEZEL only at the 'outside of the lip'. This is where the filing took place. In this photo, you can see the Culet situated just above the hole.
 

 Here you can see where I did the hammering, I attempted to keep my hammering just at a 45degree angle all through this process. The reason will be answered NOW.

  The three stones are so very close together, but NEVER touching. If two, or three touch during the hammering, the vibration will chip & shatter the stones.

 After all of the hammering is finished, the 45degree angle is still been seen. The reason of this will be explained...NOW!

  With my Flat graver of #40, I will initiate the (very important) "Bright-Cutting" inside the Bezel.

   The 'inside bright edge' is the reason of not filing on the top of the Bezel wall.


   In this photo, I explained the 'before & after" finishing.


 In this great photo, I've displayed the actual "Bright-Cut" finish.

On the top of the finished Bezel wall, is where I used my Pumice Wheel to give a nice & clean finish.

 BTW, you can see the numerous indentations caused by the hammer-anvil hitting the metal.

  The Level of Difficulty on this setting is 7.5 out of 10.
 This process wasn't too difficult, but some challenges seemed apparent to the novice jeweller-setter. Just make (darned) sure that the three stones don't touch each other.

gerrylewy18@gmail.com

Monday 11 March 2024

Can you "Gypsy-set a Princess-Cut" stone? - 19 photos

 Is it possible to set a "Square-Stone" into a round hole? Of course it's possible, and here is the proof, that it can be done.

 This tutorial-essay is rated at "9.75 out of 10" on my Difficulty Scale. The chances of breakage is at (all-time) high of 9.0 as this exercise is not for the beginner, so very sorry!
============================================
All areas of the ring and stone setting areas need to be highly polished prior to any stone setting.
===========================================


These large bud-shaped burs are used only to make a round hole now nearly square.

 You can see my faint lines in the ring where the stone will be fitted. I NEED THIS AS A GUIDE for my drilling and opening of the space for the intended square stone.


 My large Bud bur are used only at the 4-corners. Please allow, the EXACT PROPORTIONS of the stone to be fitted to the opening. 
 No guessing on the size of the opening, if you exceed the dimensions needed, the stone will never fit well.

 With a round bur drill into the desired areas where the corners of the stone will be situated.

 The 'round bur drilling' needs to be DEEP into the metal corners.


  With your Flat graver cut little flat sides to the square hole.
 Once that this done, you've reached the exact dimensions of the 'opening to the square stone'.

 These are the only burs that need to be used. Don't have a large array of unneeded burs laying around your immediate work area.


 You can see a 'faint lines' drawn on the metal, this is where the corners will be situated.


  Where the Pavilion is to be placed, this is where the corners need to be square and clean.
I suggest using a small size bud bur of #002 (or #003) and carve a corner at an angle. This angle will follow the Pavilion facet along the corners of the stone to the metal opening.


  In between the four holes of the 'corners', there must be a 'connecting-bearings' just for the girdles of the 4-sides of the stone. (I made a gross error in not photographing these bearings).


  Place the stone into the square hole just to make sure that the stone will fit. At this point in the setting process, check that the four hole 'sides' are in alignment to the stone.

 ARE THE FOUR CORNERS (of the hole) MEETING THE CORNERS OF THE STONE?


 Is the stone sitting Flat and not crooked? If the stone has passed these requirements then you may proceed with your "Reciprocating Hammering".


 In using your Reciprocating Hammer, don't put the hammer-anvil on these four corners, why not? This is where the breakage will always occur, avoid any downward hitting at these 4 positions.


 Don't hammer or squeeze the metal flat, we need some 'thickness of the metal' for the 'Bright-Cutting' Flat graver to be used.
 

  I always "Bright-Cut" the inside of the frame as this will give your ring a 'finished appearance'.
 I 'aim' my Flat graver towards the juncture of the 2 sides. This will always give me a 'square looking' effect.


 "Seeing IS BELIEVING". We've actually fitted a 'square stone into a round hole'. What I do now is to Bright-Cut the inner-sides of the setting. I will use my Triangular file #4 cut to trim all of the inner sides of the bezel.