Saturday 18 August 2018

How to set your Baguettes!

'Baguette setting' can be very easy. This is only if you know 'exactly’ how the technical setting steps are to be applied and in sequence! 

This Baguette setting exercise is not for the 'faint of heart'.

On my “Scale of Difficulty of 10”, (10 being the most difficult) Baguette setting is at an '8'. This is due to the multitude of metal carving steps, using only the “Bud & Round" shaped burs and a Triangular file, of #4 cut!


"The Scale of Difficulty"!
Amethyst stone! This is a definite 8, on the Difficulty Scale of 10! Why is this rating so high? This is due to the fragility of the Amethyst stones!!!
Blue Sapphire & White CZ are quite easy, as they are @ Scale of 6.5!


 There are no short-cuts! There is no easy way to do this kind of setting, either the stone is 'sitting & fitting' correctly, or it isn’t…Simple as that! 

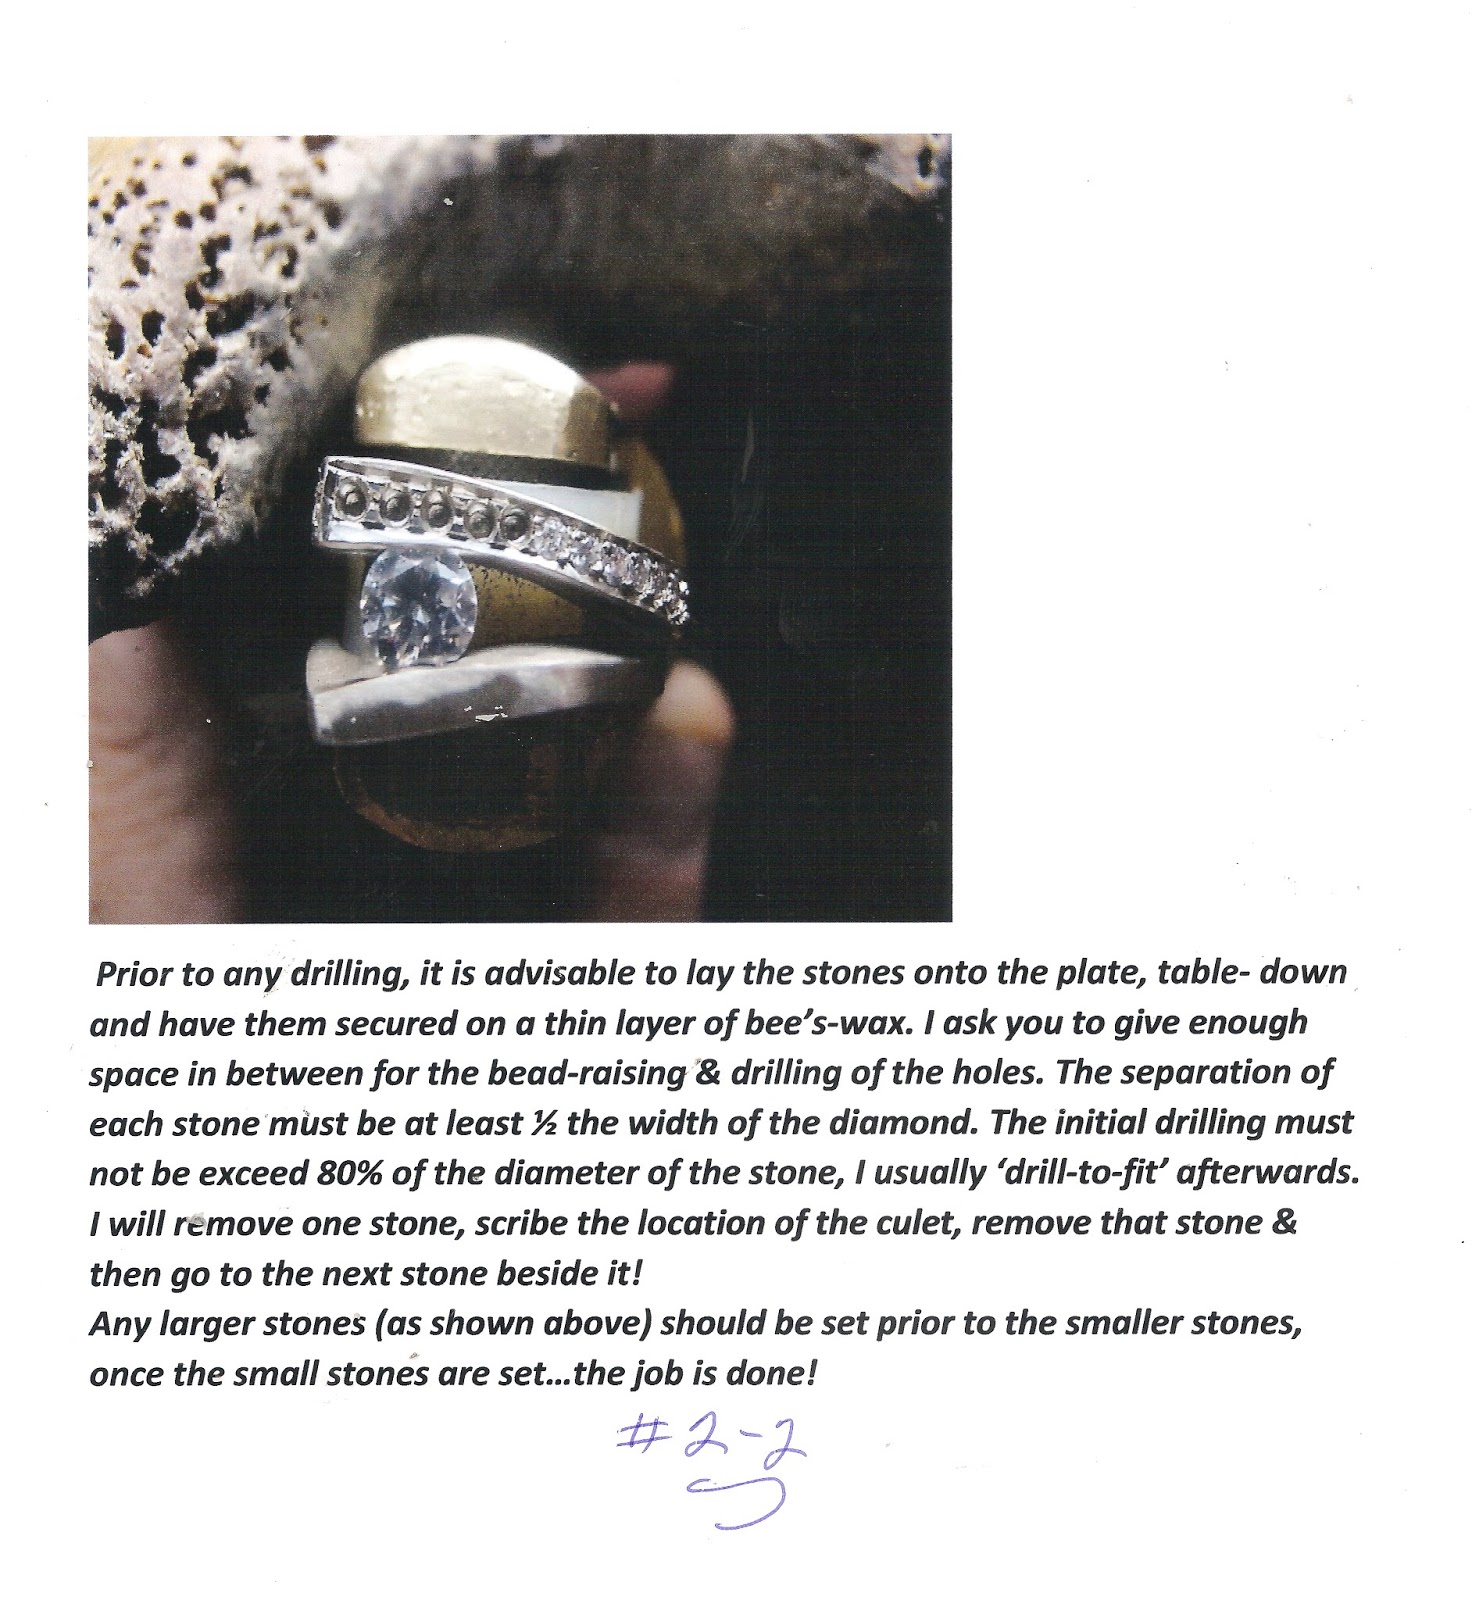
If you can see that these two (2) spots these are now acting as a guide for further drilling with my #007 round bur! I'm repeating myself many times as these 'beginnings steps' are so important. 

 You now see the three (3) dots that will eventually be a bearing cut. The left & right side of these dots are where the corners of the stone will be sitting/placed. 

 Here you can see just 'where & what angle' my bud bur is angled at. This specialized cutting is now preparing for the angles for the stone. The bur size must not be any larger than a #007 (or #008 max).

 After all kinds of bearing cuts, I always use my 'mini-magnetic tumbler' to just make sure everywhere is nice and semi-polished!


This stage of preparation is not an option, it looks just simply 'ugly'. The angles on all 4 corners are totally missing, hence a poorly looking Gallery & not to be used for any stone! "Short-cuts" are now resulting in a poor setting and stone breakage!  


Showing these two rings, you can see how poorly cast the ring is on the right side. Pre-cleaning is a 'YOU MUST DO THIS...NOW'! When the stone is in the ring, it's now too late to fix or do a minor repair!


In this photograph, you can see the three colours of stones I'm presently working on, Blue Sapphire & White CZ's are the easiest to set. This is because there are no problems with the Mohs Scale of Hardness (9) of these two stones. 

BUT, Amethyst stones are the 'most' delicate to set. The chances of breakage are quite high! REMEMBER, get the setting Tripoli & (light) Rouge polishing done NOW! Even BEFORE you solder the 4-claw head! Amethyst stones, I believe are at about 6 on the "Hardness Scale".


What are those 'long lines' on the metal?  The answer is that the person who cut the 'rubber mold' had little knowledge (or care) about how to remove the ring from the vulcanized-rubber. Hence, these lines are now a cleaning problem, as they must be removed completely, or having a new mold made before any new waxes can be injected!

When the person used their Exacto-knife to cut open the mold, the resulting lines are formed by trying to cut the mold in half! There was little care given as where the 'separation' should occur. The 'rubber-separation' must occur at the side of the ring, not where it is shown here!! This now makes the 'pre-cleaning' stages much harder task to bear.

 In hammering the 'End-Bezel' (as it's properly named), the setters favourite 'reciprocating hammer' anvil must start at the center then go to the corners, and again making very sure the stone is NOT MOVING and not crooked!

 You can now observe just where the 'anvil' is being placed for the initial hammering. BTW, start the pressure of the hammer anvil at it's 'lightest, or softness' stages of hammering! 
 In this photograph, you can again observe where the anvil is hitting.
 In this last 'hammer contact', I've totally hammered the 'end-bezel'. All of this was shown from the little arrows, signifying where the hammer must touch!

DON'T LET THE ANVIL get close to the front edge of the 'End-Bezel'. Try and aim the anvil to make contact in the middle of the bezel walls. Just in case the moving 'anvil' won't hit the stone...OUCH!

I rest or balance my reciprocating hammer-anvil against my fingers. I don't want any unnecessary movement of the 'anvil' that could run amok and 'ruin' the stone.

All of the Bezels are accurately & nicely file-finished. All 'Ends' are squared-off and easy on the eyes!

 The 'end-bezel' was bent back on purpose, why so? The reason is that these two stones are about 10% longer than the opening of the gallery. The stone should have a dimension of 2 x 4mm's, many times the stones are not as noted on the stone-folder. 

The stones being shown & to be set are 1.95mm x 4.25mm. The very slight 'bending action' can be easily corrected & filed afterwards, once the 'clean-up' is initiated. This is really an easy task! I use a Pumice wheel of #180 grit, then using a Pink Pumice wheel at #1,000 grit.

In this photograph to fit the stone, I  used a flat & smooth-faced plier jaw just to pull back the 'End-Bezel'. I don't want any sort of plier marks anywhere as the cleaning could be a major problem afterwards.

You can now observe how thin the stones are and each of them are longer than the bezel-frame. With this problem, 'we' must make allowances for the (incorrect & unusual) dimensions.

The positioning of the 'anvil' is so very important! This will make your 'downward hitting pressure' to make a narrow contact all in one small 'hit'!


You can, as well, use your "steel pusher" to start the moving of the end-bezel. Copper or Brass pushers are not powerful enough to move the metal over the stone. Starting your first compressing of the bezel wall, I prefer if you could start in the center of bezel..on both sides together!

Place your 'metal pusher' on one corner, then the opposing corners! With this series of metal-pushing or moving the metal over the delicate 'Facets'.

 Place your 'metal pusher' on one corner, then the opposing corners! With this strange series of metal-pushing or moving the metal over the delicate 'Facets'.

 Your stone will never get crooked because you are totally IN CONTROL at all times. This is even preventing the stone from getting crooked or twisted. When the stone is secure, it is almost impossible to straighten the stone afterwards!   

ALWAYS USE YOUR 10X POWER LOUPE. Your 3x power head-visor is not strong enough to see how the stone is being set. 

In this (great) photograph, I'm now demonstrating just how the positioning of the 'hammer anvil' can be used. You can see where the anvil is positioning during the hammering process! Don't let it get closer to the stone than being shown.

This Amethyst stone is now tight! The filing for the 'clean-up' will with little effort, you can 'file to trim' the 'bending of the top End-Bezel frame.

This lower photograph being shown is the "Side-View" and it's showing the stone sitting in the Gallery. 

Time to start the filing (and overall cleaning) of the End-Bezels using only a "Triangular #4 cut, 20cm in length".


In this lower picture, you can see four little dots, or holes. These are made to guide our next step in preparing the metal-frame for the new stone!

Next stage is to connect the dots into one straight line. This is where the 'End-Facets' will eventually be placed. what size of bur, I'd be using a round bur #007! 

To prepare the corners of the Gallery, I'll be using a Bud shaped bur of #007. The angle of the bud bur cleaning out the 4 corners must be held at a 45-degree angle, obviously, the stone is faceted at almost a 45-degree angle as well. I use my 10x loupe to check just how the bur is cutting. What you see is that I must now carve out the sides of the Gallery.


Now you can see just why I used 4 little dots, or holes to guide my round bur. If I didn't I'd be having my round bur spinning & cutting not where I want my stone to sit. 

I'd like you to drill into the corners deeper, as this will prevent any corners of the stone to touch the metal   


Where are the corners of the stone? See what I mean? None of the 4 corners are going to be touching any metal.

The "Gallery angle" must be the very same angle as of the stone; End of story! Detailed cleaning of the Gallery is half-way finishing of the stone setting, get this done correctly.

With this very extensive technical essay on Baguette setting of stones, I hope that your first of many stone settings will be favourable for you. BTW, just go very easy on every hammering you do!

"gerrylewy18@gmail.com"


Monday 13 August 2018

Diamond Setting, Spacing of stones!

 Long before "Computer Aided Designing" came into vogue, Diamond Setting was all done by hand & it was the 'norm'! Many steps were involved in just the basic process in 'spacing'!

The actual setting of the diamond is not on our present agenda, but the "Rules on Spacing" in this exercise, can be very important! 

In this 'spacing'-demonstration, I used only a minimum amount of wax just enough to hold the stone.

I would take off ONE DIAMOND, then scribe the metal. How much spacing would I give (each) two gemstones? I prefer a width of at least 'half a diameter' of a stone, then allocate further spaces all around the tube. If I'm off by 1-2 mm's, then I'd 'move' all stones, until the spacing is 'nice & even'!
 In this very exacting process, I would set the larger stone FIRST! I have to make (darned) sure that there is enough metal around the center of the Diamond, in the Bezel. This is before the smaller stones are going to be set!

If the metal is not sufficient to set the smaller stones, I'd gently put the stones almost at the edge of the outside section of the yellow frame. So much setting going, in so little space provided.

In this prepared, 'bead-setting' pattern, I took into effect the number of stones and combined this with equal spacing! I drilled all of the holes first, then allowed for the cutting afterwards!            BTW, this plate had no holes or cutting done to it, before-hand! What I'd do now is to just set the stones of equal sizes, and the job is done!

 In the following picture, you can again see the little wax layer. Now with the graduated sizes of stones, 'no guessing' is allowed and 'no shortcuts' are even permitted!
 You now notice that I set the larger diamond first, why? I don't want any movement, of any metal, while the larger stone was being set. I'd even do a "Tripoly, Pre-polishing", once the many smaller stones are not set yet. I have the luxury of pre-cleaning, but this cannot be done after the small stones are already set!

You can now see the diamond-sharing of 'beads'! All attempts to Bright-Cut are now done NOW!

Once the stones are in, forget about any chance of polishing, it just can't happen!! But when the ring is in pieces, you can then and only then, can you do a full 'clean & polish'.

You will notice easily just how close the stones are to each other..'girdle to girdle". I don't want any spaces or any sort of 'visual openings' in between any of the 'set stones'. It just won't look good!

In this photograph, I chose to 'bead-burnish' each bead, before going on to the next stone! When all of the stones are 'in', I won't have the opportunity to give any setting perfection to my precious stones!


Hammering; Used in the "Gypsy-Flush" setting process! "Bench" magazine

"Gypsy/Flush Setting" (including a "Bench" magazine article that I wrote, circa 2004. (I was unable to remove the advertisements).


 This essay will carefully explain the very important setting steps when you are hammering the metal in the "Gypsy/Flush" setting!

 I intentionally 'darkened' the ring surface for one simple reason. That reason is that this is the only method for you to see where your hammer is actually touching the surface of the ring.


 This is the angle of the hammer (45 degrees) while it is making direct contact. The hammer must never touch the "edge of the (stone) hole, or opening".

Your hammer is basically doing two things, that is to 1) 'Move' the metal towards & 2) Over the edge of the stone, nothing else!!


 In this picture, you can see just where the multiple (8) 'hits' are taking place. The next step is to hit 'gently' all around the frame of the edge of the stone, nowhere else!


 Your Pumice wheel is your very 'best friend' in all kinds of stone settings. It is now removing every 'hammer hit' that you might have made on this soft .925 silver metal setting!

 Can you see just how close to the edge of the hole the side of the Pumice wheel is going? Getting closer with your wheel and it is then waiting for the 'damage' to start!..;>(

Just one touch of your rotating Pumice Wheel and your stone will lose many of its "Upper-Girdle" facets and including the 'Table facet' surface. There is just no quick method to repair the stone, except removing it and messing up your ring. A.K.A ...YUK! 


==============================
 In this (not on this topic) photograph, but worthwhile to mention, you can see that I went and engraved a pattern with my interesting graver, aptly named "Liner, 10/16".

 I use my "Liner, 1016" to engrave a "###" pattern when and where needed. This pattern is aptly named a "Florentine Finish!"

 I would use this innovative pattern only if the metal has multiple 'casting errors'. The errors are if my item has numerous 'pin-holes', anywhere.

 There are 4 pinholes in this pendant, can you see them?..:>)

 I thought that this 'little extra surprise finishing note' would be interesting and helpful to you and everyone!  If you have any comments, please email me at

'gerrylewy18 (at) gmail.com'

Sunday 12 August 2018

Errors in setting a "HALO"-ring!

Errors that can be made in a simple & basic "HALO" ring!

 An (average-quality) setter asked me to give him some work as he was needing setting & would I assist him? Well, I answered the 'call' and look what I saw after I closely examined his (mediocre) labour! Obviously, I haven't seen him since that time, just 2 years ago!
His brother is my favourite jeweller, but future Diamond Setting with this fellow is now "a thing of the past"!

There are some really serious errors in these 3 rings. Let's describe them in detail on just what happened & why?

BTW, I decided to scrap these 3 rings, instead of trying to fix all of the errors made trying in vain to correct. Remember, these 3 rings are only in silver (.925) and the c.z's were not correctly positioned in the metal and not too expensive! But my 'true dollar saving' is now in my time.


In this first photograph, you can see three stones and all 3 are set crooked! I'd actually break all 3, just to get them all re-set, not too mention ruining the claws in the process.
I'm looking at one of the white sapphire stones under the picture of the claw, it appears to be of an "8/8" cut. This means there are only '8 facets' above and 8 facets below each girdle of the stone. The rule of all Cubic Zirconia fabrication is now 57 facets in total!


 Just what happened to the 'missing' stone? It got lost somewhere in the 'sonic-cleaner'. Not too mention, the "Culet" was just rotating on the metal inside of the hole...YUK! (disgusting!)

One stone was set too high. The other two were sitting on an angle and the other was slightly lower! The stone on the far right was sitting inside of the halo-ring. 

The metal between the stones was not even cleaned or polished prior to the actual setting process! I think he used a Flat-Graver to 'dig in & slide' any metal over each stone, just to secure each stone.

All serious cleaning (and polishing, if needed) MUST DO DONE, when? The answer is NOW! 

The 'metal in between each stone' gave me the impression that setting care was not taken from the first moment he touched any of the metal. Even if the ring is silver, gold or Platinum.
"Absolute care must be administered at all times!"

In this photograph, you can see the mini-claws are just not sitting ON each stone. They just look like 'posts', or prongs standing up!

In this viewing, you can see that he 'over-polished' the 'end claws'. the result is that there is now no 
chance or possibility of having any detail remaining on these claws!

What would I do prior to setting any of the multitudes of stones? I'd prepare s pumice wheel and have it re-shaped to a finer point and this must have a 'clean-up' before any setting was to take place.
I might use a very fine pointed #006 Bud-bur and remove any offending pieces of metal in between the claw-tips. All kinds of pre-cleaning MUST BE DONE prior to any form of setting of stones.

 If you look under these two rings, what do you see? The CAD designer also made errors in his computer programming, namely undrilled holes for the "Culet" of these stones.


This setter chose to use a 'bead-burnisher' to push over any or all of the claws. But in this process, his heavy hand squeezed the tips and left a ridge around each claw. Another YUK!


All of his actual stone-setting was with the aid of a microscope! Don't tell me he missed all of the important points in just the basics of setting! BTW, this setter and many more these days, have no or little practical knowledge or experience of "Bright-Cutting".
 Many of my peers frown upon even thinking of 'cutting any designs' in the metal. 
gerrylewy18@gmail.com