Diamond Setter, Teacher & Blog-Author!
Gerry, the Cyber-Setter!
This is a reprint from an article that I wrote, words have changed, but the techniques are still the same!
(This article was published many years ago in a trade magazine. After finding it (again),
I altered much of the wording and added a few more mini-topics just to make it easy for you to read.)
===================================================
This diamond setter reconditions many of the worn-down burs by using a separating disk to sharpen each of the "High-Speed Steel" burs' teeth. To avoid mixing the different styles of burs, I keep them separated in many little pads as shown further in this essay!
My primary interest in diamond setting is that of “Cut & Bead" Setting, "Gypsy/Flush Setting" & "Princess Stone Setting". I avoid the 'mass production' of four claw settings, as that's not my preference. Specific burs of interest are now described below.
These modified 1/2 burs, that you now see below, will be seen in another essay on "Cabochon Stone Setting". One thing you should need to remember, is to keep the exposed teeth sharp for cutting metal.

1. Burs in wooden boxes. I keep my high-speed steel burs against
the back of my bench in four boxes. They are arranged by size at all times! I have no intention (time wasted) to keep looking for a bur that is not in its own receptacle.
As some of these larger HSS burs can be rather expensive, from almost $5.00 to $20.00 for the 5mm bur. I make every effort in keeping these sharp at all times. The following pictures show just how easy it is to re-sharpen them.You can't re-sharpen the Carbide, Under-Cutting bur, named "156C"!
2. "How to Re-Sharpen a HSS bur", this might have been repeated in another essay. Since we're on the subject of "basic burs", why not mention this again!
When I see that the HSS bur is not cutting anymore, or it's just sliding along the metal, we need just one implement. I use a separating-disc I use this to re-cut the teeth.
Which of the teeth would I need to save? I paint the whole bur in a coloured ink just distinguish one tooth to the other.

When I touch the bur with my disc, I can see which tooth has been cleaned. Please be very careful on this cutting process, you must keep the teeth perfectly sharp.

You don't really need to recut the long bur, it's just the end of the bur is cutting into the metal, nothin else more!


After close (10x power loupe) examination, you can see how sharp those worn down teeth are now looking!

3) "How to reshape a 1/2 Round bur, only used for Cabochon drilling"
I do this by removing half of the bur, this is the perfect tool for Cabochon forming, for the inside of a Bezel. This re-shaping process can be done on your own 'bench grinder'.
 This is how I re-shape the round bur against my bench-grinder.  Now you can see these sharp edges of the round bur being made ready for metal cutting. These teeth must be made ready at all times! Once you get the idea of what you have to do, then it will become much easy to prepare!  You can see these little sparks of metal being removed..(this was difficult to show, while I was holding the bur in my fingers, as well as holding my iPhone)! 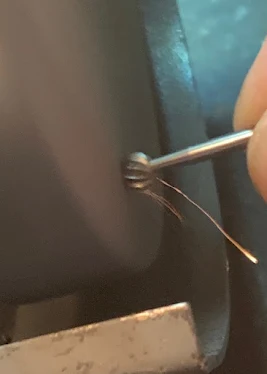 |

4. Wheels and discs. I keep all of my #180 and #1,000 grit Pumice wheels
of Flat Face and Tapered designs along with the "Emery, Snap-On" discs with a
“Medium” grit in their own separate tray.


5. Gemstone holders. When I saw
these "rubber, table-leg, protectors" in the local hardware store, I knew they'd make
the perfect gemstone holders. I (glued) some of them to my bench-top, so I can
separate stones by size, gluing them prevents any movement and spillage.
On the two square pads, I cut away the front-lip so
I can see the stones inside making it easier to see while sitting down.


I use any kind of machine oil with a "Light, Viscosity" for example; “3 in1" oil is the name that is often found in any hardware store, you can as well use regular 'motor oil'.

7. "Bench pin". I dig a recess in my bench pin for holding diamonds
during a setting project. Also, I keep my bench pin oiled. This dulls the wood so it's less likely to reflect fluorescent light into your eyes as you
work. It also looks much cleaner!

9. Hand-piece. I prefer my Micro-Motor, hand-piece this is true especially for Bezel
setting and subsequent “post-setting” cleaning, where maneuverability is a 100% must.
I can easily move the lightweight handle from vertical to horizontal positions during setting. As they are made in plastic, the handle weighs only 7 ounces.

10. Vulcanized rubber. I use a piece of rubber to clean diamonds after setting.

11. Pliers. To customize my pliers
for a claw/prong setting, I use a Corundum wheel to cut grooves inside the jaws. The claws/prongs
nestle in these hand-made grooves, preventing my pliers from slipping off during the setting process.


12. Oil stone. I keep my oil-stone close by my side for sharpening
gravers.
13. Magnet. I use a "horse-shoe" magnet to run it across the oil-stone. This interesting technique removes any metal particles that can get embedded into the stone during the graver re-sharpening process.
This cleaning is often done during the diamond setting process. I can do the re-sharpening of the graver, many times a day!

14. Polishing papers. I keep many wooden sticks of Emery & Polishing papers in my bench tray, each is labelled by it's grit number. On the #800 stick, I’ll rub an area with a soft leaded pencil.
The graphite pencil fills in the small granules in the paper and transforms that #800 paper into #1,000 paper for finer graver polishing. This is used primarily for Bright-Cutting.

Here is an example of what happens when the graphite is used in a #400 paper and then it's turned into a #600 paper. Now the manufactures are using #400, #600 and up to #1,200 paper. (Many years ago they used numbers as #4/0 and #6/0.) |
|||
 |
15. "Antique, Pump drill". FYI, this 'Pump-Drill' dates back to the Pre "Flex-Shaft" days. It was used in the 1930s and '40s to drill holes by using an "up & down" pumping action with the 'fly-wheel'.

16) Antiques: "Seed-Pearl, drills".
You might not be needing these anymore, but 2-3 decades ago these were the most sought-after burs at our benches. Not any more as designs have changed, pity!

In conclusion, I feel it is necessary to
explore different Diamond Setting bench layouts. I'm now going to show how my present Diamond Setting bench looks today in May 24. 2021.
I was teaching online with a New York city school "92Y", then the Covid-19 pandemic started shortly afterward.
You can see my laptop sitting on my bench, it's not usual for me to have such an array of equipment, such as a CCTV camera IN MY bench. This is too 'busy' for me, as there were 'too many distractions' for me to concentrate.
For jewellers who have a vast array of machinery, diamond-setters need only the bare essentials to create such wonderful setting patterns.

Hoping you all find my "bench accessories", helpful to you, as well as interesting!
If you need other topics to be discussed, in great detail, please email me directly at gerrylewy18@gmail.com