Saturday, 23 June 2018

Diamond Setting patterns! <=> Larger Stones

How many ways are there to set an Engagement ring Diamond?

“The opinions & techniques on Diamond Setting, are expressly those of this Blog-Author”. The listing of these setting patterns” are from my work-experience spanning ONLY 60 years!


Although there are many ways to set a Diamond, or Gemstone. With the assistance of the 'Computer Aided Design' program this dramatically helps the jeweller in designing an appropriate ring to match the new diamond.  
 During the past many years styles have evolved & changed, but the basic designs, still stay with ‘us’.

With each photograph; I’ll explain in detail where each stone is finally used with what size it can take. 

Suffice to say, these patterns are now to be kept in these blog-archives for posterity. Some of these patterns have gone by the wayside and not seen much these days.

“In writing about them; I ask "Not now, when else? And if not by me, who then will take their time in explaining these styles?"
Furthermore, I’m not doing this project for myself, I’m writing this blog for everyone and including YOU! So let’s now start!
-----------------------------------------------
 Let’s start with two ‘popular rings listed as (A-B)’ from the 1960-70’s. I learned to set these stones during my formative years in learning to set large stones.

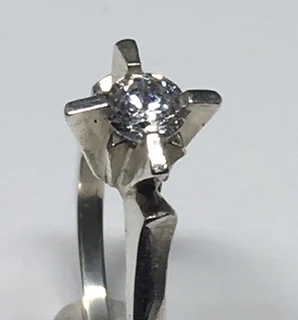
=> A) This Gent’s ring, 'out of style' had a novel way of holding the stone into the ring. No 'Setting of Stones in Wax' in those earlier days everything had to be set by hand. No errors, or mistakes were allowed, “We learned perfection” right from the beginning!


 The size of the stone was quite limiting, as it had to be of a size that still allowed the four corner bars, each to be saw-blade cut & and the little
amount of metal to be lightly pushed over the stone.
The stone size was usually from .15 ó to .40 point size.
  But thankfully, this pattern has been deleted and ‘put out to pasture’ =>The next out of style engagement ring was named
 “Flat-Topped Design”, the diamond range was in .18ó .38 point. I know these facts personally, as they were the cornerstone for sales of the company I once worked for. Because of the style of head, these rings were sold to the newly married couple who had a very limited budget!


---------------------------------------
A “6-Claw/Prong head” was so popular and still is, why so? It gives a great deal of security & as well lets the customer see much of the stone as possible! The stone range is about .50 pointsó 1.00 carat.


 ---------------------------------------
 One of the best and basic rings ever created was & still is the 4-claw head! There are no limitations as to what size of stone can go into this head. I’ve seen a stone in this ring design from basically a .30 point size & to over 1.50 carats. I prefer to have my CAD person have the stone prior to designing thus making ring perfectly fit the stone!

 ---------------------------------------
 One of the most popular styles in Fancy-Cut stones is the “Pear-Shape”! I’ve seen either a round claw, or a “VEE” shaped claw covering the point of the stone. Either method, the point of the stone is paramount in protection and security from breakage! In this design, I’d prefer “Double-claws”, as one claw is too fragile in the ‘security department’. The size of the diamond (measuring in mm’s) is dependent upon also the customer’s budget. I’ve seen .75 (3/4 carat) ó 2.00 carat sizes, but these would be then carefully CAD designed just for these “Fancy-Cut” stones.


--------------------------------------------
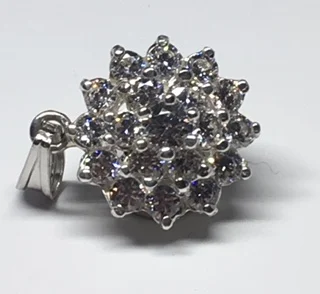
The most popular is the “Cluster-top”, now this can be such a wonderful showing of diamonds, why so?
When all of the diamonds when placed “side by side” the effect is great! It gives the customer more access to “Show & Bling” & for less money spent. This ring has 16, (3.0mm’s) stones of .08 points EACH and a .15+ point (4.5mm’s) center! I like this design as it gives height, as well as width. You will see the same ring style, but now seen as a pendant option.


----------------------------------------

Halo rings”, so darned great to look at … even though these shown  are only in silver and set with CZ’s. As all of these ‘essays rings’ are in silver and set with CZ’s. The diamond sizes used are 16, .015 points and a center size depending on the stone requested. 


This ring is CAD created WITH THE STONES on hand. No guessing, or ‘mix to match’!
The CAD creator needs all of the diamond measurements before his skill of computer-designing takes place!!!

The favourite choice of stones for these special rings are either in a Round shape, or using Cushion-cut stones. I personally prefer a stone with no sharp corners (Square or Princess-cut). If this stone is needed, there may be some problems while in setting.

-----------------------------------  
Square stone, or Princess Ring!” There are many designs where a square, or Princess-stone can be set. Some are shown here in this essay. I use two different styles in my teaching to my students, which is best is your choice. Again for that special order, I suggest to get your ring CAD created. Remembering, that all claws must eventually not be bent over to grab the stone. On this particular style of a ring, it is advisable to “Pre-Polish” lightly prior to setting.


--------------------------------------------------
“Tube-Set and Half-Bezel ring”. One thing to understand is that in any Tube-Setting, there is an amount of 10-15% of the metal covering the stone. Appraising is quite difficult and leads to much guess-work. If you select this style of ring, get the stone ‘Pre-Certed” prior to setting, or as it’s properly named “Pre-Appraised”.
 Remembering, that there could be an ‘inclusion’ just at where the girdle is now being covered!!


----------------------------------------
 “Triangular, shoulder-stones”. This particular shape of stone is very delicate to set. I’d ask you to be careful in working with these shapes of stones. In the empty mount, I was asked to set Triangular-shaped, Rose-Cut diamonds but have them upside down…what? Yup! The studio owner requested them to be “Culet” up & then the “Table facet” facing down!!! The nice part is that the corners were completely covered & protected. In the center, the owner wanted her “Rose-Cut” center-stone secured with not 6, but 8 claws! Too many claws and all are covering the multi-faceted stone!
(There was a further challenge; as her initial design made that I couldn’t set her shoulder stones. I had to re-design the end-bezels and give more space between the ‘head & the shoulder bezel-claws’ all of this with the help of my CAD designer.)

--------------------------------------------
  Another pattern is having two Triangular stones on the shoulders. I prefer to have the shoulder stones mounted, or set first. Then Laser-solder the head, why this convoluted process? I need full access to the mini-claws, filing of the claws, then getting the polishing process completed.
 The corners of these stone are so sharp, you can break them just by looking at them. Once the stones were set, I “Bright-Cut” the inside of the “Vee” shaped claws. Do the "Rouge polishing", post setting post.

  Setting this delicate stone is a 9 out of 10 on the “Difficulty Scale”.
 But I had to ‘archive my past experiences’ in creating this new ring, was this easy? NO! But I found that knowing the procedure in how to set a Princess ‘Vee’ shaped claw, greatly help me!


I didn’t want ‘big blobs of metal’ holding the little stone.
-------------------------------------------------
  “Marquise shaped stone”. I prefer to have two, round-shaped, end-claws giving security to the points of this fancy-cut stone. The claw tips must be made round & smooth to your touch. In this case, the center stone is set first, then the shoulder-stones are set afterwards! I’m even thinking of pre-polishing the Marquise-stone claws first.

 If I attempted to set the shoulder stones first, then the center stone next, many of these claws could get crooked. You might even lose a stone after a short while. It could get to be a quite a messy setting job! “Center first, then the shoulders, agree?”
---------------------------
When setting an Oval stone, I'd prefer to use round tipped claws, as these  are more aesthetically appealing.

In this essay, I prefer to show how the larger stones are set. In the next essay and accompanying this essay (part 2) are setting for smaller stones..for example; Gypsy/Flush, Shared Claws and a mini, 4-claw layout.

For private training in Diamond Setting, I offer in-house training programs from    3 to 5 days. Contact me at "gerrylewy18@gmail.com"


Wednesday, 20 June 2018

Full-Bezel Setting of a Marquise-shaped stone.


 Full-Bezel Setting of a “Marquise-shape” Stone!

  (I prefer to 'under-line or highlight' certain areas of this essay, why? This essay has very important setting notes! =>There are many setting techniques that you must now need to know.)

 I just never attempt to have one little technique get forgotten, nor would I ask you to do some research, in problem-solving the missing information. I have no intention to have you guess. My feeling is that I am guiding you, but not misleading you. (I edit my essays about 15-20 times before posting)
---------------------------------------------------------
 I’ve been asked on many occasions to explain just how a Marquise stone is prepared and then set into a Full-Bezel. Apparently, when I ‘located’ a stone of my liking, it had the correct width, but the length is 1.75mm’s short!

 We setters, just have to make do with what we have. In this case, I completed the setting process but with little bezel-gaps at either end.

The very first thing you should do is to observe the width of the girdle of the stone at its widest point. I always check the measurements by eye, I’m using a #007, round bur drilling deep INTO THE “VEE” ends! Just how deep into the wall of the “VEE” do I drill? Easy answer, deep enough that ¾ of the round bur is embedded into the center of the “VEE”…as shown!


 At no point do I want (or you) to have the point of the stone actually touching any part of the "VEE"-corner metal!

In this demo-exercise, this “Vee” drilling is still so necessary, but it’s good to know for the other setting projects. Under a powerful pair of Opti-Visor lens magnification @#7, start making a “beginning-cut” of a ‘rough looking bearing’. From this point, all carving must be at the same depth from the bezel-wall tip & all around the inside of the bezel frame.

  I use, as often as I can, select a HSS a.k.a. “High-Speed Steel” bur with a 90- degree pavilion to match the lower angles of the stone. I’d use this ‘aggressive cutting bur’ at the widest section of the stone. It is only here where the Pavilion with make contact to the Bezel-Wall.

Where ever you make your bearing-cut, remember it’s here that your stone will sit. The amount of concentration in this preparation of cutting angles using the round or HSS bur, is so-o important!

 Use your 10x power loupe at all times, “don’t think that if it looks good, it’ll look good to go!” But be aware of little pieces of untouched metal sitting and not wanted! I don't want, or desire any problems once the setting starts.

 There must be a certain depth of the bearing-cut, let’s suppose we actually cut & lower the bearing-cut to be at least ½ the distance from the Bezel-Tip, to the base of the Bezel-Wall. The top of the “Gemstone-Table” must be at the same height as the top of the bezel wall, when completed!! I’d try to leave when finished, at least 1.0 mm as a ‘safety barrier’ in case the bezel gets worn down from constant wear for many years to come! “Don’t think for ‘today & now’, but for the future use”.

 If the stone has different thicknesses on the girdle, plan to put that thickest section of the stone against the bezel-wall, ‘mark’ that area with a black, felt pen! You just might need a larger round bur for this section. Drill into the bezel-wall, but this time go deeper into the BEZEL”. Now with the HSS (High Speed Steel) bur, angle your cuts to make allowances to the Pavilion shape of the Marquise stone. With this ring we are dealing with so many angles of the girdle & thicknesses, lengths & widths. This ring can be a ‘real setting’ challenge!!

 There are going to be many times you might be needing numerous burs and all of them are of different sizes. Why so many? In the process of selecting burs, you might need one bur to match the different widths of the girdle. I might even have 2 sizes of HSS burs just to make sure the pavilion of the stone is sitting correctly in the bezel. I would not hesitate in using many round burs, as I want the stone to fit with no problems!

No stone is manufactured perfectly, there will be little subtle differences in the facet-shaping & cutting of any stone. We must be made aware of all these “weird shapes” given to us to attempt to set it .


Many times you should place the stone into the ring, just to make sure the stone-table is not sitting twisted & not crooked. If the stone is still ‘moving or rocking’, take the stone out and re-drill the ‘bearing & the pavilion-cut’! 

Your stone might be rocking & pivoting on a rough piece of metal still left behind somewhere in the bearing cut. I would use a slightly smaller HHS bur to cut just exactly where I want the bur to cut. A larger bur won't give me that opportunity, it's too wide & might damage other parts of the Bezel.


 When you start the hammering, it will squeeze the stone and “this is can be a total disaster waiting to happen!”


 I’d even use a larger round bur to make a girdle-cut, what size? Again, measure and place the bur of your choice, against the stone. Let that stone just sit and now after multiple times, examine each preparation step with your 10x power loupe!

To tighten the stone, I’m now showing you two methods to hammer the bezel-wall. I could use a “riveting hammer” or my favourite “reciprocating hammer”. The hitting surface should be filed at a “45degree angle away” from the stone girdle, why so? When you are hitting the wall-tip, you won’t hit the ‘table’ of the stone instead. You are now hitting & hammering at a constant 45degree angle.


 Start the initial stages of setting this stone at the widest part of the stone and carefully hammer towards the points of the stone. You will now be just ‘securing the stone’, until the stone is tight! Then you can use any method to hammer the metal ‘towards & down’ onto the “Star-Facets”. Once the stone is tight, then now you can hammer all around the bezel-wall. Again, at a 45-Degree angle. Use on your method of hammering, my way might be best, or your own method. Being comfortable is #1!!! 

 Where the ‘empty space’ is near the the "VEE" of the Marquise stone, I’d keep hammering, as if the stone-material is there! If you prefer to use the reciprocating hammer instead, please be careful on the “TENSION” screw as the hitting of the metal doesn’t squeeze the bearing-wall & stone!


 Keep checking to make sure the stone won’t get stuck at an awkward angle! If it is stuck, take the ring out of the clamp and reset…NOW!
  

 The stone is now IN, now what? It’s time now to use your Onglette graver #2, to start the “Bright-Cutting process”. You can see just how the metal is slowly being cleaned & shaved away from and what is remaining is a ‘mirror image’ all around the inside of the Bezel-Wall. “Bright-Cut” even where there are two little empty spaces due to the short, stone-length.

As you get near the point of the joining bezel walls, I'd use my Flat Graver #40, or my graver Glardon #10.


 As you get closer to the ends of the Bezel opening, I’d still Bright-Cut. As this makes the cut look like there is a stone close to the ends of the bezel. For the actual ends, of near the “Vee”, I’d use a Flat Graver to cut right to the point and as where the two side-cuts are joining each other.

 We’re nearly finished! At this juncture, I would use my many types of pumice wheels, from #180 & #1,000 Pink & Blue Pumice, “Tapered & Flat” faced wheels. All levels of intense ring-cleaning now starts to take place. I use an "Emery-Disk" Medium grit, to start the cleaning of any 'file marks' or ‘hammer hits’.
 Here are the Pink and Pumice wheels doing just what is necessary to make this ring a fantastic looking item!!!


 I don’t want any ‘rounded corners’ on the ring patterns, what is needed afterwards...is to carefully polish the ring.


 On a rating of 10 in my “Difficulty Scale”. This is a definite 6.5 plus!
 “gerrylewy18@gmail.com”