For ongoing maintenance, I use "Artists-Pencil" as shown, it has a soft-leaded core and this alone will easily make a soft polishing paper even that much more softer in the "grit".
This will make the Polishing Paper from an #600, to a #1,000 grit. I found a great tool-shop that has papers with grits of #2000, I did so yesterday as I bought 3 of them and adding them to my (useable) inventory! I had 6 paint stirrer sticks sitting in my office, I have 3 remaining...:>)
Those 3, ultra-soft, "Polishing Papers" are now ready to made even softer, or smoother with the pencil rubbings. With my Flat graver ready to be used. I'm just excited that I can't wait. I'm getting newer silver flat plates for experimenting on tomorrow, that's what makes my diamond setting writing, so much darned fun. I can then show you and the group how it works.
This will give me the upmost smoothness that is hard to find. As you can see I use the pencil rubbing on a select few.
The need and constant graver attention results in precise cutting.
Hence, all of my gravers must be ready for precision "Bright-Cutting" and must be always in prestine condition whenever possible. If not, I'll have to change my profession, "G-D Forbid"!
I'm using a razor blade to make the inside core of this 'Artistic Pencil' maintain it's wide pencil-core. This wide core is what 'we' need to keep a wide swath of Rubbing on the Polishing Papers.
This "Pencil Rubbing" is not required on any Emery (#180 - #240 - #400 Emery Paper. This is only on the "Polishing Papers" the "Emery Paper has a range from #180 (if it's found) #240 - #600 grit".
From #800 grit and up to #1,200 grit is the range on your "Polishing Papers". There are some #2,000 grit, at this writing, I found some sheets of this paper & I bought them at $3.00 a sheet.
The Pencil rubbing as shown here increases the smoothness of these Polishing-Papers. The pencil-core fills in the pores of the paper and increases the required grit. Many times, tool suppliers may not have the required grit, then YOU must create your own paper-grit as needed.
This is the information for any "Artistic Pencil", the date below signifies when I first bought it!
This is how and where the "pencil rubbing" is at work to give you the best possible metal lustre.
I make sure that my graver is not being used "off the pencil rubbed" areas. I need the smoothness on all of Pencil-Rubbing areas. Please observe this 'rubbed area' as shown below.
In this precision polishing, I keep my graver "always on the Rubbed Areas". Becasuse of this, I must always maintain a very wide swath on the polishing paper. Do you see how wide my rubbing area is?
The wide rubbing on my paper is made for just one purpose only and that is to give my 'rubbing' a better chance to get to my Graver.
I don't push or dig deep into the polishing paper I'll do this GENTLY! If I RUBBED TOO DEEP, I COULD EASILY RUIN THE PAPERS' SURFACE as this can easily happen.
In the following many photographs, I must let you know that these don't belong to anyone else, I HAVE NEVER COPIED OR PLAGUERIZED other peoples "library of photos",
These are my own writings and photographs:
If you want to copy my text or photo's, please feel free in doing so, there is no charge for this.
"Now lets get on with the show!"
I liked this 'square of engraving' inbetween the two stones. I have no reason to have any stones set first, if I did, there would be broken graver points or soft stones everywhere. This would be just a bad option.
EVERYONE, please remember, do all of your "Bright-Cutting & other sort of Engraving" long before your stones are set.
There is no possiblity that any of your soft Emeralds, Amethyst, or Rubies can or could get broken. This technique is phenominal in this easy process, this is named "Pre-Cutting", as it was taught to me from my teacher, 63 years ago! aka "Stanley A. Levine" (z"l).
This engraving was accomplished with an Onglette #0, #1, #2. This engraving put a 36 out of 10 on my Difficulty Scale. But where and why were these made?
The name is "Azure", as underneath EVERY single hole from where the stone was set, a little pattern was then created.
In my earlier days the "Model-Maker" actually made each pattern by hand, then to keep that pattern he'd make that model in to silver, he then made a rubber mold and then have it stored it in a combination-safe for security.
I'd even put a "50, on my Difficulty Scale", remembering that in those days there wasn't any CAD to work with, pity!
Another Azure pattern that appeared under each of the holes from where the diamond was set on top. But I did this myself as an example for you in using only my Onglette #1, & #3, (as #2 wasn't wide enough) for this demonstration.
I could use a "Square graver", but I didn't have one in my graver-inventory at this time!
In using my oil-stone, my graver is held at an (estimated) 45degree angle.
More "MAINTENANCE" steps for you!
When the gravers get worn down and needs to be reshaped, there are two methods!
Using your "Oilstone" for frequent and minor reshaping, or using your "Bench-Grinder".
A little safety story for you:
I was teaching a class and one of the (***) students decided to put his graver against the 'schools ring polishing machine' rotating at 30,000 RPM, not the regular Bench-Grinder @ 3,500 rpm.
The "danger factor" was that the sharp graver could have slid out of his hand and then got him impaled.
I stopped the class and told him if I see anyone doing this, I would "kick him out of the class, immediately!" I reported this "Mature Student(?)" to "Headmaster & Principle of the Jewellery Course". He saw nothing wrong in what he was doing. I immediately stopped his machine and told him to take the night off!
To continue of with the graver essay:
All of this cutting was prior to any stone being set. I can "Bright-Cut", any metal with no danger of breaking any soft stone. It just can't get broken, as it has no contact from the stone to setting proccesses.
Can you imagine the possibility of breaking a stone (of your choice) with so much metal around these Rubies? This "Pre-Cutting" is the answer to all of your setting problems.
This ornamental cutting is so-o decorative, now honestly look carefully and examine the little
"square pattern cuttings". (BTW, please excuse the breaking in the metal on the right side.) This was due to the thin layer of silver plate supplied from my caster.
Can you think that if a stone was set before the engraving started? It just wasn't possible to make a clean cut.
For my next essay, my 'layering of silver' will be much thicker! This cutting cannot be done if a stone was set (to repeat). This great looking cutting just couldn't get done if a stone was in the metal.
All of this cutting was done with a "flat piece of metal". Interesting to think that all of this was done with only three gravers, they are the Onglette #1, #2 & Flat graver #40.
Just imagine that all of this cutting was done on a flat plate! Even I, at times, I'm amazed with the results in these cuttings.
REPEATING this point: This "Azure" (as it's named) is actually created underneath the surface of the ring, this is where the stones were set on the top.
This "Pre-Cutting" then lead up to the "Bright-Cutting" processes. Again realizing that this
all started with a flat metal ring.
Here you can see the fine and thin graver. For my Pre-Cutting, I choose to use only a Graver #1 Onglette...nothing else!
The image of the cutting was reflected on both sides of the "line of cutting'. I had to be extremely carefull that there were no "faceting" on either side of the line of cutting.
This is the ultimate and serious case of precision metal cutting. The image is similar to a mirror! "This mirror image" was created by a Flat Graver with a thickness of 1.05 mm's, or with a #40 blade. Experience? So many years to achieve this high level of precision cutting.
The metal is only 1.50mm's in thickness, this is just too thin for any deep line of cutting.
But with the metal I had on hand, I could still set a soft stone, albeit with some difficulty. But I succeeded in the stone setting, but with some experience. This is a great photo showing the little cutting of Onglette #1 graver.
This is the finished setting of these soft stones, no one stone got broken if I cut the metal afterwards.
I had to make sure that all of my gravers were ready for my "Pre-Cutting"and then which gravers do I use in regards to the final "Bright-Cutting" processes.
"My gravers are the extensions of my fingers". For me, this is 'my enjoyment', there is no such thing as struggling to cut lines in the metal.
If you are "struggling to cut your lines", then the point of your graver could be broken.
Please examine your graver-point with your 10x power loupe, if you see that there is 'shiny' surface on the graver tip, then 100% of the time that the graver point is indeed broken. Too bad!
HOW DO YOU KNOW IF YOUR GRAVER (POINT) IS BROKEN? The answer is easy, your graver will be sliding along the surface and "not cutting" into the metal.
(I actually prepared on a good graver and after working on about a dozen gravers. I had to get just that one graver that looks like it was really broken).
I think on the '12th' simulated graver reshaping', I managed to get it to look like it was "nicely broken" just for this essay.
Now you can see that little shiny point, that's where the "graver only appears" to be broken!
For the initial cuts, cut little lines, then on the second series of cuts, join these lines together. It takes series of short cuts to get the one long cut that you need! This is my rule of line cutting!
What can you do? I have either to cut deeper, or fill it in with Solder, then recut. That is why I suggest to "you to cut lightly for the first few times. Than after a few little cuts your graver will find a steadier line of cutting,
"A steady hand will give you superior and better cutting results".
Patience, or the need to work slowly, wins over your need to rush yourself! (I'm speaking from experience on this.)
The end of the line-cutting (as seen in this photograph) has one major flaw, or problem; as you are cutting, at the end and the graver tends to "turn in" and it isn't continuing to cut a straight line.
This can be an almost normal occurance for any series of setting and with engraving.
The result is that the hand may not be strong enough to keep the graver to cut in a straight line. I have the graver to cut "little cuts or jabs" in the metal.
One lo-ong graver cut is not advisable, even I wouldn't do it, so why would you?
Please be careful with your graver point, don't let it cut into your finger tips! From my earlier years, I used to have some "battle scars"..:>(
All of this cutting was done prior to setting any stones.
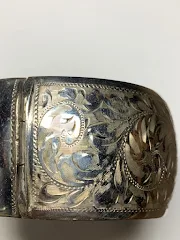
This cutting in the metal is one of the nicest versions. I still had room for a 'Milgrain' edge! This my version of a "Fish-Tail, Bright-Cutting" edge!
This is a 'close-up' of the pictures in my library of plates of silver. Let's call this my "Visual Resume", the proof is in my quality of metal cutting.
This is a nice angled cutting, as it's called, "Two Bead" setting!
This is an ultra-close-up of the 'Fish-Tail" pattern. All of this was from a flat plate of metal.
From just a few holes, I created a 'place for the stones to sit'.
Interesting place for the stones. "This Difficulty Scale of 10, is now 30!"
A very simple, clean cut for one stone to sit. Difficulty is of '30, out of 10'. There is no missing of the lines at the end of the 'pattern', (where the lines come together) this takes much practice!!!
I would polish the metal before the stone goes in, afterwards a very light Rouging will make this ring just shine like a mirror..:>)
Remember, that there is a fine line between quality gemstone setting and mediocre setting. Practice makes a happy diamond setter and then a client who will enjoy wearing this ring literally for decades.
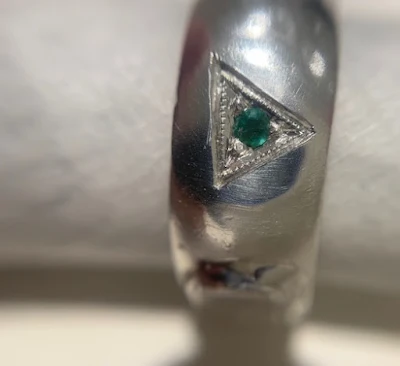
This ring with the Emerald was created in using only Onglettes #0 & #1, with a Flat Graver #40. Again it was I, who did this insanely careful Bright-Cutting setting this Genuine Emerald!!!
I 'burnished the (inside) decorative beads' before the stones are finally set. I like the "Milgrain" finishing, as this technique gives you a nice clean edging!
The "Square" or Pyramid-pattern with cutting makes this so intruiging to look at. Observe the cutting as it has been prepared only using your Flat graver.
You notice how the Beads are well defined and not ruined by any "inferior graver cutting".
You can also see the "Reflection" on the sides of the lines, as this is not any distortion in the graver cutting.
Only a Flat graver can give you this effect. Making sure that there is no "Faceting" along the sides of the line during the Bright-Cutting many cutting processes. I feel that there is a fine line between Exquisite Metal Cutting and being just getting the job done FAST!
The extra few minutes in graver cutting, is the difference between a "Piece of Wearable Art" and just a few diamonds put into a gold ring.
Patience & practice is so very important in Diamond Setting
THIS IS NOT AN EASY PROJECT TO DO IN YOUR CUTTING!The size of stones is about 1.25mm's. How could you think of anticipating to do any serious Bright-Cutting, if any "Pre-Cutting" wasn't done first,
This is a very difficult cutting process, as this is the ultimate in being able to do your Diamond Setting, par excellence!
You need the "Depth" of the cuts, the "Fine Graver Cutting" (on both sides of the lines) and the "enthusiasm" in wanting to get this Bright-Cutting done just right! I'm speaking from my own experience!
On the two sides of this demo-plate, is the "before & after" lines.
This is just a great opportunity in getting some claws created and a few stones actually set. The only problem was the thickness of the metal.
On the average any thinkness of any metal was be no thinner than 1.50mm's. If you have less than 1.50mm's you might be asking for problems.
This is basically how, or I should say, the processes in creating claws from basic setting stones in a silver plate.
This is the fundamental process in creating claws from a plate of silver with the help from an Onglette #1, or #2.
I'm taking little basic cuts one little cut at a time. Then I'm going over the whole process AGAIN with the same Onglette #1 and then the Onglette #2.
Then again joining the whole series of cuts into longer cuts, until the series are joined together.
I'm not just telling you this process, but this is what I'd be doing myself..even today, or tonight!
Right now this is the best series of photographs that I could find in my photographic inventory. All I said upon finding them was a quiet..."WOW, I found the exact pictures that I was looking for, well over 7-8 days! So here they all are.
All of my text plus and other pictures can be explained in these few remaining pictures..another quiet...WOW!
You the reader, are going to be learning a lot from this one, easy to read essay. I only wish that I had this blog way back 63 years ago!
These pictures are my answer to "Pre-Cutting"
I know this looks horrid and needing much improvement, but this is what the "Pre-Cutting" actually looks like. This is long before even the "basic of the basic" Pre-Cutting has started.
What I do is to make a series of very short, deep and more controlled cuts then this allows the graver, and I, to cut in a straighter line.
You can now have the graver cut further away from where the drilled holes are located.
If you wish more information on "Graver Cutting (or it's extremely important) Maintenance".
Please don't hestitate for a moment, email me and within a few short hours I'll get back to you. "The longer you wait for me wanting to help you, the longer you will have to wait in getting an answer"
"Your Speed in asking for help, is the answer in your learning."
"Gerrylewy18(at)gmail.com"