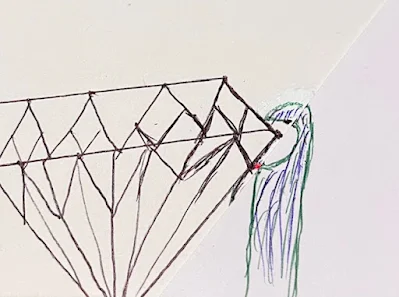
I'm very pleased to put together from my vast selection of photographs an essay just on "Channel Setting".
There are 70+ photos to explain this detailed gem-setting process. Each photo that I'm submitting, will have a detailed explanation for you to (hopefully) understand.
I will start first with the 'wax preparation' process, then to proceed & explore together the 'metal setting' techniques further on.
==========================================
I prefer to use a gemstone that is slightly larger that the width of the opening of the channel, why is this? I need some metal to be placed over the 'girdle' of EACH stone.
If you are using a bar of metal, it's advisable to give equal distance in between each stone. Initial drilling in wax is much easier at first, if you make a mistake (these will happen) it can be easily rectified by melting wax over the hole. After which, I'll just file those lumps smooth and start again...easy isn't it?
Plus, if the desired width is not to your liking, then you can apply another thinner bar of wax to make that alteration.
Supposing that your new 'wax ring' has the sufficient width, we can now start the wax-setting process.
First of all, make sure that the holes for the new stones is clean from any dirt, or residue.
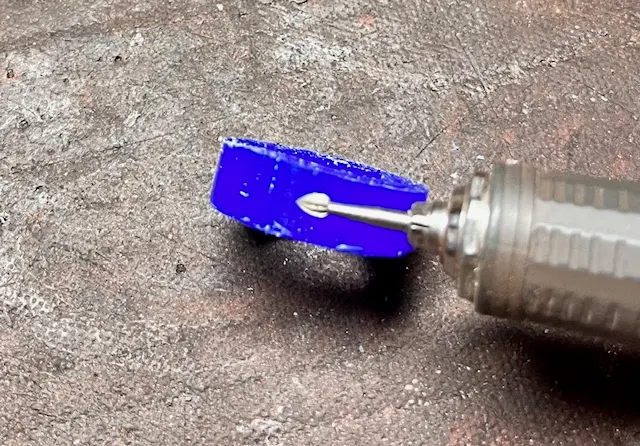
For additional security in case of handling the soft malleable wax, the heat of your fingers might distort the shape of the wax setting. I use a 'temporary' wax form to keep the shape from bending.
This particular wax design came with mini-claws, but this is of no consequence to this project. All of the holes were 'predrilled' and with 'equal spacing', this saved me much time in the preparation of pre-casting.
With this additional (blue colour) wax form, I can hold the much needed wax form in my fingers without any danger of getting it bent or ruined.
It's imperative to keep the 'stone setting' area clean from any dirt as seen in this photo. If your fingers are dirty from polishing metal, get them clean a.s.a.p. as that dirt will be transferred to the pristine looking wax.
When the stone setting has been completed, just remove the 'temporary' wax shape.
=====================================================
Here is the next step in preparation of wax-carving from a WAX-TUBE. I just selected a round and hollow wax-TUBE and started to saw cutting the width by using a sawblade of #3/0.
Once the wax-tube has been cut, there will be rough sides and these sides need to be filed smooth.
Select the width of the elongated hole by measuring the width of your stones. Allow 3/4's width of the stone, NEVER CUT AN OPENING THE SAME WIDTH AS THE STONE.
Using your adjustable dividers scribe a line in the wax as to use this for future cutting a trough in the wax.
WE ARE STARTING TO CUT AN OPENING FOR THE NEW CHANNEL.
I like an elongated bur to cut deeper. A 'round' bur will leave many errors in the wax carved opening.
If you wish you can use a wider bur to be used for Channel Setting.
BUT AS NOTED BEFORE, THE OPENING MUST NEVER EXCEED 3/4's THE WIDTH OF THE STONES.
These are a selection of "Medium" to extremely "Large", 'Bud-shaped' burs. Each size will be selected at the time of wax-cutting.
Here is an extreme sizes of burs, I never avoid buying burs that I feel that they won't be eventually used.
These burs might be used today, tomorrow, or even in 2 months time, but they are there!
To reiterate some wax-carving facts. When the center line has been decided, then proceed to make the line cutting deeper.
If you starting with a "round, hollow tube", make sure that the setting holes are in the center of the new pattern. If there is an error just fill in the wax-indentation a.s.a.p.
At each designated drilling spot use a "Twist Drill" or just a round bur and drill deeper into the wax form.
As the drilling of the holes that will be used for stone setting, measure again for equal spacing. This delicate 'spacing' is so important at this juncture of Channel Setting.
Cutting a channel in wax: There are many methods in creating an accurate channel, just as long as the channel is deep. In this photo, I used a 'Separating disk', then widened that groove with burs being shown before.
The (2) Channel Walls must be kept clean and straight, I prefer to use a #2 Triangular File to execute the trimming. The widths of Channel must be equal on either side. If not, attempt to reconfigure your filing again. I CANNOT OVER ESTIMATE THE IMPORTANCE OF THIS WAX-PROCESS.
Added notes on "WAX-CHANNEL SETTING":
These photos are showing ERRORS IN SETTING THESE GEMSTONES, why is this? No 'Channel Set' stones must not regularly have spaces in between any stones, only if the design warrants this to be made.
How do you put the stones into any wax? This is easy, warm the stones gradually with a "wax-heating pen" and let the stones flow into the wax by themselves.
This might sound weird, but the weight of the stone will allow that stone to find the correct & permanent place.
I put the wax tube either on a Metal (cool) steel mandrel or simply a graduated width of a graver handle just to keep the wax-ring 'ROUND'.
If your are setting any square stones, keep them as close together as possible. If there is a slight space in between, keep that space, why?
During casting there could be a 6% shrinkage transpiring. This 6% deviation will allow for this 'normal shrinkage' process between any wax-metal casting.
Here is the 'wax-pen' heating and just barely touching the stone. PLEASE BE CAREFUL AS TO NOT PUSH THE STONE INTO THE WAX, Just let the stone settle into the wax by itself.
You notice that I'm using a mixture of 'charcoal and wax' to hold the stone. I never use tweezers, as I could 100% loose that precious stone. I saw a YouTube video on this actually being done & the stone flew away and got lost.
When using this innovative 'charcoal mixture', remember that there is no residue whatso ever. Just place the mixture on the 'Crown Facets' to hold any size of stone, as shown.
================================================
Here are the many 35 (silver) metal techniques.
I chose to use to use semi-precious stones in this long essay, as I had no genuine stones at my disposal.
The channel walls are too short in height and not very good for holding any stones in place. Not to forget that 'filing and ring polishing' needs to explored and entertained as well. I will show how easy this process can be addressed. NOW!
In this same photo you can see different wax remains of 'mini-claws'.
Collection of stones for CHANNEL SETTING:
Out of my collection of semi-precious stones, I decided to use only 5 stones that are of the 'same depth, colour and width'. This so imperative in Channel Setting, there must be not one error in deciding which stone(s) to set.
The very first step in this process, is to use a bud shaped bur to make a 'resting seat' for the Pavilion of these 5 stones. We must never forget the the Culet of these stones be opened and cleared, as each stone must not be hindered by any metal.

How can 'we' make the wall of the Channel Setting be made higher? Let me show you NOW! I prefer to use a large Bud-Shaped and cut away as much of the metal as possible.
The lower the bur will cut, therefore the (2) walls will be created higher. Easy process?
I like to keep as many burs in my inventory as possible, If one bur is delinquent in it's cutting, then I'll use another shape to fulfill it's purpose.
I'm still not 100% satisfied with these results, therefore I will continue to excavate the metal deeper.
Here are two stones of equal width & colour, but not the depth. This will affect the shade of the stone, as this can be so very critical prior to the setting.
When you are needing to set stones in a channel setting, please avoid using the HSS (high speed steel) burs as these burs are too aggressive in the metal-cutting processes.
There are many options in securing the stones prior to the setting. I prefer to use an Onglette graver hook over the girdle of the 5 stones. This 'hooking' is primarily to hold the stone while having the downward hitting of the hammer does the tightening.
These 'hooks' will be covered by the hammered 'channel wall'.

"Gem-setting in a Channel Setting ring".
Once that the 5 stones have been selected to be set, we can proceed further. DO NOT HAMMER ON A SOFT LEATHER RING CLAMP. The reason is that the leather absorbs all of the powerful hammer-hitting being administered.
ALWAYS PRE-POLISH INSIDE THE CHANNEL RECESS. This cannot be done when the stones have been set.
My hand-held hammer weighing 27 grams has sufficient power to move the channel wall over the 5 stones, equally.
I always "Bright-Cut" the metal with a Flat graver of #40 width. This process polishes the hammered metal even prior to the ring polishing.
I will use my "Reciprocating Hammer" to move the metal down over the Girdles of the 5 stones. The hammered angle is at 45degrees all around the channel opening.
When you are using the electric hammer, don't 'smash' the metal flat. You need the metal to be kept thick for 'filing and polishing'.
I try to have a little space in between the stones, why is this required? When the stones are touching while being set, the vibration will cause a breakage at the "Girdle" facets. This can be seen in this photo just where the 'hitting' took place.
In this great photo, you can see why it's essential to "pre-polish" this ring. This ring looks dull and unappealing to the viewer.
I really prefer to move 80% of the metal over the edge of the stone. Thus leaving some metal for filing and then polishing.
I will now file with my Triangular file of #4 cut to carefully clean this ring top.
As I mentioned before in this essay, I "Bright-Cut" all around the inside edge of the Channel Setting. It will look so professional in its final appearance.
I will "Bright-Cut" even inside where the curvature of the opening is.
Always "Bright-Cut" the inside of the opening before any cleaning is to take place.
When everything in the setting has been successfully completed, then and only then will I very carefully polish the ring, starting with Tripoli and then the (beautiful) Rouge polishing.
"Isn't this a great looking ring"?
From a mediocre looking ring, there have been so many steps to follow, this has been just a mind-boggling setting process, agree?
Look how we've come in finishing this Channel Setting ring.
I purposely painted the sides of this ring that has Square-cut stones, as you can see that there are NO SPACES.
This style of setting seen in this essay has a "Difficulty Rating of 13, out of 10" and is not meant for the Beginner, nor an Intermediate level of a jeweller.
Any questions on this style of setting contact me directly: "gerrylewy18@gmail.com"


.jpg)


.JPG)


.jpg)
.jpg)
.jpg)
.jpg)
.jpg)
.jpg)
.jpg)
.jpg)
.jpg)
.jpg)
.jpg)
.jpg)
.jpg)


.jpg)


.jpg)
.jpg)


.jpg)


.jpg)

.jpg)


.JPG)

.jpg)


