This delightful pattern was a common metal cutting pattern used where I worked 42 years ago. Even in todays market, this design is still quite a common thing to see. If you wish to use it, so be it!
===============================
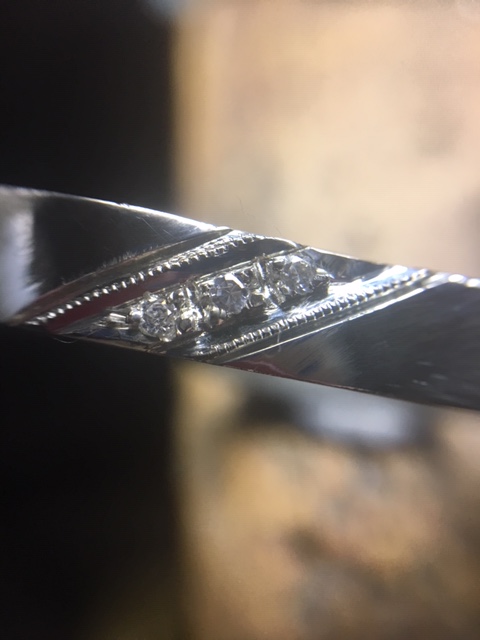
First of all, the three stones are used on an angle, why on an angle? To have the 3 stones straight across, you wouldn't have enough space to put them in, plus it looks ordinary and boring, agree? On 'an angle' looks so visually appealing.
Before you start to drill any holes, use a ink-marker and decide where each of the '3' beads should be placed, THIS IS SO VERY CRITICAL before the drilling. YOU MUST DECIDE IF YOU HAVE ENOUGH SPACE this 'inking' does this for you!
The twist-drill should be drilled through the metal and countersink these holes from underneath.
I don't need to describe every simple step for "Rough-Cutting" any engraved lines, suffice to say you should know this already from reading my previous tutorial-essays.
In this exercise, we will be creating ONLY 3 BEADS. These beads started out by engraving little squares, these "squares" will eventually be "Beads", when completed.
Again, using your ink-marker create another line (as shown) as this will be where the outside line will be engraved.
I use this ink-marker everywhere, as I am judging where the spacing of stones will end up. DON'T GUESS, BUT BE SURE WHERE EVERY STONE IS TO BE PLACED.
Locate your smallest round bur, suggesting a #002 or #003 and core out the metal in between one bead to the other. Do this again from one line to the other, this will end up as a little "O+O" pattern
If you need to cut wider along those initial lines, please do this NOW! I suggest using your Onglette #1 for a start. Then follow through with a deeper cut with the highly polished Onglette graver #2.
Point to remember; the "O+O" must be dug deep as to create beads that will able to be pushed over every stone.
The "end stone" will only have 3 beads, not the regular 4. I want to make every pattern pleasing to the wearer.
The little "O+O" pattern will be so very useful in creating your 'new' beads.
This new 'pattern' will be your new created (friend) for many years to come. It will make your life so much easier, trust me! If by any chance, you need to use a 3-stone design straight across, remember that the wedding band should be as wide as you can. If not, the whole setting design could look cramped and difficult to manage in Bright-Cutting.
This "3 stones across" was created on purpose, I had to show you the good and other finishes. "Jewellery is a visual profession", if this looks cramped, don't use it.
After your angled Bright-Cutting, I whole heartedly support in using your Milgrain Tool as to have a nice finish to your Bright-Cutting pattern.
Emphasize the inside cutting lines in using your Flat Graver. One more thing to remember, is to recut with your Round burs the inside grooves, why?
After much cutting the "O+O" pattern this might get spoiled or cut "out of shape", there is so much work being done with your gravers, in such a small area. Problems might generally occur.
These are my "BEST" Diamond Setting friends, I treat them as such, how? By having them in a highly polished state at all times. I prefer to create these patterns with the very front of the "modified" graver point.
In this exercise, how can you "Rough, or Bright Cut" with a graver that looks like a bulldozer slamming into metal? 👎😌 Hoping that you had some interested insights in how to make this Bright-Cutting design an interesting pattern. (along with some humorous facial diagrams).
All of this was taught to me almost 50 years ago, long before CAD came into existence.


No comments:
Post a Comment