This essay is only a review of past essays and setting notes. Its always great to review these on a basis that sometimes the brain forgets some of these important setting notes.
Some of these essays are 7 years old, but it's so often that to review them is almost like viewing them again new!
I will be covering (in greater detail) HIGH SPEED STEEL BURS, HOLDING A GRAVER, TUBE SETTING, MILGRAIN TOOL , BEZEL SETTING, VARIED DIAMOND SETTING TOOLS.
===============================
Here are two High Speed Steel (HSS) burs, on the left are 'teeth that are badly worn' but on the right are a refurbished and sharpened series of cutting teeth.


How can they get repaired? It's a very easy technique, Use your "Separating Disk" and grind the inside of the hollowed out tooth and the shape will return. I do this all the time, with very little labour.

Use your Onglette #2 graver that is Polished on only one side. With that modified side of the graver, cut around the Bezel wall slowly, holding the graver point at a 45degree angle. Now you have a clean looking finish.

This photo shows all of the required and important angles of a "Round, Brilliant-cut diamond".


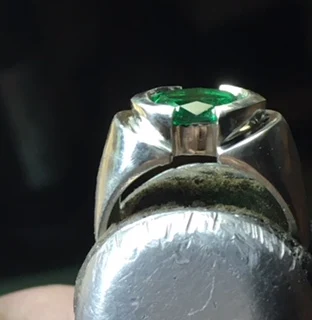
This ring I call is a "Flat-Topped Claw' setting. It has a file angle of approximately 25degrees from being horizontal. On the outside edge the claw tips are 'rounded off' aka smoothed for wear to avoid any sharp outside edges-corners.

This is how the graver handle should be held in the palm of your hand.

The graver point should be nestled in your palm and the point must not protrude any further than being shown.
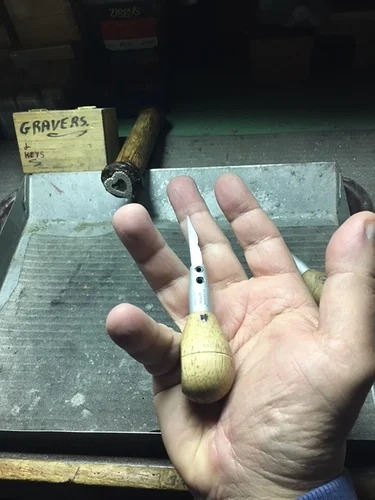


You can use any length of a graver, it makes no difference how long or short the graver is. The "extension" handle holds the graver securely.

I use a core of a "Drafting-Pencil" to rub the lead into the pores of the Polishing Paper. Then in turn, your graver will be shiny as a mirror.

I'm now showing you how the modified HSS bur will look after its been re-sharpened.


On a Gypsy-Flush ring, every setting opening MUST BE BRILLIANT CUT.
 These are my "156C" aka Carbide burs. These teeth are much closer together than any HSS bur.

I use these same burs, but only on very small claws, don't use your HSS burs. The wider spaced bur opening will not give you an accurate claw preparation.

This is my bench-type, hand-held motor. There is no heavy cable to tire out your hand, arm, or fingers. There is still a 'foot-pedal' to activate the 'on & off' action, but the speed is activated by the dial located on the front.

Here is my inventory of small round burs, they are ranging from #004 to #010+ mm's.

Here are my favourite burs, these are my "Buddy-Bur", aka Bud-Shaped bur.

Here is a finished and modified "High Speed Steel" bur.

Here is my small assortment of tools for setting gemstones in a heart-shaped creation. I keep the minimum amount of setting tools in front of my work area.


In this photo is the procedure in reshaping this just discussed "77B Cup" bur. BTW, don't speed up your rotation of the bur, plus always lubricate your cutting bur.

I use these "pair of adjustable-pliers" as an added method of securing some of my jewellery pieces. These can be bought in any hardware store.

Please observe the different shapes of the Pavillion of these three stones. The barrel-shaped stone of the LEFT will have a different shaped features in bur-shaping.


I paint the steel bur as I want to see where the "Separating Disk" is cutting.


Here are my "77B, Carbide" cup forming burs. The bur of the LEFT has been altered to give the bur a good chance of the teeth to get to the edge for a clean cutting action. The bur on the RIGHT, is how they are initially created, you can see just how wide the outside edge is. This is NOT CONDUSIVE FOR A CORRECT CLAW BUR SHAPING ACTION.

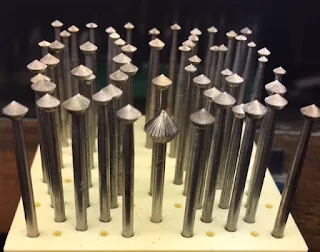
This pallet of burs are 156C (Carbide) contain ONLY THE WIDEST ASSORTMENT. I placed a HSS bur in front, just to show the difference of shapes.
The HSS bur is basically the same shape as a Diamond but not the 156C, can you see the shape difference?


The CENTER Green stone is nearly good for setting. The WHITE stone has the best qualities for stone setting, the Girdles are thin and there are no barrel shaped features as with the Green and Light-Green stones.
The WHITE stone angles are conducive to better stone-setting situations.


With the fine pointed graver tip, I can easily get my Graver to Bright-Cut towards the point of the Pear-Shaped setting. I always use a rubber, finger-pad to protect the skin of my thumb.


Here is my Graver with it's modified angle, I have no problems working with this fine-shaped angle. Why would anyone have a thick pointed graver? There is little chance to get the graver to get in between those fine setting areas.


Just another view in using the fine Graver point. I always aim the graver-point towards the corner of the "VEE". Following this, I'd use a Pumice #180 grit wheel on the outside of the "VEE" to maintain the "VEE" shape.

=====================================================
This is a full "review" of setting an Oval gemstone to be placed into a partial Bezel. You've seen this many times in this blog, but it's always good for a complete review.After coring out the Pavillion of the stone, it will make the stone be set without any hindrance.


The angles of the lower Bezel MUST be the same angle that of the stone.

If the stone is rocking or not sitting correctly, REDO THE CLEANING AGAIN.


Here you can see that the stone is sitting FLAT and not rocking in the Bezel.


Now you can see just "how and where" the ring is being placed and held during the securing process.


Place your stone now for the first test, if you are satisfied, then go to the next step.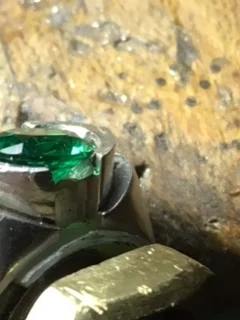

I suggest that the Round bur be 50% larger that the Girdle of the stone, this is only for making the bearing.


Examine the stone in relationship to all the areas around the Bezel. 


I suggest to have your Pillar file make the Bezel wall uniform in thickness. This must be filed at a 45degree angle, why? This is where your hammer will be hitting the Bezel frame.
This is the view of where the file will be placed against the Bezel wall.

I suggest to hammer on your ring mandrel, you need the underneath support from


After all of the hammering of the Bezel metal frame, this is what your Bezel should like. Don't hammer the 'guts' our the frame, but just gently "hammer, or push" the metal-frame over Bezel onto the stone.
I would as well keep the metal onto the stone with touching the stone. There must not be any spaces on the Bezel. Not any space should be seen between the stone and the tip-angle of the Bezel wall.

Your graver point must now remove the inside of the Bezel and make it shine.

This is exactly what you are aiming for, a nice smooth graver-cutting. One single cut with no "rippling" effect of the finish.


Here is my Milgrain tool, as you can see on the front edge, is the rotating-wheel that has the teeth.

Here the actual rotating wheel with its teeth, that will give you the row of "balls". (Try not to press down onto the metal cutting edge too heavy).

This "Tube Setting" stone should be examined at a point of having the surrounding Tube wall still to be being seen. Have the Tube held in the clamp holder very securely, either being held on a shellac stick.


Whatever you choose, the Tube "MUST NOT MOVE DURING ANY OF THIS PROCEDURE".

The round bur that will be used for making a bearing must and should be 50% larger than the Girdle of the stone.

This photo is just before I will start my Round bur and other bur-bearing cutting. I must make sure that this tube is holding tight in the clamp before I start my setting procedure.


Once that the "bearing-bur" is level, I can start making the groove for the stone to sit.

With the chosen bur, I'm now starting to make a bearing for the next step...the HSS bur. This bur is only acting as a guide and nothing else.

Once the bearing has been made, I'll attempt to lower the stone into the Tube. If there is a problem, examine the bearing further as the stone MUST EASILY BE LOWERED INTO THE TUBE.

I can apply my "Half-Round, Cut-off bur" into the Tube.


This bur will now allow me to set the stone with little difficulty.


Examine the hitting angle, it should be only at a 45degree angle.

The hammering makes a little "lip of metal" to appear. This has to be "gingerly" removed with the help of a Pillar File of #4 grit.


With your Onglette graver #2, Bright-Cut the inside of the Tube setting.


As you can see that my bur is held in a vertical position thus giving me a proper access to the inside of the Tube.


Here are the three burs that I will be using extensively.


My hammer will start the gentle tapping of the metal down onto the stone. DON'T HIT THE METAL TOO HARD onto the stone, we still need the thick bezel frame for wearing. Excessive heavy hitting will make the Bezel top too thin for natural wear.

Here is a photo showing the Reciprocating Hammer doing what its best known for, that is moving the metal down and on to the stone.


The Pillar file will smooth off that "lip" of metal, as it isn't needed.


Here is the collection of Bright-Cutting metal made for this spectacular photo.

This is the finished Tube Setting. The "Difficulty Scale out of 10" is a 12-15. Experience is a learning process and not taught in a book or seen in a video.

I'm using a very low temperature "Bernzomatic" hand-held flame to soften the Shellac to help me to remove this Tube Setting. I need to soften, but not to burn the Shellac.


==========================================
This gemstone technique will be shown in the following tutorial essay, named as "Siffari Jewellers #404". I am showing the "Milgrain Effect" design, this was not a Computer Designed process. As all of my Bright-Cutting was done by hand from my 65 years of experience.


No comments:
Post a Comment