In this very extensive tutorial-essay, I will be explaining in the greatest detail possible how to create "VEE" shaped corners for a Princess (Square) cut stone. The actual setting or tightening will not be discussed in this essay. Sorry!
The Difficulty Level is abut 35, out of 10, why? There could be multiple reasons to ruin this ring, or just the 4-claws.

First of all, polish the "Basket" in between the four claws, prior to any stone setting.
Do this NOW!
There are many errors in this ring-photo. "Let me count the ways".

1) First of all the stone is terribly crooked. 2) The claws are not filed equally. 3) Too much polishing ruined the sides of the claws. 4) Not too mention that the polishing made the claws too thin for long usage. 5) The top of the connecting basket was not FLAT Graver cleaned.

The Blue stone is sitting at a good angle, no problems here to write about.


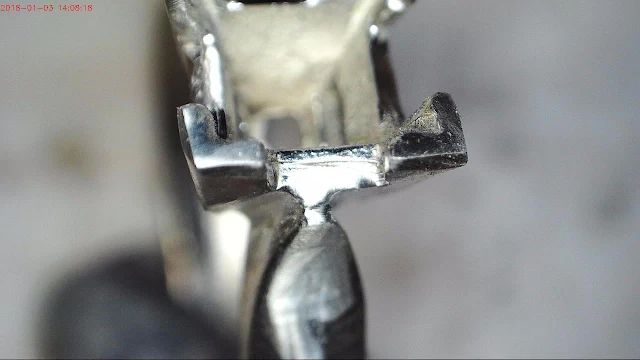
Have the Bud-shaped bur cut at a 45degree angle along the full width of the Basket, why here? This is just where the inner "Basket" section will rest against the Pavillion of the stone. The metal angle MUST CONFORM TO THE ANGLE OF THE STONE.

In this photo, you can see the 45degree angle of the Pavillion. This angle must match the same angle that is now being created inside of the Basket.


WOOPS! This stone is slightly crooked. how can you correct this, it's very easy. Just bring back two sides of the claws and rotate the stone, just enough to have it looking well positioned.

This stone is looking better in this ring. All that 'we' must do is to trim the four claws with a Triangular file #4 grit, as it MUST look like it has a "VEE" shaped design.
.jpg)
These claws have not been filed correctly. Those slanted sides of the claws need more care in fixing them, these can be corrected with using your Triangular file.


You can see where the corners have been cleared out!

Under careful scrutiny you can see where all of the lower claw corners and "Vee" areas have been Bud-Shaped cleaned.
I created a bearing for the 8-stone areas of the four claws this is where the corners of the stone will be resting against.
Each Princess stone corner has two sides to be concerned about. Now this is why this setting is so high on the Difficulty Level. of 35 out of 10.

.jpg)


Once that the 4 claws have been brought in towards the four corners. do it this way. DON'T BRING IN THE CLAWS, CORNER TO CORNER. Disaster could be looming for you, as in breakage.
The most secure claw position is to bring in the claws side to side, NOT DIAGONALLY, AGREE WITH THIS PATTERN?

Either they don't know how to use the Flat graver on this inside of the claws, or they just don't care.
I've seen this first hand, I just couldn't believe what I saw. DON'T YOU FORGET THIS RULE OF FINISHING.

Use a ball bur to grind out the 4-corners of the "VEE" shaped claws. You don't want to have rough metal leaning against the corners of the Princess stone that could be worth thousands of dollars.
Another point is that a bearing must be cored out on the four claws, there should be 8 Girdle 'bearings' for this one stone.
Therefore two bearing grooves just for one claw. One indentation for the corner and two side bearings. The size of the Round bur must be wider than the Girdle of the stone.
NOW YOU KNOW WHY I GAVE THIS PROJECT a very high "35, OUT 0F 10".


This is just how the finished "VEE" shaped claws should be looking. You can see that the Basket of the 4 claws are not near the Pavilion of the stone. The claws are uniform in overall thickness. I'm very pleased with the outcome of this ring.

Gerrylewy18 (at) gmail.com.
No comments:
Post a Comment