Wednesday, 4 September 2024

"Pumice Wheel cleaning", why use them? - 11 photos

   If you are avoiding using them, this is a great mistake.
I use them at every moment during the 'clean-up'. Instead of using a mini-file, these are the best methods for cleaning inside the ring and in between the claws.
 I prefer the sharp knife-edged #180 grit pumice wheel at every step in the cleaning.


  In this photo are the two Pumice Wheel shapes you can buy, the Flat edge and the Tapered edge as mentioned earlier.

 These Pink wheels are #1,000 grit, why? These wheels are soft and will polish the metal as it cleans. Thus avoiding using the cloth polishing wheels that will round the edges of the ring.

 If the Flat Edge gets worn from constant use, I quickly run the Pumice Wheel against any Separating Disk and it becomes sharp again.

 Many times the inside of any ring needs to be cleaned again. I just use a worn pumice wheel of #180 grit and it cleans the metal from any casting defects.

After the 'Flush Setting', it is imperative to polish the metal carefully by using the #1,000 grit Pumice Wheel. The results are just outstanding!

With the Tapered Pumice wheel of #180 grit, I use the pumice wheel to clean in between the many claws. Thus avoiding the use of a metal file that can leave a serrated finish.

 The side of any pumice wheel will give the claw setting a clean finish, no metal filing is required.

 Using a Flat Pumice wheel on the tip of each claw will give much smoothness to the sides of the claws.
 
 In finishing the Bezel Setting, please don't use any file, I ALWAYS 100% USE MY PUMICE WHEELS. I'm guaranteed 'near perfection' in the results. 

   When the opportunity arises that a cluster ring needs a clean finish, avoid any filing. Please use the Tapered edge Pumice wheel with a #180 grit wheel. The sharp pointed edge gets into the little areas that any file can't reach. 


Tuesday, 3 September 2024

Baguette Stone setting


"Square-On" 4-claw setting - Bench magazine


How to wrap your Polishing/Emery papers for daily use? - 12 photos

 This can be an "exercise in frustration" as not everyone feels confident with the fine skill involved. Honestly, this can be quite a challenge for the 'absolute beginner'. In the earlier days of my apprenticeship, this too was the very first thing I had to learn.


The very first stage in 'wrapping', I use my pointed AWL that will score, but not cut the paper. This awl will give the paper freedom to be wrapped at straight lines around the wooden stick. 

   The wooden board has another name, "Paint Stirrer Stick. It is a great new tool and without it I couldn't manage to polish my gravers, it has the necessary length and as well the width.

 My finger tips are holding the paper against the board very tightly. This is the first of many wrapping around the edges, this has a "Rating of 8 out of 10" on the Difficulty Scale. There are no SHORT CUTS in wrapping your polishing papers.


  At the first 'bend' the paper MUST BE WELL ALLIGNED against the edge of the wooden stick.
 What are we aiming for is that the next many wrappings have a sharp edge. There must not have any rounded edges, why not? The paper must always have a FLAT SURFACE, this paper must polish the graver.

 If the paper has a 'balloon appearance' on the polishing paper, then the graver won't get an opportunity to get polished on any flat surface.


  We can now officially wrap the paper around the edges of the wooden stick. At each 'turning', the paper must be 'scored' by the metal AWL.

 If during the tight wrapping you notice that your 'scoring' is cutting too deep into the paper, there will be problems. It is advisable to just stop what you are doing and discard that remaining paper. It's better to continue with what's remaining than to repair, it's only paper at $?? a sheet.


 Keep turning until the very end of the sheet of paper has been wrapped around the stick. Hold the Awl against the paper at all times, keep your fingers held against the paper TIGHT as its being turned.

 THERE ARE NO SHORT CUTS IN THIS WHOLE WRAPPING PROCESS. When the wrapping has been completed, there might be extra paper, no need to worry!!!


  When the "last wrapping" shows an extra line of paper, just get your scissors and cut off that extra piece of paper. I use a length of tape to hold the paper to the wooden stick.


  I use this tape to wrap around the ends of the paper to the wooden board. Avoid any elastic band as the rubber bands will get worn and break off.


   I want to have a 'tight tape finish' to the wrapping process. Just as its being shown here. All of the edges MUST BE WRAPPED VERY, VERY TIGHT. 
 

 For quick 'paper identification' while working at your bench, write the paper grit on all sides and ends of the wooded board.


   These will be your "new tools", as these papers will so useful in polishing your gravers.


Monday, 2 September 2024

My "Guinness World Record" piece of jewellery - 5 photos

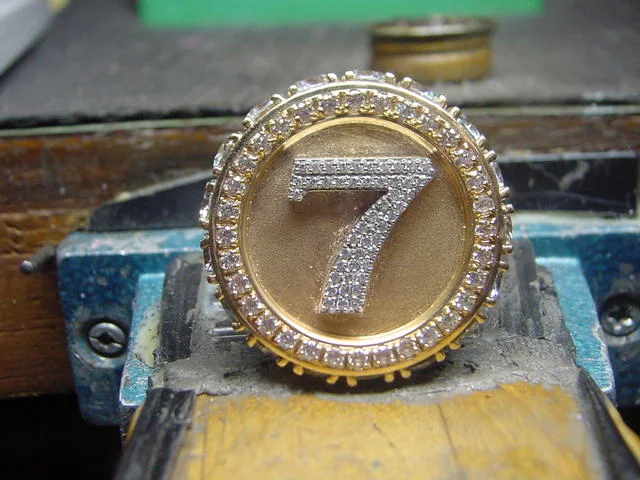
 This is my creation here are some details, it has 17, 1.15-carat diamonds. The number #8 is composed of 42, .015 point stones. The actual weight was 135 grams of 22karat gold with 5.13 carats of Pink diamonds. 
 When I was creating this "Piece of Art', I also put together more casino-related items. I will put them into another essay.


My BURS, all shapes & sizes - 5 photos

 When I had my office I was inundated with many patterns of Diamond Setting projects. Because of this I had to keep a vast assortment of expensive burs. I can't be wasting my time in running to my tool supplier, so I bought literally $1,000.00 in burs every few months.


 Here is my 'Twist drill' that I used often to drill holes. If I had a thin drill it would break in half, OUCH.


 This would be my smallest and safest (from breaking) drill for me to use. 


REVIEW: CAD created jewellery for Diamond Setting - 12 photos

 This item was presented to me with no holes drilled. It was my duty to select which stone went where. Many areas of the Dolphin's body were created in a near-vertical position.


 These two CAD renderings display the many details of where each diamond must be placed and finally set. 


  I placed this item on green branches in front of my home to give this item more colour

 This 'shared claw' pendant was challenging for me as there were only 2 mini-claws per stone. If one claw was broken, then it was up to my jeweller to repair it a.s.a.p. 

 These sections took me all week just to set these stones. There was much eyestrain on me while I was working on it. I used a "156C", 90-degree angle bur to drill for EACH stone. The whole pendant of assorted pieces was a long process.


 For the round disk shown below, I was given 9 of these to be made into a necklace/pendant.
 The inside of these rings is aptly named "AZURE", and were all created with CAD.


"Bench" magazine essay "Flush - Gypsy Setting"


  This tutorial essay was first published in the "BENCH" magazine by Bradney Simon. It is still very relevant to this day (2024). 


Sunday, 1 September 2024

What is "Bright-Cutting"? - 8 photos

After the 'Rough-Cutting" outline with your Onglette #1 graver. The next step is to recut this same pattern deeper still. The reason is that your Onglette graver #2 needs to start the "Bright-Cutting" process.


 These are my very own "G L" initials, as you can see for yourself how important the rough-cutting needs to be. All of the Bright Cutting is a skill that cannot be learned by reading one essay, it takes many years!!!
 These two photos are of the same Pre-Cutting technique. There are no 'tricks' involved, just techniques. I, as a Diamond Setter, have chosen this skill and am anxious to teach it to YOU.

 All of these 'metal carvings & cutting' must be done before any stone is set. I usually polish the metal even before any stone is put into the opening.  

I prefer to cut a 'square pattern' to enhance the actual stone. This makes the 'circle' look like more stones are being set. When the beads are over each stone, then the 'square' appears to be all alone, agree? 

   
 This two-bead setting pattern even has a name to it. I was told it is named "French Setting", whatever the correct name is, it still looks nice to see.
I add a little flair to this engraving, by running my 'Milgrain Wheel' along the outside edge.


 This one photo displays two versions of the cutting edge. On one side is just in a rough state and the other section is a completed "Bright-Cut" pattern.


Marquise Setting - (Bench magazine)

 This essay was published many decades ago, but the "BENCH" magazine publisher didn't insert any actual photos of rings into it, except for only a few basic diagrams.
 My writing is what "Bradney Simon" kept for this essay article.