Monday, 12 August 2024

(DETAILED REVIEW) "HOW TO MAKE A 'RIGHT-SIDED, ONGLETTE #2, graver"? - 25 photos

 This metal cutting tool is so very important that it can't be overlooked, or even ignored. This tutorial essay will explain it's preparation and subsequent graver polishing techniques. 

 (So very sorry, but these photos are not in any correct sequential order, as I took them from my many tutorial photo-archives.)

============================================

 This is my #800 grit Polishing Paper. These numbered papers are an official numbering system and can be bought through any tool supplier. The Polishing papers starts at #600, but the Emery paper starts at #240 and stops at #400 grit. Be careful in your buying!


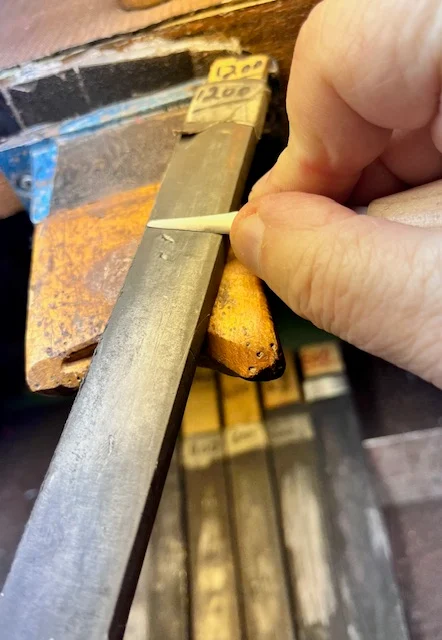
 Why am I using a soft core pencil on polishing papers? The soft lead gets imbedded into the pores of the paper and makes the paper 'grit softer'.
 This will transform any polishing paper 50% softer. The #1,000 shown here will be then a #1,500 grit. THIS WILL BE A GREAT $$$ MONETARY SAVING FOR YOU!

 All of my graver are using this 'adjustable' wooden handle. These are always used in my bench as I can keep my blades at the same length no matter the blade length. 

The graver on the 'right' is just an average blade that hasn't been modified or highly polished. Now compare the blade on the 'left' WOW, what a difference, eh? There is no comparison as you can almost see your face on the blade, agree?

 These are my "HSS" (High Speed Steel) #2 (width) gravers, #1 are too thin for Bright-Cutting purposes.
 The "HSS" name is used for the sole purpose of having the blade being made into a stronger steel. Thus not loosing their 'strength & durability' during the cutting processes.

 No matter which company manufactures your blades, it's the numbering system that is important for "Bright-Cutting".

 This (as explained before) is the first of many 'polishing papers' that is made. The numbers prior are the Emery paper, don't get confused with these important numbers.

 I use the #800 grit paper as the preliminary paper to remove all of  the 'rough' surfaces on the blade.

 This is the 'beginning' of the Emery paper processes, I mark ALL OF MY WOODEN STICKS for easier identification during the polishing processes. 

 EVERY WOODEN BOARD HAS ITS OWN SERIES OF NUMBERS. This why in my Diamond Setting, I won't pick up and use the wrong papers. Interesting method?


 In creating a "Right-Sided" polishing graver, I will 'highly polish' only one side!
 These are my 'trusted friends' these 'adjustable, wooden handles' are so important that all of my gravers are in them. 
 I put 'marks and signs' on each handle for permanent visual identification during my setting. BTW, always buy a 'two-screw' handle, as the two screws keep the blade TIGHT in the handle.
 If a handle has only one screw it will eventually get worn thus the handle becoming totally useless.


 For optimum 'higher polishing' for the 'Right Side', I usually stay with either the #600, #800 or #1,200 grit papers.

 On my two papers (shown from above) I always rub my soft-core pencil into the pores of the pores of the selected paper to increase the grit by a minimum of 50% .
 The 'inked identification' on the wooden boards is what makes the pencil so easy to buy in your "Home Depot" or drafting suppliers.

  Here is the basic #800 grit polishing paper, without pencil rubbing. In this photo is my Flat graver being started in the 'cleaning process'.

  This is the very same paper (#800 grit) but now with the soft-core 'pencil rubbing'.

 Already you can see some of the polishing line still visible, they all will be erased from the blade with these polishing papers.
 If the lines are still there go back to the Emery Paper and redo the initial cleaning, once again!

 My Flat graver of #40 (width) must also be highly polished on the #1,200 grit and then on the modified paper giving it (an increased) #1,600 grit.


 Even if the blade is getting badly worn from many months of continual use, it still can be used with the 'adjustable graver handle'.
 These little numbers that are engraved on the side of each blade are for a good reason.
 Here they are:
#39, or #4/0 Onglette gravers are the thinnest for 'rough cutting' or engraving purposes.
#0 (shown in the lower photo) is used primarily as a 'knife edge' for Pave' stone cleaning.
#1 is still for some special Bright-Cutting, but on specific areas.
#2 is my favourite and (chosen blade) why is this? The Onglette blade has a gentle curve and this curvature gives you, the setter, a reflective surface to the cutting areas.

 NO MATTER THE GRAVER LENGTH, EACH OF THESE GRAVERS ARE STILL USABLE. All of this is due to the 'adjustable graver handle' being used. $$ HOORAY!
 
 These are the main papers that I will use on a regular basis.

 If one board of papers get 'well used', all I will do is to unfold one side and start again with the 'pencil rubbing'. Thus giving me extra months of use.

  You can now see how the gravers look once the reshaping has taken place on Bench-Grinder. When the grinding has started, the chances of over-heating will lead to an immediate softening of the HSS steel, thus ruining any precision steel. YOU PAY FOR THIS ADDED STEEL FEATURE. 

Monday, 5 August 2024

ONLY 'END BEZELS' (Securing & Hammering) -19 photos.

 This is not an exercise but of a 'technique'. It is one of the most important features of setting square stones in 'end bezels'.
 The difficulty is "Rated at 15, out of 10 on my Difficulty Scale" as this is not for the 'beginner'.
----------------------------------------------------------------------------
What tools are required to set these Princess-Cut stones?
 I suggest using a "Reciprocating Hammer" with the hammering tension set to a "hitting speed" of SLOW. Being careful is an understatement!!!
 We have stones sitting against each other. I always say "Speed Kills"  and this is where doing the stone setting quickly, could severely damage or break the stones.

The stones must be prepared well in advance. Each stone has a square Pavilion that needs to be carefully 'bur-cut & opened' into the bezel.

Under close examination many areas need to be cleaned with a #002 - #003 Bud bur.


 As I don't want any of the two stones to slide out. My stone bearing will be carved out with two individual bearings.  Look carefully as the two seats or bearings, are not joined together. This will prevent any 'side movement' of the stones.

 With your "Reciprocating Hammer" GENTLY hammer the two stones into their respective spots in the setting.

 One of these two stones is slightly crooked and of the wrong shade of PINK. It's too late to fix or repair them.

 I put little 'mini-beads' over the main stone. If I didn't do this, I'd be having a difficult time in keeping the stone tight during the hammering process.

 Just for a different display, I inserted a long white stone, but using only one long bearing. At the end of the ring setting I inserted two stones.
 Was this a convoluted gem-setting process? YES, but anything can be done if the skill & techniques are there.


  Here is the #1 bearing cut prior to placing the center stone in the ring.
 
  Here is the #2 photo showing the additional Pavilion carving for the stone before setting.


 I created an 'unorthodox tightening' process by raising many mini-beads to prevent ANY MOVEMENT. Do what I did if you have any other way of securing your stones.
 You can be inventive and discover other methods of keeping your stone tight. The hammering process can be a challenge at the best of times.
 

 The stones should be tight against each other. This 'special tightening' can be a tough experience for the first time in this stone-setting project.
 When the hammering has been completed, then and only then, can you cut (remove) these mini-pieces of metal away with your Onglette graver.


With having stones of unequal widths can leave you with the stones overlapping. IF THIS BEING THE CASE, select a smaller size.
 No two stones (together) should be longer than the channel of the ring.

   The 'overlapping' is hardly noticeable, but it happened.

 The width of the bearing is governed solely by the width of the Girdle of the stone. Always be cognizant of this fact.

 On this simulated Princess (square) stone there could be 4 sides of the stone with 4 widths. Create your new seat that will occupy the 2 sides of nearly same width.

 The two white stones are as close as possible, without any breakage. As you can see there is no spacing at all. WOW!

 Long before any stones are being set, use your Tapered Pumice Wheel of #180 grit and remove any deep marks in the metal.
 When the many stones have been set, it's too late to use any cloth wheels or Pumice wheels. Precision cleaning of the ring is paramount in setting stones.

  This is one of the intricate stone settings, there can be many problems in the stone setting. JUST BE SO VERY CAREFUL.

Sunday, 4 August 2024

"Princess-Cut" stone setting with greater details - 12 photos

 This 'repeated essay' will be given to you to have a better understanding on "How to set a Princess-Cut stone in a 4-claw Engagement ring". I will explain every aspect and the many suggestions in completing this exercise.

 I never write "Do this or do that, but WHY you should do it without harming your stones".

============================================

 The first step is to have every claw at the same height, even if it has to be filed down with your emery disk.


At approximately 1/2 the distance from the tip of the claw, a round bur will make a hole. This is where the corner of the stone will be situated.
 
 The next step is to use a Bud-shaped bur of approximately #006  => #007 in size. This bur will cut at a 45 degree angle on the inside of the lower bezel. This is to remove any metal that the stone might be touching.
 
 
This is another closer photo of the bur starting to cut the bezel at 45 degree angle.


  From the claw hole there MUST BE ANOTHER SERIES OF CUTS. These cuts are for the edge of the Pavilion of the stone to rest against. 
 THERE IS SO MUCH CUTTING IN BEING DONE FOR THIS SQUARE STONE. Just so much mind-boggling action taking place, just be so careful.
 On both sides of the one hole, the must be TWO MORE SIDE CUTS, why? This is where the "Girdle-Facet" must against the claw.
 For each claw, all of the facets of the stone now have FOUR 'contact spots'. How many minutes of frustration are needed to prepare for this setting? MANY!

 The four claws need now to be extended outward to capture the large stone. This only a temporary step as we need to have a greater access to the stone in the claw-setting.


 FINALLY, the stone is being placed into the '4-claw basket'. PLEASE MAKE SURE THAT THE SQUARE STONE IS SITTING FLAT AND NOT TWISTED.

 Always be aware that the four Pavilion STONE FACETS are not touching the inside of the Bezel.


========================================
 When tightening the four claws NEVER, NEVER TIGHTEN THE TWO CLAWS 'CORNER TO THE OPPOSING CORNER'. There must never be any pressure put on the stone, or breakage will occur.
 To be safe, just tighten two side claws and repeat all around the 4-claw head.
========================================
 Let's continue on further, have your Emery (#220 grit) disk keep the claws at the same height.

 With your large 77B Cup-Bur start rounding the claws. The selected BUR MUST ALWAYS BE LARGER THAN THE TIP OF THE CLAW.

 
 Never, never hold the bur perpendicular to the stone, why not, you ask? 
Your bur will come in contact to the fragile stone (Emerald, Amethyst or a stone with less than 6 on the Mohs scale). Always hold the bur-teeth away so the 'rotating teeth' won't touch the stone.

 If you wish to use your Tapered Pumice wheel of #180 grit to do any claw-cleaning. Do this now as your cloth polishing-wheel will ruin all of your hard labours in rounding the sharp edges on your "Piece of Wearable Art".


               HOORAY, THE 'PRINCESS STONE' IS NOW SET & COMPLETED! 
      This stone setting is about 9 out of 10, on the Difficulty Scale.