This metal cutting tool is so very important that it can't be overlooked, or even ignored. This tutorial essay will explain it's preparation and subsequent graver polishing techniques.
(So very sorry, but these photos are not in any correct sequential order, as I took them from my many tutorial photo-archives.)
============================================
This is my #800 grit Polishing Paper. These numbered papers are an official numbering system and can be bought through any tool supplier. The Polishing papers starts at #600, but the Emery paper starts at #240 and stops at #400 grit. Be careful in your buying!
.jpg)
This will transform any polishing paper 50% softer. The #1,000 shown here will be then a #1,500 grit. THIS WILL BE A GREAT $$$ MONETARY SAVING FOR YOU!
.jpg)
All of my graver are using this 'adjustable' wooden handle. These are always used in my bench as I can keep my blades at the same length no matter the blade length.
.jpg)
The graver on the 'right' is just an average blade that hasn't been modified or highly polished. Now compare the blade on the 'left' WOW, what a difference, eh? There is no comparison as you can almost see your face on the blade, agree?
.jpg)
These are my "HSS" (High Speed Steel) #2 (width) gravers, #1 are too thin for Bright-Cutting purposes.
.jpg)
.jpg)
.jpg)
The "HSS" name is used for the sole purpose of having the blade being made into a stronger steel. Thus not loosing their 'strength & durability' during the cutting processes.
.jpg)
No matter which company manufactures your blades, it's the numbering system that is important for "Bright-Cutting".
.jpg)
This (as explained before) is the first of many 'polishing papers' that is made. The numbers prior are the Emery paper, don't get confused with these important numbers.
.jpg)
I use the #800 grit paper as the preliminary paper to remove all of the 'rough' surfaces on the blade.
.jpg)
.jpg)
EVERY WOODEN BOARD HAS ITS OWN SERIES OF NUMBERS. This why in my Diamond Setting, I won't pick up and use the wrong papers. Interesting method?
.jpg)
In creating a "Right-Sided" polishing graver, I will 'highly polish' only one side!
These are my 'trusted friends' these 'adjustable, wooden handles' are so important that all of my gravers are in them.
.jpg)
.jpg)
.jpg)
.jpg)
This is the 'beginning' of the Emery paper processes, I mark ALL OF MY WOODEN STICKS for easier identification during the polishing processes.
.jpg)
EVERY WOODEN BOARD HAS ITS OWN SERIES OF NUMBERS. This why in my Diamond Setting, I won't pick up and use the wrong papers. Interesting method?
.jpg)

I put 'marks and signs' on each handle for permanent visual identification during my setting. BTW, always buy a 'two-screw' handle, as the two screws keep the blade TIGHT in the handle.
If a handle has only one screw it will eventually get worn thus the handle becoming totally useless.
.jpg)
.jpg)
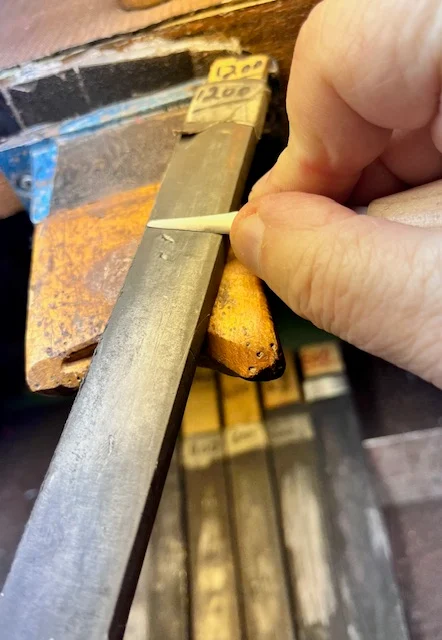
For optimum 'higher polishing' for the 'Right Side', I usually stay with either the #600, #800 or #1,200 grit papers.
.jpg)
On my two papers (shown from above) I always rub my soft-core pencil into the pores of the pores of the selected paper to increase the grit by a minimum of 50% .
.jpg)
.jpg)
.jpg)
The 'inked identification' on the wooden boards is what makes the pencil so easy to buy in your "Home Depot" or drafting suppliers.
.jpg)
Here is the basic #800 grit polishing paper, without pencil rubbing. In this photo is my Flat graver being started in the 'cleaning process'.
.jpg)
This is the very same paper (#800 grit) but now with the soft-core 'pencil rubbing'.
.jpg)
Already you can see some of the polishing line still visible, they all will be erased from the blade with these polishing papers.
.jpg)
.jpg)
.jpg)
If the lines are still there go back to the Emery Paper and redo the initial cleaning, once again!
.jpg)
My Flat graver of #40 (width) must also be highly polished on the #1,200 grit and then on the modified paper giving it (an increased) #1,600 grit.
.jpg)
.jpg)
Even if the blade is getting badly worn from many months of continual use, it still can be used with the 'adjustable graver handle'.
.jpg)
.jpg)
.jpg)
These little numbers that are engraved on the side of each blade are for a good reason.
Here they are:
#39, or #4/0 Onglette gravers are the thinnest for 'rough cutting' or engraving purposes.
#0 (shown in the lower photo) is used primarily as a 'knife edge' for Pave' stone cleaning.
#1 is still for some special Bright-Cutting, but on specific areas.
#2 is my favourite and (chosen blade) why is this? The Onglette blade has a gentle curve and this curvature gives you, the setter, a reflective surface to the cutting areas.
.jpg)
NO MATTER THE GRAVER LENGTH, EACH OF THESE GRAVERS ARE STILL USABLE. All of this is due to the 'adjustable graver handle' being used. $$ HOORAY!
.jpg)
.jpg)
.jpg)
These are the main papers that I will use on a regular basis.
.jpg)
If one board of papers get 'well used', all I will do is to unfold one side and start again with the 'pencil rubbing'. Thus giving me extra months of use.
.jpg)
You can now see how the gravers look once the reshaping has taken place on Bench-Grinder. When the grinding has started, the chances of over-heating will lead to an immediate softening of the HSS steel, thus ruining any precision steel. YOU PAY FOR THIS ADDED STEEL FEATURE.
.jpg)
.jpg)
.jpg)
.jpg)
No comments:
Post a Comment