Sunday, 16 June 2024

AMAZING DIAMOND INFORMATION: => 25 photos


  Here are some amazing information displays of Diamonds. I found these notes and think this email is pertinent to your learning of a diamond.
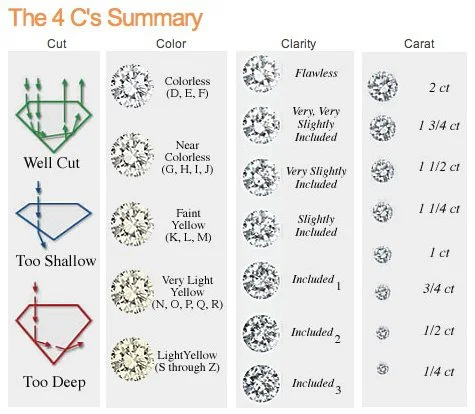
Everyone knows what the famous 4C's are, they are here in the greatest detail.
"Cut, Colour, Clarity and Carat".
 These categories are not just in simple words, all through this essay are colourful pieces of information.



  Here are $1.3 million dollars of diamonds.
 
   Here are two shapes of stones "Round & Princess-Cut", also known as "Square".
 
 This photo displays what a Diamond Polisher is doing. This skilled craftsperson is holding a diamond crystal in a "Dobb" and allowing a revolving steel wheel that has literally diamond-dust grinding facets to the diamond crystal. 
 The lubricant that is on the surface of the wheel has minute particles of diamonds that have been polished off and this dust and only this dust will cut and shape the diamond. 
 No other granules known will help the craftsperson to do this kind of 'shaping'.


  From a diamond crystal as shown, two diamonds will come from this one stone. The 'planning stages' of finding where the grain of the stone lays, is an integral part of being a Diamond Polisher.

  Hidden inside every 'diamond crystal' are two diamonds as shown here. It is the task of the Diamond Polisher to expose these two stones to be seen in all of its glory.
 From a crystal initially weighing 11.121 carats, these two stones now weigh 5.372 carats in total weight.

  The Diamond Polisher must now look into every crystal to determine where the best angle will be to 'cut & saw' the stone. The main concern is to locate where the "grain" is located, if not located accurately, any pressure will break or shatter the diamond in half. Thus leaving the crystal into literally diamond 'dust and shavings'.

  The proper name for this crystal is a "Boart". This is what every diamond looks like when it's removed from the ground.

From every crystal, two newer diamonds can be created (as shown). 


 These 5 diagrams explain in detail how the progression of Sawing and Faceting a gemstone occurs. The correct name for "Rounded" is "Girdling". It is when the Polisher actually starts the detailed 'shaping' process.
  The name "Lopped" is the start of the "Faceting process" into an 8-sided & faceted stone. The name "Finished" is when all of the 57 facets are then created into a fully designed diamond.


  These are the ideas on how to decide how to select and choose a new diamond.

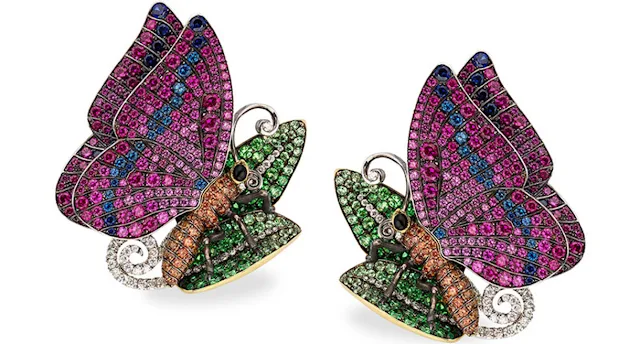
 This is a genuine set of diamond butterflies using the Pave' method of stone setting.
 Here the full-colour range of diamonds starts from "White" to "Intense Pink".


  After all of your stone selection has been completed, these diamonds can be made into fine-quality jewellery.


   The "4 C's" are explained here in the greatest detail. The 'COLOUR' is being shown in great looking multi-colours. 
 Here are the 10 shapes of Diamonds. The "Round" shape is the most common in today's market.
 This is one of the most important essays that I've come across lately. I felt that it needs to be explored in full and shared with  YOU.
 As I'm Canadian, the spelling of 'Colour" has not been misspelt all through this essay.


Saturday, 15 June 2024

Bead Burnishing and Bright-Cutting on metal => 16 photos

 These two topics are so important, that they must be reviewed often, do you agree???

Just what does a Bead-Burnisher do while burnishing a Bead? The answer is quite simple. It 'rounds' off the tip of a sharpened point of a newly created Bead. The Burnisher has an inside dish that covers that one bead. When pressed down and rotating it will create a 'little ball' that will cover the "Girdle" of the stone. 


 I use all of the Onglette gravers to "Bright-Cut" in the metal. There is no other way to create this design & pattern.


  I use only Onglette gravers #1 & #2 to initialize any 'abstract' graver cutting. Then following, with a highly polished graver to further any "Bright-Cutting". I personally try to avoid any cutting with Flat graver.

 When I 'Pre-Set' the stones, this will give more strength to the beads and give the 'stone setting' a more polished finish.


 Even after all of the stones have been set. The applied "Bead-Burnishing" process gives more lustre to the overall appearance.

 This initial photo is the epitome of being made fantastic for the wearer to view. 


 There must be a separation of the Hand-Created beads. If not, the two beads will not look complete. The only method is using a Graver of #1 width to separate the metal beads.

 Please note that EVERY BEAD must be burnished thoroughly before setting that stone. If you burnish a stone after stone setting, the chances of stone breakage will escalate.
 
  To repeat the photo that I used at the beginning of this essay. Please burnish the bead GENTLY on the softer stones. These stones are Emeralds, Cubic Zirconia, Amethyst and other stones that are below Mohs Scale of 6. 

 The side of these Bead-burnishers can be removed on your oilstone. The chances of having the 'curved edge' break or damage that softer stone are extremely easy. 
 
 Here is how you can save your stones by removing a section of the outside edge of the beading tool.

How to measure the size of your diamond. (Circa 1940's) = 8 photos

 Accuracy in measuring the sizes of diamonds (circa 1940, or earlier) was just a 'guessing game'. Imagine having a diamond that weighed with this (rudimentary scale) an estimated 1.00 carat. In all actuality it weighed (maybe) 0.95 points, many times even less.
==========================================
This is the 'diamond scale' that mostly all of jewellers used to weigh their gemstones.


 These 4 brass plates were the epitome of (limited) accuracy in weighing diamonds. 
 The accuracy was measured in at about 60-70% and was used only as a guide in guess-estimating selling costs.

I placed a Cubic Zirconia beside the 0.01 point 'opening'. Even on this scale, the stone appeared to be smaller. Let's keep checking on the other stone sizes.

  This '0.02point' size seems near to the exact size, agree?

 The 0.10 size starts to give 'us' some size problems. Remembering that 'size accuracy' was not the normal thing 85 years ago!


   For the 1/4 carat (0.25) size stone was far from being accurate and the difference was genuinely so very costly.

 For example, measuring a 1.75 carat ran into many problems. 
These problems were: the overall size, the faceting of the stone, plus the rough shape of the Girdle. A "Mein-Cut" stone usually had many imperfections in its construction, hence it's roughly hewn shapes.

 I'm using the testing of this CZ, as NEARLY ACCURATE against the guide being shown with this "BRASS PLATE, DIAMOND SIZE GUIDE"

                              ---------------------------------------------------------------------------------
  Accuracy of measuring diamonds wasn't on the forefront as it is today. There was just too much 'guess work' being used. The only measuring device in those days was relying upon this "hand-held, weighing scale".
 This diamond scale was used by my Father, circa 1940's. I use it today only as a display to what jewellers used in those days.
My Dad (z"l) was a diamond dealer in 'Industrial Diamonds' in London, England 85 years ago.

 I hope that you enjoyed this trip along 'memory lane' as I put much of an effort in keeping these 'memories alive' and not being forgotten.

Wednesday, 12 June 2024

CAD designing, from 'start to finish' - 17 individual photos.


    "C.A.D." is an abbreviation for "Computer Aided Designing".

 If you go to the computer website "Gem Reporter" you will see how this CAD program helps the jeweller, model-maker and the CAD computer operator.
 This program will give you information of the number of diamonds needed, dimensions of each stone and the total carat weights. "Is this a WOW program"?
 In the lower screen it will explain the Karat gold required with Gram or Dwt's. There is nothing remaining in deciding facts in manufacturing a diamond ring. Where was this remarkable program many, many decades ago?

 This "CAD" program will also advise the 'model-maker' and caster where the 'casting gates' should be located. All that remains is to cast the metal of  choice.
 All the operator must do is to insert the gems needed and this program will make the best available pattern in creating that ring.
Here is the simulated ring as it could be seen if it was a completed & finished ring.
 This is my design, it is named "Waterfall" as it looks like water falling down the edge of the top of the ring.


  I visually enhanced the perimeter border by "Bright-Cutting" with my engraving tools, namely the Flat and Onglette gravers.


  This pendant was created solely by CAD. There wasn't any need to sit and create "Beads and Bezels" by hand. What a tedious and days long chore that must have been?
 It made the job even for the stone-setter a delightful task, I know this for a fact when I was setting the stones.


   This 'CAD' program illustrates where the Beads & Bezels will be then situated.

 From a little CAD drawing on the computer screen, the operator can decide along with the client where the beads would be located. 
 Be forewarned, that the 'CAD operator' must have a working knowledge of Diamond Setting and jewellery manufacturing. There are many horror stories in my library of those people who didn't have such a jewellery background and how they blamed the setter for their own lack of training.

 Here is the finished pendant being made ready to be worn for many years and admired.


 This was one of the most complex projects that I have ever had. The time spent in setting these stones was not the issue, it was the complexity of getting the stones set.


 Here is a close-up of all of the stone-setting. As you can see there were vertical as well as many 45-degree angles that were on the side of the 'face'. 

 Imagine making sure that all of the stones were level and every stone was securely tightened. WOW! My eyes were tired after all of this intricate stone setting. Only 2 mini-claws were holding EACH stone.

  The time spent in the setting was a minor issue, but I was thinking who would enjoy these photos? I DID!

Tuesday, 11 June 2024

PROBLEMS in resetting 2 Marquise Emeralds => 12 photos

 A client asked me to reset 2 Marquise-shaped Emeralds. Under closer examination I saw that 3 more stones were loose, we both decided not to touch those loose stones, why?

 If any of those claws broke, the chances of repairing the claws on the 18Karat gold would be a total disaster. Even with Laser-soldering technology, the repairing would be extremely difficult and expensive task for my 'off-site' jeweller.

 As this necklace was hand-made about 30+ years ago and more claws breaking would be an ongoing problem. Of course, the chances of more lost stones was also discussed.


  You can see that many of the 'connecting jump-rings' were not soldered, why? I have just no idea.


 He suggested that I reset the 2 stones and he would tell his customer that no other work should done to tighten the remaining stones. The decision was equally shared between us both.


 Here is one of the 'spare' stones in case one got broken.


   Here is a close-up of that 'spare-stone' as you can see that not one of the connecting 'jump-rings' was even soldered.

 Here is the overall view of this 'disaster waiting to happen'.


 Upon closer scrutiny, all of the stones were not 'professionally' set. We both decided to leave the balance of the stones untouched.
 I showed my client that many of the claws were not properly secured to any of the stones.

 On looking at the under-bezel of each stone, there were an 'uneven creating' of the numerous stone baskets.

 Now you can see up-close why a few of the stones came out. The claws were not filed to hold any stone securely.
 It was a maelstrom of problems and we were sure that other stones would fall out and eventually get lost. 
 BTW, the 2-claw basket was supposed to be 'oval' to match the Pavilion of the stone.

  Very few of the stones had any uniformity in having 'rounded claws'. It was just a 'collection of poor workmanship', pity! Many of the stones were Oval or Marquise.

  In tightening just one claw. I was very concerned & apprehensive if one claw would break. I just moved one "outside claw" closer to the freshly set stone and left the "inside claw" untouched.
 All of this planning was done as my client was sitting behind my chair and talking on his cell-phone. He began to make my concentration very poor.
 I nicely asked him to refrain in his talking about his mundane travel plans to a European health-spa.

    I charged him for my time and expertise, he cordially accepted my fee.