Monday, 20 February 2023

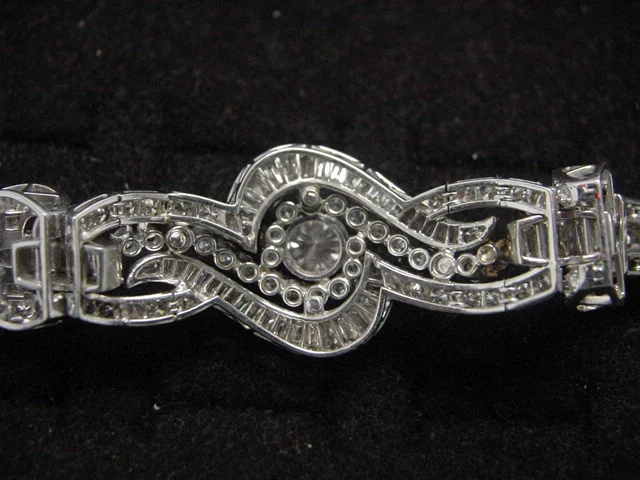
Antique & hand-made, Diamond Brooches, circa 1920's (?)

 I've saved many views of these brooches before 'some' were dismantled and the metal was eventually recycled, just to save the diamonds.

 My clients asked to do the most heartbreaking task of doing this while I had my downtown Toronto office. Suffice it to say, I took photos of every conceivable angle before I did these 'unspeakable' chores. My camera was an integral 'gem-setting tool' as I always kept my camera inside my setting bench. 

  Although some of these brooches pre-date the last century, I took all of these photos, circa 2001<=>2003 A.D.


 The technology in those days was unbelievable and so refined. I think that these photos speak for the jeweller's hard work in the Diamond Setting "Bright-Cutting" process that ensued.

  I am truly at a loss for words at the fine quality that each claw had to be created 'one at a time'. Truly amazing, aren't they?


 You can barely see that under each diamond there is a graver twisted sliver of metal preventing any or each diamond from falling through each of the metal openings.

  The fine and intricate work in cutting out the 'undercarriage' of the baguette setting areas. I believe that this was not cast, but cut out by a saw blade.


  The constant use of a 'Milgrained edge' was not for any personal need. It was a 'fashion statement' of that long ago, bygone era.
 
  Look at the height of those claws, amazing? I have a solution to that question.


 Even as I'm examining each photo, I am attempting to understand how these brooches were eventually pieced together. 

 The separation of each diamond section was with a thick saw blade, maybe equivalent to our #2/0. I believe that every individual post or claw was soldered into place. The metal carving was prepared before these claws were created.

  The baguettes were equally set with the agility of a fine-quality Diamond Setter. The mini-claws on the "X" link were hand-crafted from a flat plate. I've done this myself and this is not easy to learn, trust me on this point.

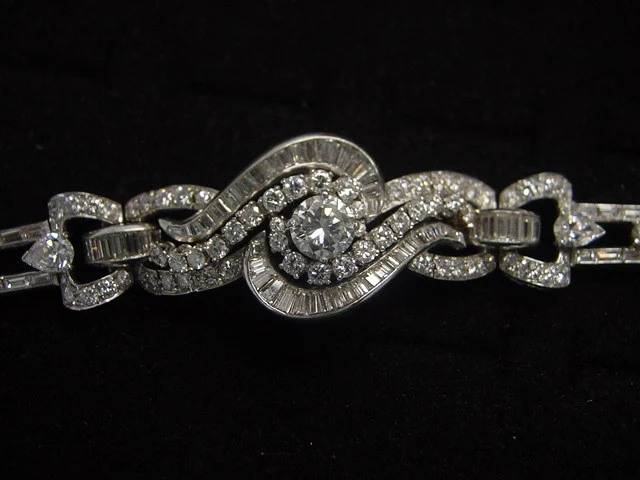
  For every baguette, there had to be 5-6 stones given to the setter to 'mix & match'. Remember that with a row of tapered stones there had to be many stones to 'have on hand'. I personally learned this process myself, about 65 years ago!
 
   Two beads held this large "Mein-Cut" stone into place. Once the stone was permanently set, extra wire beads were created opposite where the two beads are positioned. These are just barely visible.


 The 'claw settings' were attached after the fancy-cut Baguette stones were set. Metal polishing was imperative before any soldering took place.   


 These beads were hand-made using a specially designed graver named a "Bull Stick". I still have the one that my teacher gave me.


 I made this brooch just to look like a butterfly with "Princess-Cut" diamonds. The oval pearl was found in South America and he brought it home.
 I had the opportunity in working with the pearl owner himself before he died 7 months after this was completed.


 The pattern was created in many flat plates of gold. All the setter had to use was his variety of gravers, nothing else.
 Each section was set with diamonds and then soldered together to make a bracelet.


  All of these diamonds were "Mein-Cut" stones, that is these were all hand-polished and not by any computer-driven polishing wheel as of today.


 This sliding bar allowed a sharp pin to be exposed, thus giving the wearer a secure method of locking the brooch into her cloth.
 The little 'graver made hooks' underneath each diamond can be seen. I firmly believe that the metal was made too thin and another process of preventing any diamond from getting lost.
 Each segment that you see at the bottom of the screen, was originally a flat plate. The jeweller just drilled a hole and then used his saw-blade to create these segments.

 I'm hoping that you can fully understand and appreciate the many long hours in creating these beautiful brooches. This was a study of a long-gone technology.
Gerrylewy18(at)gmail.com

Saturday, 18 February 2023

Updates on 'Polishing Papers' for your gemstone setting.

 It's been a few years since I wrote the first essay on "Polishing Papers". The many uses have changed and so has the need to explore newer examples of how these papers can be used.

 In this 'revised' essay, I'll take a photo of the polishing paper and where each is used. As there are so many photos, I apologise if a few are duplicated.

==================================================

There are Emery papers of #240 & #400 grit and then the numbers change as does the grit. But here is a little surprise for you, we can change the paper grit texture within a few moments. 

I'm increasing the 'grit' by using a soft-core, drafting pencil.


 Any available polishing paper may be used with the 'drafting pencil', I used a "Primary #1" grade. It's fantastic how simple this process can be for your setting needs.

 
  This is the pencil that I'm going to use to make some changes to the grit.

The easiest sharpening method is to use a 'snap on' razor blade. This prevents any sharp points while doing the 'rubbing' process.


  I always do my 'pencil rubbing' on any Polishing Paper #600 paper grit and higher. I'll avoid the shaping on #240 & #400 grits at all times.

 I attempt to have my drafting pencil at a 45-degree angle. This will give me a wider pencil spread while doing my paper 'rubbing'. 

These two photos show how fast the pencil lead can wear down. Always maintain a good exposure of the pencil lead at all times.

Sunday, 12 February 2023

How can a steel mandrel help you in setting stones?


 Before you read my 225th tutorial essay, here are a few more samples of a steel mandrel used in the gemstone setting.


In my experience, this was the only method in securing this rectangular stone. It proved to be rather successful.


 Ring mandrels are usually for sizing rings, now as well they can be used in "Bezel, Gypsy & Channel" settings. They can free up one or both of your hands, and you can get close to your work and see where the hammer should be touching. 

 One end of the mandrel can be secured to your bench while your 'free hand' can hold the hammer. 


 Some of my "descriptive" photos needed 3-4 hands, but as I only had 2, I tried to 'visually' explain my texts.


 You can easily use your riveting hammer or even the "Adjustable tension, of your Reciprocating Hammer".


  Now why the 'groove' in the mandrel? If the item you are setting has a protruding Culet for some reason. The 'fully rounded' mandrel will have no chance to save the Culet from damage or be ruined by the continuous downward hitting. You can also adjust the force of the 'hitting motion' to suit your taste with your hammer. 

  If you wish to use your 'reciprocating hammer', you can still use your steel mandrel, but now you have a 'free hand' to hold the many stones more securely. Even with any hammering, always check for the 'Culet' exposure.


  This steel mandrel is not only used for checking for finger sizes, but now it's another 'friendly' setting tool. 

 When setting stones in wax, the coolness of the steel mandrel keeps the wax cool at all times. When you are holding your wax in your fingers, the finger warmth will quickly distort (or ruin) the shape of your delicate wax frame.

 Even when keeping the wax for stone setting, the absolute roundness of the mandrel keeps the inside of the ring free of getting out of shape.

In this photo, I'm holding the wax on the mandrel while drilling holes.


 These photos are a collection of very thin wax set rings. There isn't any way I'd hold my fingers on the wax rings while wax setting the stones on these delicate wax rings, as I'd be asking for problems.


 When the setter is required to use the 'reciprocating hammer', always attempt to use the steel hammer as well. The reason is that there will be no collapsing of the 'setting gallery'.


 When the hammering (of any description) is used with a leather insert ring clamp, the leather absorbs all of the DIRECT HITTING FORCE.

 Therefore very little 'direct' hitting action is centred on the ring itself. ALL OF THE HITTING can be measured in "pounds per inch" of downward pressure and all of this will then be transferred to your ring.


Both styles of ring clamps have the same supporting problem, which is the thickness of the leather. Any hammering will not be useful to you.


 A steel mandrel can be also used as a 'third hand' when the moment arises, you can use a riveting hammer also for stone setting. You can easily rest your steel mandrel against your bench and then be totally 'hands-free'.


 I'll still use the steel mandrel for Channel Set rings, I need full 100% security while setting these Rubies.


 Both of my steel mandrels have 'grooves' in them in case any of the stones unexpectedly protruded "Culet Facets".

  I hope that I've succeeded in allowing you to see another setting tool. 

 REMEMBER, THAT THE LEATHER IN THE RING CLAMPS ABSORB THE 'HITTING FORCES'.

Gerrylewy18(at)gmail.com