Saturday, 26 November 2022

"C.A.D." aka "Computer Aided Designing" - with 41 photographs

 "C.A.D." aka "Computer Aided Designing" no mistake about it, this is a fantastic program, it saves much tedium in Diamond Setting. I'm now going to show what takes place from the original computer rendering to the last step in production. Thankfully, I photographed every step while making a pair of large gent's rings.
 In EACH ring, there are 210 diamonds, plus one larger (0.08 point diamond) in the center. These very small stones measured 0.088 mm. Remembering, that I'm not using any 0.01 diamonds.
 These rings were designed to use 160 diamonds on the top of the ring, with another 42 stones around the surrounding area. For your information, all of my Diamond Setting was done WITHOUT any use of an expensive microscopeWith this introduction, let's now get started.

 With my example of graver cutting, I wanted to show you all the labour in Bright-Cutting.  I would be remiss if I avoided the preliminary cutting that takes place.


 Just another view that allows my metal cutting prior to setting the stones.

 As an afterthought, I needed to show how 3 "Square stones" are set in this ring. Please observe that I used my Flat-Graver #40 to Bright-Cut the metal. No, I did not use any Triangular file with a #4 cut to clean the inside edge. I used only my finely shaped Flat graver.


 Once I set this Pear-Shape stone and the Pave' set gemstones I just lightly polished the surrounding metal. Again all of the metal was Bright-Cut BEFORE ANY STONES WENT IN.

In the next two views, I "rough-cut" (outlined) and then "Bright-Cut" the metal. Why at this point did I do all of the cutting now? I wanted no residual metal remaining after the stones went in.

 The very last step in this setting process is the "Bead Forming" over the many stones. After a light polishing, I'd attach the 4-claw head..NEVER BEFORE. 

I'm now starting to explain the many steps in this Computer Designing process. This is where the diamond setting starts to get easy and with much less labour.


 This round disk (watch bezel) was crafted just for one purpose and that was to set 42 uniform in shape, round diamonds.
But, all Bright-Cutting MUST BE DONE PRIOR TO ANY GEMSTONE SETTING. WHY now? I need to have full access to Bright-Cutting with my graver.

My watchmaker had to make sure that this Bezel fit against the watch frame.

 The next item on my list was to start on these two rings. There were 420 diamonds ready to be set. You can see that there is absolutely no space in or around any of the stones. 


 The whole effect was to have a full array of shining facets aimed at the wearer. 

   What you are seeing is literally 5 days of diamond setting. with the Bezel and then the two rings. AGAIN, no microscope was used in any of my intricate setting.

 Why did I use CAD in my "Guinness World Record" patterns? This saved me so much time in just Pave setting the mini stones. Every claw and bead were of uniform height and thickness.

The numbers "8 & 7" are lucky numbers in the Asian communities, as I was wanting to explore my marketing for them. Both of these metal numbers were specifically made separately and with easier labour involved in using my bead pushers.


Can you imagine the total labour time involved without having CAD?


 Now let's now get back to these large rings. You can see just how thin the metal is where I planned to drill the holes for setting. I measured the metal thickness was only 0.75mm this was not at all acceptable.
 My client had little understanding of the complexities and care of the diamond setting, (red flags were starting to show)

Here is another up-close view of the thickness, what do you think I had to do now?

 I contacted my CAD designer to assist me in this predicament. Both of us came up with a solution and that was to completely refurbish the watch bezel, ring top, and sides.


From a pitiful initial construction to a pleasing finished metal ring. 


Here are a few of the diamonds that I was going to be working with...just so very small in size. Each stone had only 2 mini claws per stone.

  For reference, I used my digital calipers to measure the sizes of the diamonds.


Here are 195 diamonds all laid out.

I marked the little beads with a black marker as I wanted to keep each section of 15+ stones separated. If I avoided the bead markings, I would have "lost my spot" where each stone would be placed.
 Every diamond had two beads and every stone had to be Bright-Cut as well.

 You can now see how the layout is slowly coming together. I had to make sure that I didn't drop any stones.


 I had to make sure that I didn't sneeze.😅


 Here is the Rolex watch with all of the 42 stones nicely set and Bright-Cut.

 
 Here is another CAD series of disks that had four colours per section. I placed one colour in each disk for easier placement or eventual layout. 
At the 4 bars, I used my Flat graver to secure all of the stones along the inside edge.

Again, there was no microscope in any of my gemstone setting.

 In reviewing these ring tops and disks are the initial computer rendering.


 I only ask that prior to any CAD training is that you and everyone learn how to set diamonds. If not, there could be many problems being at your bench.
 If you have any questions, kindly contact me at "gerrylewy18(gmail.com".

From Wax => 1-Carat size, Diamond Ring!

 I'm not a 'talented' wax-carver, but I've seen many "Wax-Carvers" give me guidance in creating waxes and then using these techniques to write this tutorial essay.

 I'm not using any "Computer-Aided Designing" for this essay, as it's too much of a 'learning curve' to introduce you to this essay. Plus, not everyone will have this expensive computer program, I'm showing you everything made by my "hands & fingers".

 BTW, If you don't approve of my techniques, you can email me  "gerrylewy18(at)gmail.com".

 "Taf Schaefer" (from Ganoksin), asked me to give her some guidance in making a gold ring for women who 'live and enjoy their very adventurous, lifestyle'.

 A 4-claw, or even a 6-claw-setting, is so very dangerous in wearing their stone in these delicate conditions as these might get (quickly) lost or have some of the claws move.

 Taf is making (or has made) a 1-carat diamond ring, but this ring must be made so that there won't be any problems with wearing it during their "very active lifestyle". I now see her reasons for creating her "Tube-Set", 1-carat diamond ring.

 At first, I hesitated, but after her repeated questioning, I proceeded to make this into a tutorial-teaching essay but using a 6.5mm cubic zirconia instead. 

  Please be forewarned, many wax carvers have their own professional techniques, I'm only doing the best under the circumstances.

 I, as a Diamond Setter, will do my very best to show how to initially make a 6.5mm "Tube-Setting" and then "heat" this stone into the tube opening, removing it for the actual metal casting".

 Shall we start now?

1) This is a photograph of what "Taf" is asking about. You can see just how much gold will be used around the Girdle of the 1-carat Diamond. We've decided upon a rather simple pattern, but sturdy enough to hold this expensive diamond. We decided NOT TO USE C.A.D. (Computer-Aided Designing) as we both want to explore other options. 


2) Please measure accurately the precise millimeters of the diameter of the stone. Here the stone is 11.01 mm in width.


3) Lay your stone on a wax form. I would prefer to slowly heat this stone so it won't move during the next few stages of wax shaping.

3) I will NOW remove what wax pieces that aren't to be used. Slowly you can see the shape take place.


4) At last this is a nice-looking TUBE. At this point, I put a ring of wax wire all around the Girdle of the stone. 
This wire will hold the diamond at all times. YES, some of the wire will cover the stone, remember we are not using a claw-mounted ring, but only "A FULL-BEZEL TOP".


5) I will now remove the 'heated stone' from its "new home" and core out the inside of the wax frame. If I don't do this, it will just be a "chock full of wax" for casting into metal. This must be hollowed out, with a specifically made round bur with only 3 teeth.
 This bur carves & removes all the wax that is not required, nice isn't it?


6) With your "Exacta-knife", cut back as much of this Tube as to your needs.

7) Once you've decided on the length of the tube, I would trim as much of the bottom section that you will feel comfortable with.


 8) If by any chance you are not totally satisfied with your results, please keep the wireframe that is made for your large stone. You can always make another tube, I would.

9) Here are the two samples that I'm using for this essay.


I sincerely hope that this essay sheds some light on how to prepare your wax carving process. Gerry Lewy!


Thursday, 24 November 2022

From "Computer Aided Design" to a finished pendant...WOW!

 This essay all started with a computer rendering and it finished with an actual pendant. All though it covers only 6 photos, the process captured all of the exacting details. So lets now start the explanation!

========================================= 
 When the computer designer decides what pattern he or she needs, they must align the "little pins & bezels" for the stones, this is the most delicate area to work with. The exacting placement of these pins must be accurately aligned to the gemstones. All of the stones must be of the same width and depth.

 There must not be any guesswork in how or where the pins should be placed. As what you have here will be where your stones will be arranged. The designer MUST have a a minimum of 'Intermediate' level of experience in gemstone setting. ("Basic Level" of setting is not sufficient in this area of designing.)
  I'm now speaking from experience, a designer using C.A.D. finished the pattern and she handed me her pendant. None of the stones were usable as the little pins were not addressed to accommodate any of the Marquise or Round Stones. The owner & manager was furious that his time, gold and money was lost and I had to try and salvage those many errors.
 Please, Learn Diamond Setting from my blog...FIRST!!!!

 From the photo-rendering you can see the finished gold pattern. I had to first set the many round stones, then Bright-Cut the border. I used an Onglette #2 on all of the borders, when the main fancy-cut stones were set, I used my Flat-Graver #40 to trim & shape the many bezels.

 Around the "Fancy-Cut" shaped stones I decided to trim the extra metal surrounding the thick bezels. Where there was a pointed bezel, I made sure the bezels were finely cut to accommodate the different shapes.
  All around the Round stone Bezels, I "Bright-Cut" (with much care) as to keep the Bezel in a Round configuration. Where there was a Princess stone, (Square-stone). I kept the sharp corners of the Bezels finely trimmed. 

  From a computer rendering, until the final gold casting, this pendant is now completed. That is why an "Advanced Level of Diamond Setting" is warranted..(pushing over a multitude of mini-claws does not do any justice to this item.)
 All of my gravers are finely polished as to keep the metal shining, a gentle wheel-polishing is all that is needed. 

  Although that this tutorial-essay is only 6 photos in length, it shows that there is so much to learn.
 For any questions, kindly contact me via email; "gerrylewy18@gmail.com"  


Saturday, 17 September 2022

Bezel Setting Faceted Gemstones

 In this most interesting tutorial-essay that I have in my library was proposed in an Orchid-Ganoksin question. How do you Bezel Set, Faceted gemstones in a Bezel?
  In this essay, I think that I've answered most of the queries on this topic. The word "most" comes to my mind. I will delve into which gravers to use, the Scale of Difficulty, and the techniques being shown.

 Let me discuss the history on most of them, here and now!
 The first is a Diamond and Emerald pendant with a selling price of $35,000.00 (CDN). I was approached by a very good client who asked me if I could recut the mediocre Diamond Setting that was done by another setter? Then he asked me if I would, as well, FULL BEZEL HIS EMERALD.  (OUCH?)

  I examined this stone and saw just why the other two setters refused to touch it, (their loss)
It had a very deep inclusion at the tip of the Pavilion. I asked my client & friend, what is the replacement just on the Emerald? Twenty years ago, the cost was $15,000.00, in today's 2022 market
I would guess-estimate this pendant with all of the Diamonds & Emerald at $35,000.00 CDN or more. 

I was very pleased in accepting this gorgeous pendant, just for one reason, it was to take many photos of the "before & after views". I did neglect the "during", but the results were just great. 

At the time of this original writing (20 years ago) the price was considerably lower.
I will explain further in this essay, how challenging this pendant setting was.

In this lower photo are "156C" burs. "C" means that these burs are of a Carbide metal.
Plus, the 'bur-teeth' are much closer together on the shaft, but they don't cut too deep into the metal.
These come in many sizes from 0.03 mm all the way up 10.95 mm, I have all of them on my bench.
 

 Here are my best burs for this Emerald pendant. I would use the "High-Speed Steel" burs, which means that the steel is of a stronger metal. The teeth are further apart, and they cut deeper into the metal. The sizes are also at 0.03 mm and up to 10.95 mm. I have them all 


 Here is a little invention that my teacher Stan Levine, z"l he showed me circa 1968. When you are wanting an INSIDE curved bezel frame, don't mess around and waste your time.

 Use the burs that you need and grind it to shape on your "Bench-Grinder", BUT DON'T OVER-HEAT THE BUR, KEEP THE STEEL COOL WITH WATER. YOU CAN DO THIS RE-SHAPING ON ANY SIZE OF BURS THAT YOU NEED. GOOD IDEA? 

"The Scale of Difficulty is about a 4".

 Here is my HSS BUR in action! Only the edge of the teeth is doing the metal cutting. I will rotate the HSS bur three times, I need to keep the teeth at the same depth. Before I start the cutting, here is a great idea, use a round bur at the same with of the girdle of the stone, why I this so good?

 It will prevent your HSS bur from not giving you continuous depth. This round bur will act as a guide for your aggressive HSS cutting. "Scale of Difficulty is 15 out of 10."


When your stone is in the metal, and you need to use your reciprocating hammer do not hammer-hit down flat. Place your hammer-tip at an angle (as shown) as this hitting will "move" the metal over the stone, without making it flat or making the bezel-tip too thin to be filed. YOU ARE JUST MOVING THE METAL, ANOTHER GOOD IDEA? Scale of Difficulty is 15 out of 10.


After you place your stone into the bezel, time now to "Bright-Cut" the inner bezel frame. I really suggest that you use your Onglette #2, or #3 with a highly polished "right-side" and cut around the inner bezel wall. If this is done nicely, your post setting polishing will need only a careful cleaning.


 When your setting is completed. I would use my Pumice wheel of 180 grit, then your PINK pumice wheel of #1,000 grit. Your metal will be so bright that very little machine polishing is required.


 Here is another stone, but I like to pre-polish the under-bezel FIRST, why is this? Then I won't damage the stone during the "cleaning process".


 You can now see the bright metal cutting, post setting and pumice wheel cleaning. 


 I use most of the time putting my thumb inside a "rubber, thumb-cover", why? I don't want the graver blade to cut lines into the skin of the finger. I don't like blood on my rings, would you? Observe the finger orientation, and see where the thumb is located? The graver is resting on the rubber-thumb guard.  Scale of Difficulty is 8-9.


 Here is another little invention direct from my bench. These half-contoured burs will allow you to set (easily) Flat bottomed Cabochon stones. Just place the flat bottom inside the bezel and 'viola' your new bezel will be good for stone-setting. I use a regular "Bench-Grinder" for this tapering. 
The Scale of Difficulty is 4-5.

In 2016, MJSA magazine published an essay that I wrote about stone setting.

 When you are wanting to use your reciprocating, hammer remember this important rule. NEVER HAMMER YOUR METAL ON THE FLAT FACE of your anvil. It's best to apply pressure on its edge... (as shown). Here you are moving the metal "towards the stone" but not over and down!
  For the Square, "Princess-Cut" Diamonds. Drill the out corners and then create seats for the diamond. Never let the metal be hammered flat, as mentioned above, move the metal towards each stone.
 To prevent breaking two stones at once, this can & will happen, leaving a little space in between each of the three stones. If there is any movement during the hammering process, there won't be any breakage.
The Scale of Difficulty is 8-9.


 Hold your graver as the point is shown here. The Scale of Difficulty is 8 out of 10.


 You can see how the Bezel is now looking, this Bezel now has a wide and secure frame.

 This was how the Emerald pendant looked before the large stone went in. Much of the diamond setting had to be redone as the original setter had little idea how to Bright-Cut. My initial task was to recut everywhere, I used my Onglette #2 & #3 gravers. When this was accomplished then the pear-shape bezel was Laser soldered into place.
  The insanely Difficulty Scale is 75 out of 10.

 For absolute security during the Emerald Setting. I decided to place this on to a shellac-stick as I didn't want all of the pendant pieces "flopping" around.

This top picture shows how the pendant looks when assembled.

  For further Bright-Cutting and finishing of the Emerald Setting, I again decided to work with the shellac-stick. BTW, I Bright-Cut inside of the Emerald Bezel. The graver point DID NOT TOUCH THE STONE. Difficulty Scale is an easy 35 out of 10.

 Here is a genuine Amethyst Pear-Shape stone, set into a domed-shaped ring. The most delicate area to be concerned with IS THE POINT OF THE STONE. I wanted to have the TABLE of the stone at the SAME LEVEL, OR EVEN LOWER than the surrounding metal. If it was higher, "wear & tear" would damage the stone.
 The first thing to do is to use a round bur at the same size or width of the GIRDLE. I drilled a hole straight into the PEAR-POINT. Then continue that line all around the inside of the pear-opening,
 For the Pavillion, I angled the underside of the opening, with a Bud-Shaped bur. This is a delicate step, as I didn't want to damage the stone during the Reciprocating Hammering process.

The Scale of Difficulty is a brain-numbing 50 out of 10.


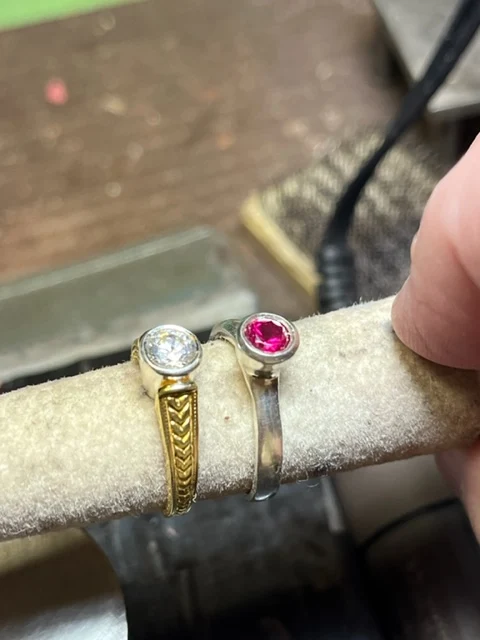
Here is a finished RUBY ring laying beside the "raw, untouched casting". What I do is to use a round bur with the thickness of the GIRDLE. This being shown will be as a guide for the HSS to do the metal cutting. The HSS bur will help to have the stone fit into its new home. AVOID HAVING THE STONE'S CULET NOT PROTRUDE FROM UNDERNEATH.

 REMEMBER TO AVOID, IF YOU CAN, from using course Triangular #2 file. If you must, use a #4 or #6 grit. With this, use your Pumice Wheels of #180 & a softer PINK polishing #1,000 grit.
 You may use a hand-held hammer if you wish to tamper down the metal over the edge of the stone.


 The edge of the teeth on the HSS bur will do the metal carving. The Pavillion of the bur will give you the exact angle for the stone.
Difficulty Scale is 15 out of 10

 Notice the thumbs and graver configuration, the only thing that is MOVING is the graver point. Difficulty Scale is 25 out of 10.


 Even if it's a round stone, or a fancy-cut stone. The fingers & thumbs are positioned the very same. The "Right-Sided" graver does all of the cutting, The "left-side" is left untouched as the Right Side is highly polished with your #800 and #1,000 grit polishing papers. The method is "Cut - Rotate the ring - Cut and Rotate" until the cutting has been completed. Difficulty Scale is 15 out of 10.

 My friends, I think that I covered many of the numerous techniques on this topic. If I missed any, please write to me at "gerrylewy18@gmail.com"