I'm not a 'talented' wax-carver, but I've seen many "Wax-Carvers" give me guidance in creating waxes and then using these techniques to write this tutorial essay.
I'm not using any "Computer-Aided Designing" for this essay, as it's too much of a 'learning curve' to introduce you to this essay. Plus, not everyone will have this expensive computer program, I'm showing you everything made by my "hands & fingers".
BTW, If you don't approve of my techniques, you can email me "gerrylewy18(at)gmail.com".
"Taf Schaefer" (from Ganoksin), asked me to give her some guidance in making a gold ring for women who 'live and enjoy their very adventurous, lifestyle'.
A 4-claw, or even a 6-claw-setting, is so very dangerous in wearing their stone in these delicate conditions as these might get (quickly) lost or have some of the claws move.
Taf is making (or has made) a 1-carat diamond ring, but this ring must be made so that there won't be any problems with wearing it during their "very active lifestyle". I now see her reasons for creating her "Tube-Set", 1-carat diamond ring.
At first, I hesitated, but after her repeated questioning, I proceeded to make this into a tutorial-teaching essay but using a 6.5mm cubic zirconia instead.
Please be forewarned, many wax carvers have their own professional techniques, I'm only doing the best under the circumstances.
I, as a Diamond Setter, will do my very best to show how to initially make a 6.5mm "Tube-Setting" and then "heat" this stone into the tube opening, removing it for the actual metal casting".
Shall we start now?
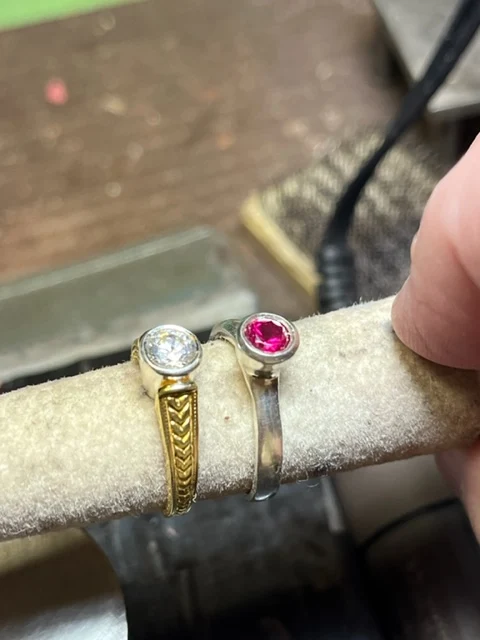
1) This is a photograph of what "Taf" is asking about. You can see just how much gold will be used around the Girdle of the 1-carat Diamond. We've decided upon a rather simple pattern, but sturdy enough to hold this expensive diamond. We decided NOT TO USE C.A.D. (Computer-Aided Designing) as we both want to explore other options.


No comments:
Post a Comment