In this most interesting tutorial-essay that I have in my library was proposed in an Orchid-Ganoksin question. How do you Bezel Set, Faceted gemstones in a Bezel?
In this essay, I think that I've answered most of the queries on this topic. The word "most" comes to my mind. I will delve into which gravers to use, the Scale of Difficulty, and the techniques being shown.
Let me discuss the history on most of them, here and now!
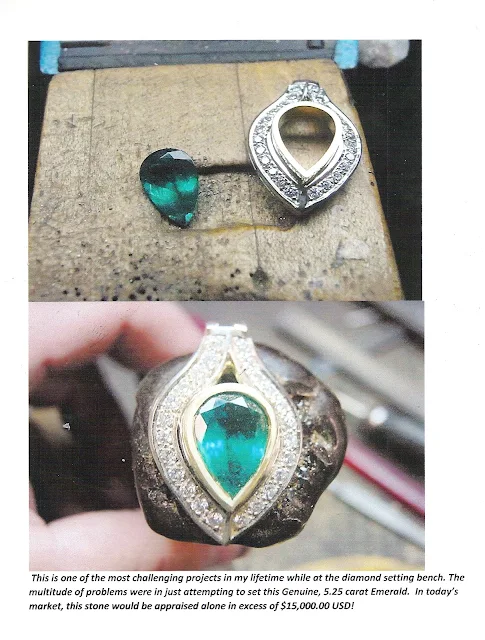
The first is a Diamond and Emerald pendant with a selling price of $35,000.00 (CDN). I was approached by a very good client who asked me if I could recut the mediocre Diamond Setting that was done by another setter? Then he asked me if I would, as well, FULL BEZEL HIS EMERALD. (OUCH?)
I examined this stone and saw just why the other two setters refused to touch it, (their loss)
It had a very deep inclusion at the tip of the Pavilion. I asked my client & friend, what is the replacement just on the Emerald? Twenty years ago, the cost was $15,000.00, in today's 2022 market
I would guess-estimate this pendant with all of the Diamonds & Emerald at $35,000.00 CDN or more.
I was very pleased in accepting this gorgeous pendant, just for one reason, it was to take many photos of the "before & after views". I did neglect the "during", but the results were just great.
At the time of this original writing (20 years ago) the price was considerably lower.
I will explain further in this essay, how challenging this pendant setting was.
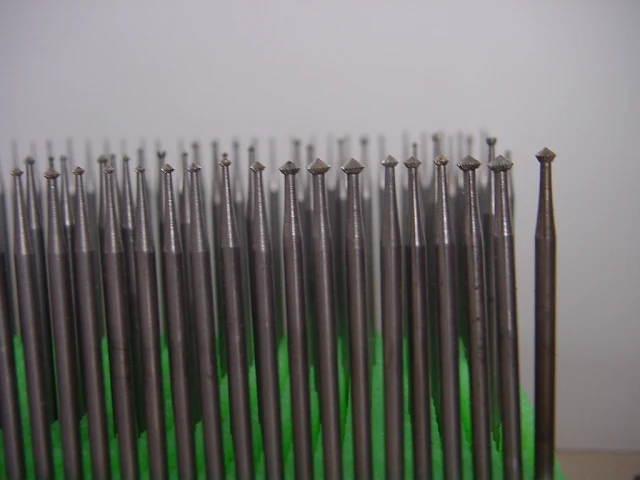
In this lower photo are "156C" burs. "C" means that these burs are of a Carbide metal.
Plus, the 'bur-teeth' are much closer together on the shaft, but they don't cut too deep into the metal.
These come in many sizes from 0.03 mm all the way up 10.95 mm, I have all of them on my bench.
Here are my best burs for this Emerald pendant. I would use the "High-Speed Steel" burs, which means that the steel is of a stronger metal. The teeth are further apart, and they cut deeper into the metal. The sizes are also at 0.03 mm and up to 10.95 mm. I have them all
Here is a little invention that my teacher Stan Levine, z"l he showed me circa 1968. When you are wanting an INSIDE curved bezel frame, don't mess around and waste your time.
Use the burs that you need and grind it to shape on your "Bench-Grinder", BUT DON'T OVER-HEAT THE BUR, KEEP THE STEEL COOL WITH WATER. YOU CAN DO THIS RE-SHAPING ON ANY SIZE OF BURS THAT YOU NEED. GOOD IDEA?
"The Scale of Difficulty is about a 4".
Here is my HSS BUR in action! Only the edge of the teeth is doing the metal cutting. I will rotate the HSS bur three times, I need to keep the teeth at the same depth. Before I start the cutting, here is a great idea, use a round bur at the same with of the girdle of the stone, why I this so good?
It will prevent your HSS bur from not giving you continuous depth. This round bur will act as a guide for your aggressive HSS cutting. "Scale of Difficulty is 15 out of 10."
When your stone is in the metal, and you need to use your reciprocating hammer do not hammer-hit down flat. Place your hammer-tip at an angle (as shown) as this hitting will "move" the metal over the stone, without making it flat or making the bezel-tip too thin to be filed. YOU ARE JUST MOVING THE METAL, ANOTHER GOOD IDEA?
Scale of Difficulty is 15 out of 10.
After you place your stone into the bezel, time now to "Bright-Cut" the inner bezel frame. I really suggest that you use your Onglette #2, or #3 with a highly polished "right-side" and cut around the inner bezel wall. If this is done nicely, your post setting polishing will need only a careful cleaning.
When your setting is completed. I would use my Pumice wheel of 180 grit, then your PINK pumice wheel of #1,000 grit. Your metal will be so bright that very little machine polishing is required.
Here is another stone, but I like to pre-polish the under-bezel FIRST, why is this? Then I won't damage the stone during the "cleaning process".
You can now see the bright metal cutting, post setting and pumice wheel cleaning.
I use most of the time putting my thumb inside a "rubber, thumb-cover", why? I don't want the graver blade to cut lines into the skin of the finger.
I don't like blood on my rings, would you? Observe the finger orientation, and see where the thumb is located? The graver is resting on the rubber-thumb guard.
Scale of Difficulty is 8-9.
Here is another little invention direct from my bench. These half-contoured burs will allow you to set (easily) Flat bottomed Cabochon stones. Just place the flat bottom inside the bezel and 'viola' your new bezel will be good for stone-setting. I use a regular "Bench-Grinder" for this tapering.
The Scale of Difficulty is 4-5.
In 2016, MJSA magazine published an essay that I wrote about stone setting.
When you are wanting to use your reciprocating, hammer remember this important rule. NEVER HAMMER YOUR METAL ON THE FLAT FACE of your anvil. It's best to apply pressure on its edge... (as shown). Here you are moving the metal "towards the stone" but not over and down!
For the Square, "Princess-Cut" Diamonds. Drill the out corners and then create seats for the diamond. Never let the metal be hammered flat, as mentioned above, move the metal towards each stone.
To prevent breaking two stones at once, this can & will happen, leaving a little space in between each of the three stones. If there is any movement during the hammering process, there won't be any breakage.
The Scale of Difficulty is 8-9.
Hold your graver as the point is shown here. The Scale of Difficulty is 8 out of 10.
You can see how the Bezel is now looking, this Bezel now has a wide and secure frame.
This was how the Emerald pendant looked before the large stone went in. Much of the diamond setting had to be redone as the original setter had little idea how to Bright-Cut. My initial task was to recut everywhere, I used my Onglette #2 & #3 gravers. When this was accomplished then the pear-shape bezel was Laser soldered into place.
The insanely Difficulty Scale is 75 out of 10.
For absolute security during the Emerald Setting. I decided to place this on to a shellac-stick as I didn't want all of the pendant pieces "flopping" around.
This top picture shows how the pendant looks when assembled.
For further Bright-Cutting and finishing of the Emerald Setting, I again decided to work with the shellac-stick. BTW, I Bright-Cut inside of the Emerald Bezel. The graver point DID NOT TOUCH THE STONE. Difficulty Scale is an easy 35 out of 10.
Here is a genuine Amethyst Pear-Shape stone, set into a domed-shaped ring. The most delicate area to be concerned with IS THE POINT OF THE STONE. I wanted to have the TABLE of the stone at the SAME LEVEL, OR EVEN LOWER than the surrounding metal. If it was higher, "wear & tear" would damage the stone.
The first thing to do is to use a round bur at the same size or width of the GIRDLE. I drilled a hole straight into the PEAR-POINT. Then continue that line all around the inside of the pear-opening,
For the Pavillion, I angled the underside of the opening, with a Bud-Shaped bur. This is a delicate step, as I didn't want to damage the stone during the Reciprocating Hammering process.
The Scale of Difficulty is a brain-numbing 50 out of 10.
Here is a finished RUBY ring laying beside the "raw, untouched casting". What I do is to use a round bur with the thickness of the GIRDLE. This being shown will be as a guide for the HSS to do the metal cutting. The HSS bur will help to have the stone fit into its new home. AVOID HAVING THE STONE'S CULET NOT PROTRUDE FROM UNDERNEATH.
REMEMBER TO AVOID, IF YOU CAN, from using course Triangular #2 file. If you must, use a #4 or #6 grit. With this, use your Pumice Wheels of #180 & a softer PINK polishing #1,000 grit.
You may use a hand-held hammer if you wish to tamper down the metal over the edge of the stone.
The edge of the teeth on the HSS bur will do the metal carving. The Pavillion of the bur will give you the exact angle for the stone.
Difficulty Scale is 15 out of 10 Notice the thumbs and graver configuration, the only thing that is MOVING is the graver point. Difficulty Scale is 25 out of 10.
Even if it's a round stone, or a fancy-cut stone. The fingers & thumbs are positioned the very same. The "Right-Sided" graver does all of the cutting, The "left-side" is left untouched as the Right Side is highly polished with your #800 and #1,000 grit polishing papers. The method is "Cut - Rotate the ring - Cut and Rotate" until the cutting has been completed.
Difficulty Scale is 15 out of 10. My friends, I think that I covered many of the numerous techniques on this topic. If I missed any, please write to me at "gerrylewy18@gmail.com"


.bmp)


No comments:
Post a Comment