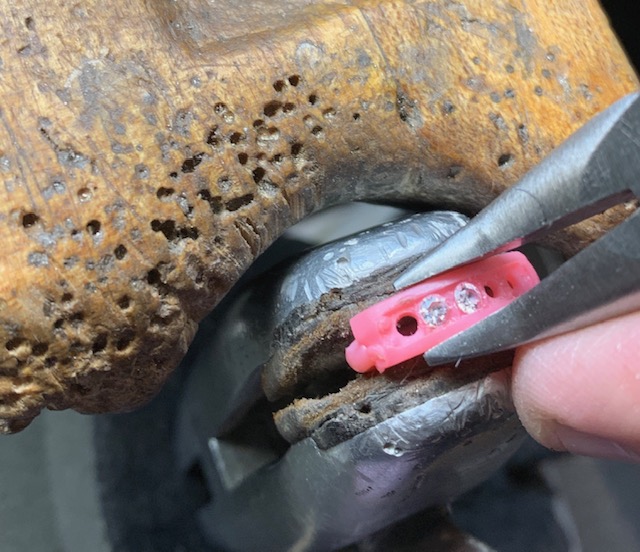
There are a 'few' names for this pattern for stone setting. The names are "Pin-Setting" & or "Mini-Claw Setting". Whatever name you wish to give it, the techniques are still the very same.
The Difficulty Scale is (about) 6.5 out of 10.


When the stones are slightly heated, they will melt some of the wax surrounding the Girdle. This 'melting of wax' will for sure hold the stone in place.

On every large casting, there still needs some 'finishing' to take place. For example, I'd prefer to bore out the holes long before the metal casting. The heat from your finger-tips will not soften this wax while you're holding it.

The light-blue coloured wax is the regular injection wax. I shy away from this kind of wax, as it is very susceptible to getting distorted from the warmth from your finger-tips!!!

If you need to do any re-coring of the plugged up holes, do so, but be very careful as not to distort any of the little 'pins'. We need every one of them!!!

It's cheaper and much faster to replace any pins that are 'missing' from the injection process. If you encountered any 'missing pins', all you do is to add them in the wax form.
The metal adjustments are more time consuming and labour & time-wasting. The answer for this is to examine your rubber mould again to see if that's the source of the ongoing problems.
Another thing I must mention is that it is much faster to clean any 'extra' wax spots that don't belong there. "Cleaning in the metal", can be so very problematic if you are starting out with this sort of metal-working.


See how I can now hold this bur, just so very gently, remember we are using this on wax, and not on metal. Try not to be too 'aggressive' in rotating the blades with your fingers.
Hold this bur vertical and not on any angle! (I wanted to use both hands in this picture, but of course, one hand had to hold the "iPhone" camera.)

How long did it take me to clean all of those plugged holes? I estimated at least 2 minutes!
Now imagine if this was metal? Don't even ask!

Here is the actual rubber mould from where the waxes originated from. Can you see the few faint pins in the rubber, these will be eventually "plugged-up" holes!

The caster who does my wax injecting uses 'talcum powder' as a "Powdered Lubricant" to prevent the sticking of the two rubber forms together, while being separated to reveal the new wax. You can see the residue on both 'halves' of rubber.


For an example here are a few of some of my previous setting C.A.D. projects. The whole setting process of setting these 'few' stones took me less than two hours. Not one 'mini-claw' was broken, thankfully!..:>)

As my client was a 'novice' CAD-designer, we both decided where every mini-claw should be positioned.

Remembering that only "2, mini-claws' were created for EACH stone, 'claw breakage' was not an option! As I had only a few moments to 'rest' my hands and fingers, I took a photo of this whole process!


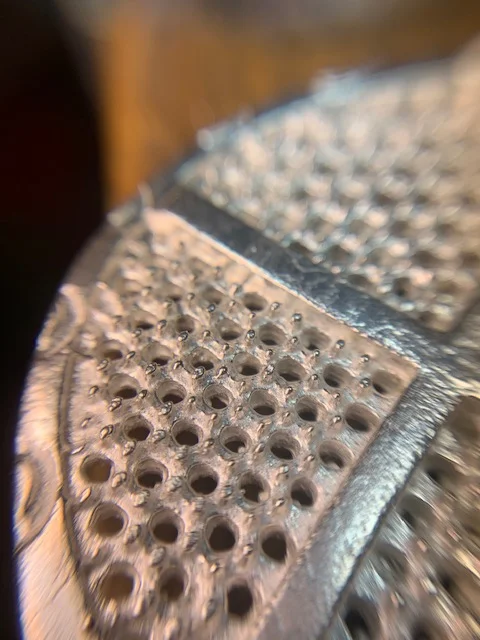
This one section of the plate is totally useless, darn! But I photographed it to show you how castings might not turn out to what you want..;>(

This section is still useable, to a point! The "pins" are just high enough (maybe) to be able to move over the girdle of the stones.

This disk is now going into the recycle-bin, just to salvage the silver for newer 'demo'-rings!

I can still make this section a 'decent setting' by using a Flat graver to dig into the base of the pin to push or move the pins closer to the stone.

I have to be very careful when trying to set the stones in this section, 'no shortcuts' are allowed!

These pins are nice in the 'height department'. I see no problem in using this plate for this exercise!

I set two stones just for the purpose of showing you what happens if you have an undersized stone.
The stone on the right is too small and it isn't sitting flat, or properly centred in the hole. The stone on the left is slightly larger and the 'pins' will get much closer to the girdle. Two pins for one stone!

You can just barely see that I used a round bur to clean out the rim of each hole, as this is where the Pavillion will touch the 'rounded' hole.

I'm now starting to use my "Under-Cutting bur" aka "156C" to start to make the 'fine' bearings in each of the claws. I will never think of cutting or digging into each claw, as this is not necessary. All it takes is a little touch with this bur, and it's DONE!
I will come in at a 'slight angle' and move it into a 'vertical' position in a few seconds as seen below!

I rotate the bur in it's setting, so it is touching all of the pins!


Hand-holding is another major concern to the setter, you are doing two things at once. The first step is to move the pin closer to the stone. The second step is to press down the tip onto the facets of the stone and this will hold the stone permanently in place!

I put a little 'flange' or facet on the edge of the burnisher, this will enable me to move the burnisher into an upright position without damaging the Table of the stone.
You can do this by taking the burnisher & lightly 'run or grind' it on the oil-stone surface.

I've separated this selection of stones into little groups as I will be needing the larger stones in a moment. There is a lot of "picking & choosing" in this project! I will have 60 stones and select only 42 as required.

My 'setting tools' are kept to a bare minimum, I don't need to fumble around and looking among many. In fact, some of my handles are colour and as well, shape coordinated.
With my peripheral vision, I can easily locate the handle that I need without looking and taking my eyes off of the multitude of stones and pins!


Here are some views of the same setting areas.

BTW, you can see that I've cleaned and made sure that each hole is rounded with my bur. All of this was done at the very start in this setting project!

On a topic of pushing the multitude of pins, there are two methods. I will use an Onglette #2 with a rounded-off 'underside front' this will enable me to move the graver, without breaking off the point.
I'm using the "face of the graver" to push the claw towards the stone
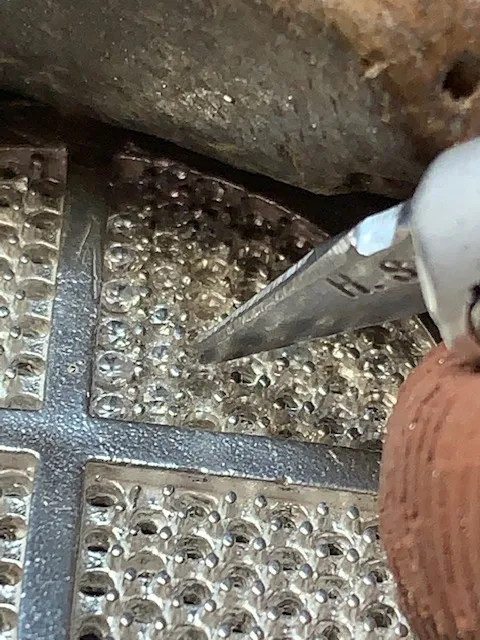
Here again, is my favourite bead-burnisher ready to be used.

As an alternate option, I sometimes use my Flat graver pivoting from one corner to the other side and leverage the graver in a forward motion this will move that one small pin closer to the stone.
Once the pin is moving now with the Flat-face push forward. Trust me this works 100% of the time. BTW, this takes some practice, so please be rather careful at first.

With my Flat graver #40, I am now starting to "Bright-Cut" the setting area. I want it to shine even without any polishing. I'm only cutting the very corner of the wall, but not touching anywhere near the stones. I call this making sure the viewer sees only a bright edge and surface.
Some setters don't bother with all of this extra work, it's too labour & time-wasting! Not me, I want this project to shine.

Now you can see just where my Flat #40 graver was cutting, nowhere else is needed. I think that you can see a long sliver of metal that was just now being removed.
 \
\
As a final photograph on this long essay, you can see the remainder of all of my 'extra' stones and the finished setting area.
For this one section, my setting time is about 45 minutes. This is including much deliberation of choosing the correct stone sizes and finally the Bright-Cutting process.
Just remember, that I now have 3 more sections to work on for a total of 168 stones of various sizes just on this one plate. I will stop many times to give my eyes & fingers time to rest, so should you!
BTW, as I always say. "There are no short-cuts in stone setting"

I prefer (and so should YOU) to exam the waxes before commencing to forge ahead and start the metal casting. My reasons are many, as you will see.
The Difficulty Scale is (about) 6.5 out of 10.
This particular wax (shown below) is aptly named "Ruby-Red" is just a great medium for this kind of 'accurate' casting. It's a very hard material and when the final casting takes place, you know that it will give you the exacting results that you demand!

If you're planning to 'set stones in wax', remember that the wax claws are not meant to be moved. They won't pass the 'pressure of pushing & moving' test, they might just break off!

When the stones are slightly heated, they will melt some of the wax surrounding the Girdle. This 'melting of wax' will for sure hold the stone in place.


If you need to do any re-coring of the plugged up holes, do so, but be very careful as not to distort any of the little 'pins'. We need every one of them!!!

The metal adjustments are more time consuming and labour & time-wasting. The answer for this is to examine your rubber mould again to see if that's the source of the ongoing problems.
Another thing I must mention is that it is much faster to clean any 'extra' wax spots that don't belong there. "Cleaning in the metal", can be so very problematic if you are starting out with this sort of metal-working.

You can hold these very sharp wax-cleaning burs in your fingers and then slowly rotate it in the wax plugged-up hole. BTW, I do this all the time and there is absolutely no need to put these burs into your flex-shaft handle. Your hand-held, rotating speed is sufficient for this easy task.
Remember one important thing, these little three-toothed blades are extremely sharp at the point and along the edges of the three teeth. It is very easy to puncture your skin!!
Please use the utmost care, they are meant to be used for cleaning & cutting waxes, but not skin!!

See how I can now hold this bur, just so very gently, remember we are using this on wax, and not on metal. Try not to be too 'aggressive' in rotating the blades with your fingers.
Hold this bur vertical and not on any angle! (I wanted to use both hands in this picture, but of course, one hand had to hold the "iPhone" camera.)

Now imagine if this was metal? Don't even ask!

Here is the actual rubber mould from where the waxes originated from. Can you see the few faint pins in the rubber, these will be eventually "plugged-up" holes!

The caster who does my wax injecting uses 'talcum powder' as a "Powdered Lubricant" to prevent the sticking of the two rubber forms together, while being separated to reveal the new wax. You can see the residue on both 'halves' of rubber.

I can't imagine having anyone create these beads-pins 'one at a time'. These CAD programs do this so carefully. All is remaining now is to 'emery-clean & a light 'pre-polish' the whole setting areas.
That little pin at the bottom of the plate was a little pin from my Magnetic-Tumbling beaker. If you intend to cloth-wheel polish, your little pins will get ruined in minutes.

For an example here are a few of some of my previous setting C.A.D. projects. The whole setting process of setting these 'few' stones took me less than two hours. Not one 'mini-claw' was broken, thankfully!..:>)

As my client was a 'novice' CAD-designer, we both decided where every mini-claw should be positioned.

Remembering that only "2, mini-claws' were created for EACH stone, 'claw breakage' was not an option! As I had only a few moments to 'rest' my hands and fingers, I took a photo of this whole process!

This was just one section of a long necklace, I had to have the drawing at 'arm's length' at all the time in selecting the correct position of the 1,176 stones.

These pictures are in the category of "Whoops!"
Here are many photo's of plates that I had cast, the pins are at a very low height. I could still set the stones but with some difficulty, these 'might be used' at a later date, hopefully!

This one section of the plate is totally useless, darn! But I photographed it to show you how castings might not turn out to what you want..;>(

This section is still useable, to a point! The "pins" are just high enough (maybe) to be able to move over the girdle of the stones.

This disk is now going into the recycle-bin, just to salvage the silver for newer 'demo'-rings!

I can still make this section a 'decent setting' by using a Flat graver to dig into the base of the pin to push or move the pins closer to the stone.

I have to be very careful when trying to set the stones in this section, 'no shortcuts' are allowed!


I set two stones just for the purpose of showing you what happens if you have an undersized stone.
The stone on the right is too small and it isn't sitting flat, or properly centred in the hole. The stone on the left is slightly larger and the 'pins' will get much closer to the girdle. Two pins for one stone!

You can just barely see that I used a round bur to clean out the rim of each hole, as this is where the Pavillion will touch the 'rounded' hole.

I will come in at a 'slight angle' and move it into a 'vertical' position in a few seconds as seen below!

I rotate the bur in it's setting, so it is touching all of the pins!

Here two bead-burnishers that will do all of my metal-pushing and rounding the tips of the pins at the same time. The tool on the right is too small and is well used with rough edges. The better bur is on the left, why? It is larger and will envelop the 'pin-top' and give a nicer finish.

Hand-holding is another major concern to the setter, you are doing two things at once. The first step is to move the pin closer to the stone. The second step is to press down the tip onto the facets of the stone and this will hold the stone permanently in place!

I put a little 'flange' or facet on the edge of the burnisher, this will enable me to move the burnisher into an upright position without damaging the Table of the stone.
You can do this by taking the burnisher & lightly 'run or grind' it on the oil-stone surface.


My 'setting tools' are kept to a bare minimum, I don't need to fumble around and looking among many. In fact, some of my handles are colour and as well, shape coordinated.
With my peripheral vision, I can easily locate the handle that I need without looking and taking my eyes off of the multitude of stones and pins!

With the larger selection of stones, I've decided to use them where only ONE CLAW will be used for setting. With the same 156C bur as before, cut a bearing that will allow that stone to be fit, don't dig in too deep or the stone will never get tight!!!

Just one claw is now holding that one stone, interesting isn't it?

Now let's continue on further and proceed to prepare the rest of the stones along this bar of metal. AGAIN, just one claw to hold each of the stones!

Here are some views of the same setting areas.

BTW, you can see that I've cleaned and made sure that each hole is rounded with my bur. All of this was done at the very start in this setting project!

On a topic of pushing the multitude of pins, there are two methods. I will use an Onglette #2 with a rounded-off 'underside front' this will enable me to move the graver, without breaking off the point.
I'm using the "face of the graver" to push the claw towards the stone
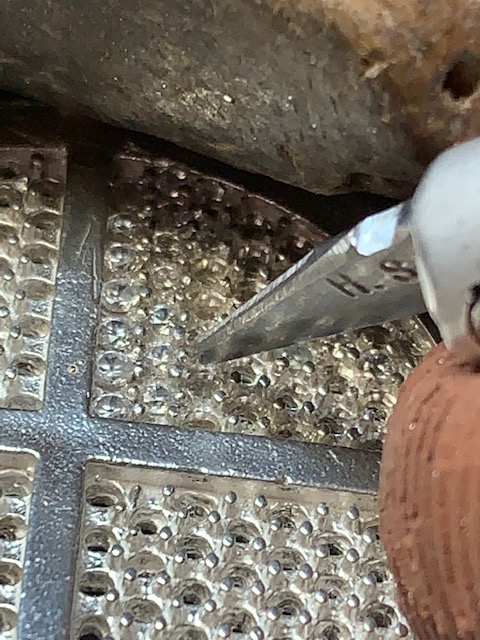

Once the pin is moving now with the Flat-face push forward. Trust me this works 100% of the time. BTW, this takes some practice, so please be rather careful at first.

With my Flat graver #40, I am now starting to "Bright-Cut" the setting area. I want it to shine even without any polishing. I'm only cutting the very corner of the wall, but not touching anywhere near the stones. I call this making sure the viewer sees only a bright edge and surface.
Some setters don't bother with all of this extra work, it's too labour & time-wasting! Not me, I want this project to shine.

Now you can see just where my Flat #40 graver was cutting, nowhere else is needed. I think that you can see a long sliver of metal that was just now being removed.

As a final photograph on this long essay, you can see the remainder of all of my 'extra' stones and the finished setting area.
For this one section, my setting time is about 45 minutes. This is including much deliberation of choosing the correct stone sizes and finally the Bright-Cutting process.
Just remember, that I now have 3 more sections to work on for a total of 168 stones of various sizes just on this one plate. I will stop many times to give my eyes & fingers time to rest, so should you!
BTW, as I always say. "There are no short-cuts in stone setting"