Saturday, 30 March 2019

"Diamond set, Winged-Lion"-Pendant (and problems!)

"Finished Winged-Pendant, from a rough casting, but with many problems!"


What tools did I use?

1)High-Speed Steel; Flat Graver #40.

2)Onglette #1 graver: that is used for only 'rough-cutting' any lines used prior to all "Bright-Cutting" processes.

3)Bead-Raiser: this is a basically a Round pointed shaped Onglette #2 graver.

 4)Bead-Burnisher, used for 'rounding the tips of all beads'.

5)Bud bur; only if the need to "move a hole" is required...(read further on this method).

Difficulty Scale? I estimate this to be about 7 => 8 on a scale of 10.

Days in creating this finished pendant? 7-10 days (one or two hours at a time) 

How many years of experience needed in this project?..too many..:>) 

 A client came to my 'home-based office' and presented me with an unusual project, I looked at it and I thought, this looks like the "Winged-Lion". He wanted to put some diamonds into this 10 karat, 55-gram pendant and asked could I do him a favour in "making it look better than it first appeared".

 I asked him "Could I use this project as a new topic for my blog?" He 100% agreed! I always ask permission first! I then mentioned that he could examine the essay along with the multitude of other photographs prior to the posting of this essay. I don't want any legal problems after spending many hours & weeks and the long hours at my setting bench and preparations in writing this blog-essay. 

 This first photograph (many to follow) just how the basic frame, minus any 'wings' not yet attached. The first casting had no holes anywhere but only an empty frame. I started to think as to what is needed to make this a wearable pendant!

 Being a Creative and a Diamond Setter has its merits in creating this unusual pendant.

 On the leg, I used a "Gypsy Setting" technique, "Beads" were not in my portfolio on this part of the 'animals anatomy'.


   I prefer to use only "Flake Shellac" on my 'wooden shellac-stick' to hold my setting projects, why so? I'm so very comfortable in using it, plus the wooden stick is also easy to hold for and after many hours!


 In this photograph, you can observe where the largest of the diamonds are being placed. I believe in selecting the diamonds, I had an estimated 5 different stone sizes to work with. Just in this one "wing", there were 5 sizes, now multiply that number for the other areas of this winged-pendant! 


 I decided, as always, just think where the beads will be placed further on. This is so important in the overall design and pattern of setting stones!

"This is not time wasted, but time saved!!"


  I thought of another pattern in diamond Setting and that is a "Cut-Down" setting design. You can see that the "inner curve" has to be just exactly in the alignment of stones. If one hole is slightly out of alignment, I can easily 'move' the hole at the beginning of the drilling process!

 => I used a "bud-shaped" bur to 'lean the bur' to one side of the hole, hence, I can literally 'move' that one hole in any direction that is needed.


 Already you can see how the "Beading Raising" process is starting to take place. The balance of the stones will be now smaller. I'm emphasizing the overall effect, even in these earlier stages of the setting of the stones.


 I'm now into the final stages of using any stone size that is given to me. I've set the biggest stones and the rest are just 'filling in' stones.
 

I'm even 'Bead-Burnishing all of the beads, even at the very early stages prior to any aggressive Bright-Cutting. Select a bead-burnisher that is larger than that bead!


 Here is the finished "Cut-Down" effect & pattern. You can observe that I've even cut a "Bright-Cut" line on the inside the row of stones, I used a rough-cutting #1 Onglette graver for this process.


 I don't approve of any empty spaces, I marked in ink, just where the next pair of stones will be set.


 As I had two 'wings to work on, I already had an idea as to where the stones would be placed on the lower 'wing-plate'.


 The question now is what technique & pattern could I be using to set the inner diamonds? I decided to use a "Star-Setting" pattern. I outlined (with my black marking pen) where the lines will be cut! 


 On both of the 'wings', I chose to be creative (again) and to use every possible pattern in my 60 years of experience as a setter, to make this "Winged-Lion" look more interesting than when I first received it.

 At every opportunity, I chose to use my "Cut-Down" pattern to make the edges look like 'feathers on the wings'.  


 I used a modified "Star-Cut" pattern but using as much space as I had available, but without making the empty space look too 'busy'. The large hole in the center top is where the 'two wings' will eventually be joined together.


  In this photograph, I used a reflecting mirror, hence "two images in one" picture.


 Now you can see the final stages of the "Winged Lion" and the two wings that will rotate. As I had so many more stones to use, I decided (with my client) to set more diamonds in the neck, tail, legs and feet.


 Now you can see just how the (almost) finished pendant looked after the Rhodium plating was applied!


 As the two wings were moving against each other I noticed in horror that there was a groove being cut into the lower wing. After the initial shock wore off, I realized that the top "Star-Set" diamond Pavilion was much deeper than the top wing-metal. The Culet of that stone was cutting a groove into the lower metal plate, each time it moved over the plate!. OUCH!

 How did I overcome this problem? I just 'scored' a little groove into the metal just where that 'top diamond' was touching!!! Now there is no chance for that 'top-diamond' to ruin the 'finish' on the lower plate.


 As this casting had numerous pin-holes all due to the improper casting, I used a Corundum, rotating wheel and 'roughened' the surface.
 

Another point is that to solder all of the pieces together I wouldn't have any chance of any of the 'wings' to easily move. My jeweller decided to use a 'post & rivet' approach and this can be seen in the next few photographs.

 All of the underneath holes were 'counter-sunk' to make all of the holes uniform in their overall appearance!


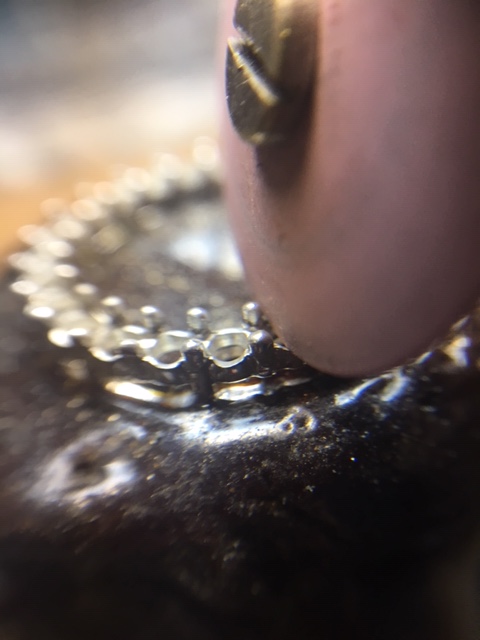
 Here you can observe the multitude of pin-holes that I had to contend with. The Corundum wheel just 'moved' the metal and covered the holes..:>(


 Here is a close-up picture of how the "pin & post" looks, interesting technique? 


 This is the final cleaning of the porosity this was interfering with my setting, in many places. 


 Another up-close photograph of the Corundum wheel starting to 'move the metal' and cover up the many holes.


 Here is the final pendant as it now appears. I'm going to improve on the 'Rhodium Plating" at a later time.

 I sincerely hope that you understood what problems can and sometimes occur when the casting process is not up to the standards that we all need.

Contact me if you wish:  'gerrylewy18 (at) gmail.com"


Saturday, 16 February 2019

'Shared Claw' setting... AGAIN."

   I was asked to write an essay on this rather interesting topic. I needed ideas from the "Orchid/Ganoksin" group of jewellers and this is just one of them!

 From 'my few years of experience', here is what I found & as well as the techniques that will be 'carefully' explained.

  Past history on this "demo-pendant": My two daughters gave my wife this round pendant that was bought from an upscale jewellery store. As you can see that these stones were of a 'mediocre quality', I think they were only 'white spinels'. I'm now replacing them with "Swarovski, Zirconia" stones, in my personal opinion is these stones are much better quality and of a higher lustre now for my wife now to wear.

 BTW, all of my demo-pieces are using "Swarovski, Zirconia" as they have (I think) a "Mohs Hardness" at 8.5! (You can correct me via email if I'm wrong!)

 What tools are needed for this essay/exercise?

1) Large round bur, this is to carve a 'round gallery' for the Pavilion of the stone!

2) Copper, or Brass pusher...but please, DO NOT USE A STEEL PUSHER! 

3) Bud-shaped bur. The #006 bur is to make two bearings, on both sides of each claw!

4) Ring clamp for your own setting project). For this demonstration, I'm using my "Shellac-Stick" as this demonstration is of a 'flat pendant'.

5) 10x power loupe. This is to be used for closer examination, other than your Opti-visor @ #5 power lens! I'm using my Iphone setting with the stronger 'close-up' feature on the camera, plus an additional 'close-up' lens attachment.

6) Pumice wheels of #180 grit, these will be in a Tapered shape.

7) Pumice wheel of  #1,000 grit, (Pink coloured wheels) 'Tapered' shape as same as the #180 grit Pumice Wheel!

8) Cup-Shaped burs a.ka. #77B. The size of bur #012 is used this essay as the claws are only 1.0 mm. I always make my bur selection a size la rger, never 'the same as'.

9) Smooth jaw 'pair of pliers'. These are to be used in moving the two 'claw tips' together. These two claws must be opposing each other when finished!


10) Wax-dob. This is used to pick up the stone.  Don't use tweezers, the stone might fly off  'by parcel delivery' and never to be seen again..:>)

 Let's be honest, can you see the difference between these two pendants?..:>) The top photo is the 'store bought' and the one below, is after some serious modifications!      As you can observe how transparent these 'white spinels' seem to be and with no overall shine to them. Just a poor quality of stones. 


 Here is a close-up of the original stones, you can see the 'uneven spacing' in between the stones, and the mediocre setting. The only 'saving factor' is the silver that the pendant that it was made with, and now let's look further.


 Under closer scrutiny, you can see the bearings and the 'rough metal finishing. Let's look into the examination of this pendant.


 OMG, this is what this jewellery store was selling? Observe the inside gallery-angle where the Pavillion of the stone should be resting against and the surface of the gallery.


  I just couldn't believe the thickness of the girdle of this stone...:>( Would YOU sell stones like these? I really don't think so!


 I saw little holes in all of the 32 claws throughout the pendant. I think the 'offshore' manufacturer attempted to reduce the 'metal-weight' at every possible opportunity.


 I kept these 'poor quality stones' separate from my superior "Swarovski-Zirconia" stone inventory. I'm using my shellac-stick as this is the only way I can keep the pendant from bending while I was continually working on it!


 My first cleaning step was to ensure that the inner 'opening' is near perfectly round and at an angle that is equal to the Pavilion-angle to the stone.                                                           

 I really don't think this silver is at .925 purity (possibly .850 purity). The metal had a reduced '.925 silver resistance', (with my previous silver experience) this was a RED flag! While using my burs, the metal was not responding as regular silver should!


 This is not the way to make a pendant, kindly observe the uneven finish along the gallery, enough with this. Let's attempt to clean the pendant for resetting with much more superior quality stones, agree?


 I first attempted to use my Triangular file with a #4 grit, but this proved to be not a good choice of a 'cleaning tool'. There would be many striations (file marks) that will be remaining everywhere.


 My next move will be using my Pumice Wheels of #180 & #1,000 grit wheels. On every setting item good or even what we see here, this process is a good way to start, ...again.


  I'm now using a well worn, bud-shaped bur to clean the metal in between the two 'opposing' claws. A 'well used', or 'lightly worn down' bur, as it only skims along the surface then all is remaining will be a smooth & shiny surface.

 If I used a Rouge (#1,000 grit) or my favourite Pumice (#180 grit) Wheels, I could have ruined the two claws, as they were so close together. I found that I needed all of the metal where possible, just for this 're-setting process'.

 To re-cut the bearings to now accommodate the better quality stones that I now have, I ignored those old bearings then re-cut the claws with a #006 bud shaped bur. 

 Why not a round bur? I wanted to make a 'horizontal cut' and avoided the round bur. The round bur could have left me with an 'uneven' cutting groove. 

 On each 'opposing claw', I had to make 4 bearings, this was a very careful & deliberate process. If I went in further into the claw, I could have and weakened that one claw-tip. The end result could have been 'a broken tip' or even the 'claw'.                                       

 I had to re-cut, with the bud-bur right at the bottom of the 'gallery'. The 'older' bearings were somewhere near the top of each claw/prong! In this photograph, you can see what and where I was doing my bud-shaped burring.


 I now have a few of the 'newer stones placed in. At every 5-6 stones, I start to secure each group of stones, why 5-6? If I dropped my shellac-stick, I wouldn't lose too many. If you look closely, you can see the 'opposing distances' between the two claws slowly starting to take place.


 I lightly 'scored' the surface of my pliers, but not too deep as I didn't want the pliers to ruin the sides each claw. I'm only touching the very tip of the claws, nowhere else!

  The pliers were originally 8.00 mm's wide and I then reduced them down to 1.36 mm's. "I must feel comfortable with them" while being used. I even use a pumice #180 grit wheel to further smooth the plier's tips! They 'grip' but never scratch the surface of the metal.


  I'm touching the very top of each of the two claw-tips...'in unison'. As I want to have the two tips hold the two stones together. I'm not pushing the claws with any 'normal pushing tool, but with my pliers, I'm carefully bringing in the two claw tips further together and in this process, I'm actually securing two stones at the same time.


  Those little marks were from when I 'removed' the white-spinels previously. Now you can see how level the stones' girdles are in their 'new home'. On a normal .925 silver, those marks wouldn't be so easy to make. I still think that this silver is only of .850 purity.


 Although there is a space in between each of the new stones, now the 'spacing is equal'. You can again 'see the opposing claws are finally getting closer together'!


 I examined the previous setting process and noticed that the claw-tips were of a uniform height.  I didn't feel the need to reduce the height further, in other word's "if it ain't broke, don't fix!" 

 At this point, I took advantage of this, by now using my #77B a.k.a. Cup-Bur and rounded off the tips. I held the Cup-Bur at a 'slight angle away' from the stone. This is so critical as I didn't want any additional marks on the claws.

 What size of cup-bur would I use on this photograph? For this demonstration, I was using a #014 bur, or in other terms; 01.4 mm's in diameter.

 Why did I scrape & mark the shellac? You can see that I'm only rounding off one claw-tip at a time. When I'm starting to round off the bur tips, I might lose my place as all of these little claws look all the same.

 As to remember where I left off, during my 'little cuppa tea-break', I won't forget where I last touched & which claw. Good idea? I use this method all the time and even today! 

 I don't know the exact angle in numbers, but making darned sure no edges of the bur is either touching the Table-Facet or the back-end of the claw.


 Can you see the overall angle that my bur is being held at! Never hold any cup-burs in a vertical angle. If the angle is vertical, the cup bur would be sliding around the facets of the stones, but 'not shaping the tips'.


 Even prior to removing the extra, soft silver pendant from the shellac, I'd give the 'claw-tips' a fine Red-Rouging. I'm concerned about any bending, as I'm using the shellac stick to 'stabilize' the pendant from any undue bending!


 In this photograph, you can see that I'm directing my mini, low-heat torch to exactly where the heat must be applied. I want the flame to be set at 'low temperature' but not to 'burn' the shellac by getting the flame too close. If you see the shellac starting to bubble. STOP! Please withdraw from the heat, NOW!  


 I'm very sure you can see 'some difference' between the first and final finishing. There is just no comparison, agree?..:>)


 I'm happy to give this "refurbished pendant' to give to my daughters who will AGAIN give this to my wife. As my teacher & instructor said if you are proud to make this for your wife it must be good!  Contact me anytime;gerrylewy18 (at) gmail.com.

Sunday, 10 February 2019

Which 'basic' ring clamp should YOU use & why?

 "Which ring clamp should you use is a reasonable question?" The clamp options are wide & varied including which to choose, when & why not?

 I know that there are many types to pick from & I have 5 styles to choose & each with all a different purpose! 

 The following photographs will show you which to use, why & what are 'good &  not-so-good'.

 Let's start with the "Inside Holding Clamp" This mechanism is of two clamps that are my best, why? It doesn't interfere with any designs (Azure patterns) to the inside of the ring. 

 The plastic insert expands and secures the ring from sliding sideways when I'm Hammering or Raising beads. In this photograph, I was applying a "Florentine" pattern to this ring!


 Here I am getting up close and starting my "Gypsy/Flush" drilling of the bearing cut. I need to see and have close proximity to the ring, if not the stone, this clamp affords that opportunity.


 I was confident that this ring won't move while using my "High Speed Steel" bur.  My other comment on this is that my 'hand & fingers" are really being close together around the clamp and not too far apart. The word is "comfortable", this is so important in everything we, as setters must be.


 Here being shown, are the many ring inserts for this "inside ring-holder". There are newer clamps built on this idea, this was the first on the market 15 years ago and then many improvements have come our way. But I've done much in using this particular clamp and its served me well..:>)


 The second one, of the well-used ring-holders that I use, BUT there is one drawback and it can be a darned nuisance to the setter. It's that large tightening screw that is on one side of this great clamp. 


  Can you now see why I find the screw a great problem? I even filed half of it away when I bought it. So should you, if you choose to buy it.

 I call this a "ring-vise" as it holds the ring from the outside and it is so important that no movement is allowed. You can see it, as it is holding the ring very securely that you won't have any problems in having the ring rotate or have any sort of movement.  (I even have a pair of pliers to tighten it further!)


  I was attempting to set these delicate Triangular stones in this ring-clamp. But 'security' weighed over the screw getting in my way. 

 I kept the ring in this clamp and I worked around this problem by just rotating the screw to be 'under' the bench-pin....Problem solved!


  Here is a side view and the name of this very interesting 'screw-type' clamp.


 Can you tell me how many clamps are there that allow you to hold the ring in this position? But you are then limited 'just by that extra piece of metal sticking up and interfering with your finger-tips' and the bur you might be needing. Great idea, but this also has some limitations as you have very limited access to getting your burs near the stone.

   I really like this metal clamp as it allows my fingers to get really close to the ring that's being set.


 Even with an additional layer of leather now joined to the inside the clamp, there isn't any risk of damaging the tube. The tight grip by way of this vise, the tube isn't going to move.


  I didn't want to have my fingers too far away from what I was doing. This style of clamp served its purpose..nicely!


 Just another view of the tube-like setting. The tightening really helped in this case. No need to worry if the tube got loose while setting, it got tightened further with my pliers.


 This style of clamp is not to be used at all for any sort of rings. It was meant for items that have a wide circumference, as in this replica made in silver "Guinness World Record, Poker Chip", that is now being displayed on its side!
 
You can see the little pegs holding this very unusually wide item. BTW, for the record, the official "Guinness" certificate was given to me on May 30, 2013.


 This is the best holding devise that I have, I can move it so easily and not be limited to any engraving-ball that is on the market with all tool suppliers.


 The extension of the 'working surface' can reach 67.38 mm's or 2.65 inches in total. BTW, I didn't have anything that wide to show you, but you get the idea, agree?..:>) Nice!


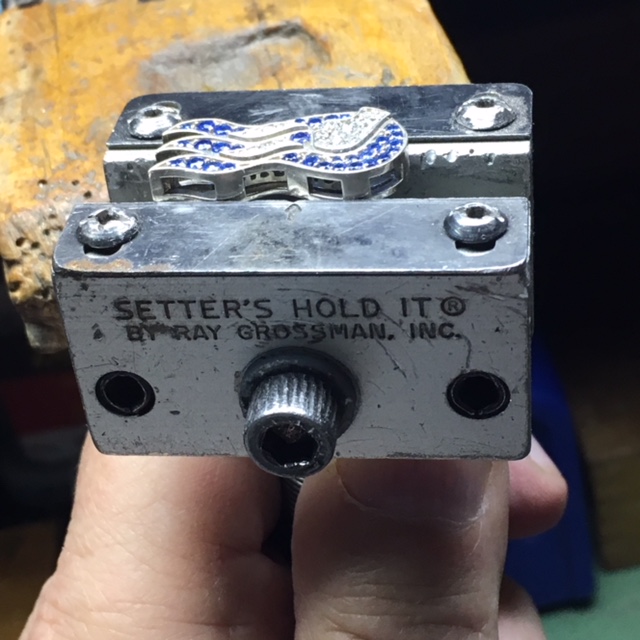
 Here is the actual name engraved into the side of the other clamp, but it is locking by one simple holding pin. Those two sliding vice-grips on top are not thick enough to hold really anything.

 I found that wanting to tighten anything, those sliding top-plates really cut into my setting projects. This left deep cuts into the metal & caused me many reasons to clean & fix...not nice!!..:>(

 After many attempts to use this "Setters Hold It" clamp, I'm putting this clamp aside for Diamond Setting. There may be other few uses for this style of clamp, sorry but this setting tool is not for me! I might just donate it to school, or another student..:>( 


 I've been using a wooden clamp since the day I started Diamond Setting & that is only 56 years ago. I still find many uses for the wooden clamp, as I enjoy using the flat and wide surface on this clamp.


  Here I'm Bright-Cutting the inside of an Oval Bezel, the clamp holds the ring steady & gives my fingers easy access to the ring instead of crowding of my finger-tips.


 In this photograph, you can see that after so many years the leather has gotten worn away. This is quite 'normal' of continued use and had to use a new layer. I just used an old leather belt and kept the old one to give me more ring support.


 I am showing the thinnest width of clamps and to the widest. It all depends on which you as a setter, can now select. Do you want crowding of your finger-tips or which clamp do you need to hold your item for a setting? YOU SHOULD SELECT THE CLAMP THAT YOU ARE 'COMFORTABLE' WITH.

 The next problems you 'might' encounter are, when you are setting stones for a long time, perspiration on your palm starts to occur. That can easily be eliminated by using a wooden clamp as metal doesn't allow the sweat to disappear.

 You gotta have room for your finger-tips as well not to crowd each other. I've had that problem occur on many an occasion.    

  Have you made your decision on which clamp to buy and use? My suggestion is to buy the one that you will be quite comfortable with for years to come.


 These are all inexpensive for your pocket-book, so why not buy one or two, at a time of the ones been shown.

 BTW, the "shellac-sticks" can be an option for some 'flat-surface' items. I preferred to show you only ring-clamps for this time, avoiding the 'shellac-sticks' as an option, as not everyone uses them. I use these and only I feel comfortable with the results!

 If you have any questions on any of the items being shown, please contact me at my email address:

"gerrylewy18@gmail.com"