Monday, 6 May 2024

Which "Handpiece" is best for you and why? - 21 photos

 In this detailed essay are handpieces that Jewellers, as well as Diamond-Setters have at their benches. There are 'pros & cons' for mostly every item being displayed here. I have my own preferences, but that won't let me persuade which you should buy.
 Some of them are less expensive than the others, and some tool suppliers might be less expensive then the others. Be aware of the country of origin, as quality is number one.
(These 'comments' are mine to share and should not be used in your purchasing of tools).
  
         =========================================


 This steel pole has just one job to do and that is to suspend the (heavy) motor and shaft at a preferred height for you. In addition, the height can be easily adjusted to your individual needs.


 For convenience, I secured my motor on a clamp 'up & against' the bench.

 This motor & shaft should avoid being resting on your bench-top. If the motor is among your hand-tools, you might not have any 'freedom' in working with your jewellery. 

 How high should the motor be? From the 'top of the motor to the end of your handpiece' is mostly the desired overall length.

This is the optimum length of your motor & shaft, I'm using my photos of my bench as a prime example. What I displaying here, is not from other benches, but my own.

   Every motor MUST COME WITH A 'FOOT-PEDAL', if not, DON'T BUY IT.

 In this photo is my very own easy to use 'micro-motor'. You'll notice when the handpiece is not needed, it's in it's own receptacle and not getting in my way of my setting tools.


 One added feature of these desk-top 'micro-motors' is a foot-pedal, plus they come with a 'reverse' control. These are great ideas, you just never know when these are needed.
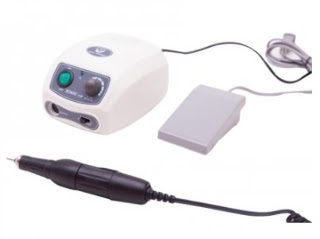

This hand-piece is good, I once had a handle like this. The only reason why I gave up on it was the 'flipping' of the locking device for the burs. (I had these devices actually snap and cut into my flesh on my hand.) 
 If you ask me what my opinion in buying this style of handles, 'think twice'!


 This handpiece is lacking a 'flex attachment' therefore making it rather too difficult to use in the craft of gemstone setting. To put it another way, there is NO FREEDOM in maneuvering anywhere even in jewellery production.
 If you are depending upon ease of use, there isn't any! If any handpieces are lacking this important feature, walk away!!!


 These are an assortment of mobile, micro-motors. I'm not mentioning names, but this manufacturer is one of the best in the market.


 This particular handle is good for jewellers, but not for the intense mobility needed in gemstone setting. There is no "flex-shaft attachment" to give you that added ease of moving your hand or wrist.
 This key is used to tighten the burs in the handpiece, shown below.


 Instead of letting your handpiece sit in your bench, I suggest to let it rest on a stand instead of getting wrapped up with your other tools in your bench. I never have my handpiece sitting ON MY BENCH.

 This little micro-motor is so very portable, this style of design allows you to work with a small bench area. But is it durable for long periods of working? Your decision!!!


 I think that this is a' life-saver' as you can use two handpieces at once. All you do is to switch from a "Reciprocating Hammer" to a regular Rotary tool all with one button.
 I'd give this "Micro-Motor", 'two thumbs up'. All you need is one rheostat main control, that's it! It has a speed control, reverse, plus a button for another handle. 

 This motor and attachments are great, if you are doing constant jewellery fabrication. The basic requirement is the pole MUST hold the heavy motor and long shaft.
 I just noticed one important fact that is missing, there are no "Flexible" features at the end of the two handles. You need 'complete freedom' of movement, these two handles are lacking that much needed feature (this is not nice).

   My own Micro-Motor is similar to this being shown here.

This is the epitome of a good handpiece with it's own stand. This cord is it's own 'flexible' attachment. I always have two handles, just in case one handle gives me a problem.


Thursday, 2 May 2024

"How do you hand-polish gravers"?....(at a very low price) - 17 photos

 Instead of spending 'tons of money' on a rotating 'honing wheel' flat disk, I can show you how to get the same results for less than $10.00

This Level of Difficulty is about 4 on my 10 Scale, YES, I wrote "4-10".

 Go to your local paint store or any hardware store and purchase a few paint-stirrer sticks. Then buy sheets of your preferred 'Polishing Papers',
Would you believe that's all you need? DONE!!!

 I'm not displaying the 'oil-stone sharpening process' in this essay, just this just a 'paper-polishing' technique. Although they both need to be mentioned, this essay is only how to polish your gravers without any ultra-expensive "power hone" polishing tools.

===================================================== 

 With my "Soft-Core Drafting Pencil", I explored different methods of filling in the pores of the paper to accept the process of increasing the texture of the paper.

 This paper was #1,200 and is now equivalent to #1,600 grit without any additional expense.


 With the same pencil, I've increased the paper grit from #800 to almost #1,100 grit with not one penny more spent extra in additional costs.


In the "pencil-rubbing" section, is where I'll place my Onglette graver.


 I'm rubbing my Onglette #2 against a paint stirrer stick wrapped with #1,200 grit paper. The only 'contact' I have with the graver is as shown in this photo.
 Of course, do not forget how nicely shaped the graver point is. 

 I don't want any 'large amount of unused graver metal' to interfere with my delicate Bright-Cutting processes.


 For convenience I'm now using my preferred "Adjustable Graver Handle" why this style of handle?
 I can place a long blade inside the core of the handle and leaving only the working section of the blade being exposed.

 I use two colours of handles as the 'wine-coloured' is always holding my Flat graver. This is used solely for quick graver identification purposes. 

 Now comes the 'polishing aspect of this essay', I'll lay the front section of graver and  gently hold the graver to the paper.
 The 'rubbing' will put a more tactile and smooth touch to the HSS steel.
 You can see here just where the graver is being polished, with an extra emphasis to the underneath section of the Onglette.
 
 What you are seeing now is just how far up the graver length the 'rubbing action' is being used.

 I applied a soft-core pencil to this paper and by rubbing on the paper, this process literally imbeds the pencil-lead into the pores of the paper.


 In essence, this soft paper now has the equivalent of #2,000 grit.....IS THIS EASY, OR WHAT? I'm emphasising the 'added pressure' to the graver, just where the cutting will soon commence.

 In the beginning of this exercise, I'm using a 'rough texture' of paper #240 grit to initiate the smooth texture. I need to have a clean area for my graver to cut, but not yet!

  Instead of buying multiple 'honing-disks' costing astronomical amounts of money. 
Each sheet of new paper 'could be' about $4-5.00 EACH, including taxes. Which is cheaper?

 The next paper is this series, is getting softer and smoother metal for cutting.

  For "Bright-Cutting" and other designs, such as 'ornamental metal sculpturing', it's imperative to have an excellent Onglette blade.

 I always use two blades as seen here. HSS (High Speed Steel) Onglette graver. The thickness is seen in the numbers shown, #0 is thin and #2 is slightly thicker. 

 On the #2 tool, is great to use, as I can easily modify the side of the graver so it'll be easily used in Bright-Cutting. Only ONE SIDE OF THE GRAVER WILL BE USED FOR THIS STYLE OF CUTTING.


 As you can see the ONLY THE POINT OF THE GRAVER HAS BEEN HIGHLY POLISHED. It is unnecessary to highly polish further along the shaft of the graver.

 The shiny area has never seen any 'honing disk' nor will I attempt to allow any flat disk to touch the graver.


 I WANT TO KEEP THE 'GENTLE CURVATURE' OF THE BLADE. If I put this graver to a flat honing-disk, the 'gentle curve' will be ruined or lost, therefore preventing me from getting a smooth and gentle cutting finish.

I can now use these Onglette blades in "Fish-Tail", "Gypsy Setting"& "Bezel Setting".

 I use this style of 'adjustable handle' to ALL OF MY GRAVER HANDLES. When the graver gets shortened from constant use on the bench-grinder, all I do is to extend the graver out of  the handle.

 In closing, if you still want to buy those honing disks, the decision is yours. I have never bought any nor do I wish to. My email address is "gerrylewy18@gmail.com"


Saturday, 27 April 2024

How do YOU remove 'injection-wax' from INSIDE of a wax-statue? - 26 photos

 How to make a wax statue 'lighter in weight, but not so costly'? There is only one technique and that is to use a specialized "3-tooth bur".
 This bur literally 'removes' the wax inside the separated ligaments where the wax isn't needed.                      
                     This Level of Difficulty is 8.5 out of 10!


 This is a close-up of the wax-carving 3-tooth bur. As it only cuts on wax, the teeth hardly ever wear out. If I need to dig deeper into a wax form, all I will do is to lengthen the bur from the chuck.

    Don't hold any delicate wax-form too long, or it will get soft from the warmth of your fingers. Thankfully with this statue, we won't have this problem.

 Keep all of the remaining wax residue out of your wax-cleaning areas. As this will cover-up what you are doing.

 Please don't speed up the revolutions of the rotating-bur. Take care while doing the carving, or your '3-toothed bur' will pierce the wax pattern. Then a 'repair process' is needed, this will be shown further below.


 This photo shows how delicate the wax-removing can get. BE CAREFUL.

 Examine each 'wax clearing section', Just don't go at it without measuring the wax length needed.


Leave enough thickness for your metal casting. "What remains, will be metal."

  Remove all residue from the "3-tooth bur", removing of wax must be seen with 'no guessing'.

  For being on the safe side, keep the walls of your wax-form thin, but not too thin. REMEMBER THAT THERE IS A 6% REDUCTION between the wax => metal.

                                           Repairing the wax-holes.

  To reach into longer sections or areas, you can extend the cutting bur, as shown below.

 If you keep your long section at a proper angle, you won't pierce the wall. This is what happened here.

There will be times in removing your wax, you will be needing to 'fix' your holes. I really suggest that you use a softer wax than what you are currently working on. 
This wax melts at a lower temperature and as well the newer wax is of a different colour.

 "This operation is surgically delicate", lower your temperature of the wax pen. Keep your melting pen clean by just heating it up and keeping the pen-tip clean where you are working.

Even if  the colours of the 'repaired wax' is of a different colour, that is of no concern.

  Here are both 'arms' of the statue, one is drilled, but the thickness of the wall is still too thick for being 'lighter in metal weight'. More wax removal is required, as the weight is still too heavy.


 The wall of the arm on the left is the 'desired thickness'. The center 'arm' needs to be contoured more evenly. Of course the 'arm' on the right is untouched.

These are the thin wax-sprues that can be bought in any tool-supplier. I use them for making 'gates' and fixing problems in my wax-carvings.

                                      Weighing your waxes!
 
  This particular arm weighs 3.3 grams and this is before any removing of any wax.


After much 'careful' wax-removing, this arm now weighs 2.5 grams. Nice weight for casting!

The "face" wax-weight is a very heavy 5.5 grams. This was too heavy for metal casting and above all, so very costly.

Now compare the weight shown in the 'hollowed out' head, it's now at 3.0 grams.

 The main torso of this statue weighs (a ridiculous) 25.8 grams. But how did I solve this major weight-problem?

 My solution was easy, but well worth my efforts & labours.
First of all, I split the torso in halves, then easily carved out the wax. This weight went from 25.8 grams down to 8.6 grams for a reduction of 17.2 grams. 
I'd call this a big "WOW".

 This 'leg of the statue' needs much careful separating, as I just can't manage to use any '3-tooth' bur in it's present condition.
 I can easily remove as much of the wax as needed. Then afterwards re-joining the hollowed out pieces of the leg again.


 Even I had a 'challenging time' doing the carving and repairing of the wax. But suffice to say, that through all of these photos, I enjoyed explaining all of the subtle nuances to you wherever you live. "gerrylewy18@gmail.com"


Sunday, 21 April 2024

How would you 'cost & weigh' a large wax sculpture?


  In my previous essay, I displayed my 8-inch mold from our family heirloom "circa, 1934" statue.
 As it was too large to cast & to clean being in one piece, I disassembled it into smaller pieces. I'm going to show how it can be cost effective & will be explaining this process further in this, my 385th blog-essay.

 As many of these wax-pieces are solid, I must 'separate & carve' them to avoid the expensive casting costs.
 For now, I will prepare another wax statue just for this process. As these pieces have been sitting in various containers for many years and some pieces got lost or destroyed. 
 I will ask my caster to inject my 8-inch mold as I need to locate the missing parts of the 'feet and both arms'.
=============================================
 The complete wax statue (as shown) weighs 106.60 grams. YOU MUST ADD 10% FOR THE (casting) 'BUTTON'. When you are weighing your wax "Piece of Art" always INCLUDE for ALL SPRUES, (these will be removed after casting).

 I used a cost calculating schedule just for this essay from "DENTRITICS.COM" to estimate the costs mainly in .925 silver.

 The metal casting weight is calculated at 1,104.38 grams (710.21 DWT) the cost in USF's is $90.81 plus the (company of your choice) casting fees.
 
 Silver (.925) alloy is at $28.64 an ounce dated on April 20th, 2024. The gold price fluctuates by the hour, silver is much stable. 
 In our Canadian (37.53% added) exchange currency, these costs will be $124.89.
In "Euro" currency, the charges are 84.24.
In "GBP" (English) currency, the charges are 73.40.

Once that I have carved & reduced the many wax weights, these costs will be greatly reduced. I will again estimate the final wax & casting weights, but these numbers shown are only a testament to the rigours of calculating these costs.
 There are so many variables to contend with, I had to make sure that this essay is accurate as possible.
 
  At a later date, I will attempt to display how the wax-carving is actually processed.