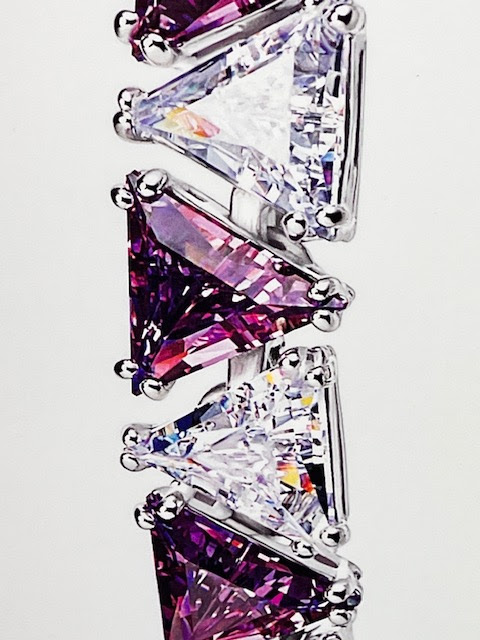
Saturday, 13 May 2023

Which file would YOU use; "where and why"? (25 photos)

 Files can be a wonderful tool on your jewellery bench or a prized possession. On my setting bench they are a tool that can be bought even at your local hardware stores.

 The first file (on top) is used primarily for wax filing. These well spaced teeth are not to be misconstrued in filing or trimming of metal. Their (teeth) sole purpose is to remove large amounts of wax that will be used prior to the metal filing process.

 The lower file picture is used in the removal of unwanted metal. 


 As a few of these files look almost the same at a distance, I 'number' each of them. Why would I need a "O" then pick up a "1" instead? A few problems would ensue.
 The two "OO" signifies a grit #2. I used this as there wasn't too much space to write exact number. 


 This has dual purposes, on one side it is flat and the other side being shown has a curved surface. This 'rough textured' file is used mainly for wax carving.

 You can easily see just how wide the teeth are, these teeth won't file smooth, but used to remove unwanted wax from a new design.

  I paint numbers on files just to distinguish one grit from the other. (Excuse the rust spots)


 This file has a grit number of "O", it is used to remove any 'rough casting' defects.

 These are photos taken with my Digital Microscope at 240x power magnification. These files are used often as you can see remnants of particles from prior cleaning.


"WAX-SHAPING FILES"
 These wax removing files only do one thing and that is to shape the new wax form. These 'sharp teeth' literally grab the not-needed wax and assist in shaping the wax form.
 
 For your eyes, this file has two surfaces, one side is FLAT and the other is SEMI-ROUND.

 BTW, I remove the wax by applying a low heat torch to the teeth and the wax just melts or burns away.


 A less aggressive file is a "Half-Round '0' grit" file, this will give a smoother 'finishing surface'.

=========================================

    "BUYING FILES AT A HARDWARE STORE"
 There is nothing to be ashamed about this 'alternate buying' venture. These files are much cheaper and the stores have a wide selection.  
 My favourite places are the "DOLLAR STORE and "HOME DEPOT". Most of my larger files came from these two (international) chain stores.

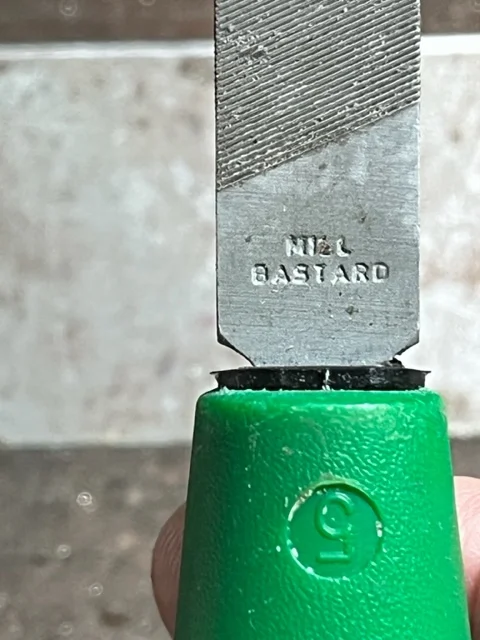
No, "Miel, is not a Bastard!" But the name "BASTARD" refers the 'Course' texture.

===========================
TRIANGULAR FILES"

 (I'm using only a #4 grit file, as #2 is usually too aggressive for this kind of delicate filing.)
 
  I've now finished with the large 'hand-held' files and now I'm going to now display the "Triangular" 8-inch files and their numerous setting applications.
 These files are used primarily for detailed cleaning around gemstone setting and the tips of claws.
 Instead of numbers everywhere, I use 'felt-ink line markings'. I can make these markings all around the handle, instead of searching the 'grit' when needed.
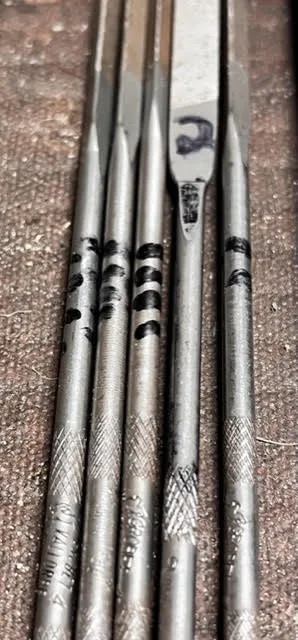
 
    This #2 file is FLAT, not of a '3-square' shape as 'IIII' is. =>"IIII" refers to #4 grit.
 
 Here are a few examples where these Triangular files are to be used. Although these have been used in my recent essays, these are great for this particular tutorial-essay.
 This delicate trimming was done with a #4 grit Triangular file, even at the outside curves.


 All of these detail finishing were as an example of #4 grit filing. I rarely use a #2 grit file for this very delicate work.


   This particular filing on the 'outside of the claws' takes MUCH PRACTICE.

 I suggest that the 4 "ends" of the Bezel be trimmed first, then file ONLY with the #4 grit Triangular file.


  Please be very attentive when trimming the "V" claws, this is a very delicate area. Again, #4 grit Triangular file is required at all times.


  (I will use my Pumice wheels of #180 grit to remove any marks remaining on the delicate metal. This "Triangular" setting is not on my 'to explain & display list'.) 
   gerrylewy18@gmail.com

Wednesday, 10 May 2023

Simplicity at its BEST.. (8 photos)

 In my recent trip through this high-end shopping mall in Toronto, Canada. I saw these displays. I couldn't resist to capture the views for our blog. We just have to keep our eyes & iPhone ready.
I don't want to be concerned about what was the name of the store.
 I'm just showing you that with a bit of creativity, we can all aspire to make our little creations "outstanding" if not, wonderful.
ENJOY THE VIEWS as much as I did while taking these pictures all in about 4 minutes of labour.


Preparing to set 'Princess-Cut', Genuine Emeralds. (11 photos)

 Of all gemstones on a setter's desk, Emeralds are the most delicate to work with. Breakage is very high on our list and can happen at any moment if care is not taken!

 On the "Mohs Scale" of softness, these are about 6.0 as a Diamond rate is at 10.0.


 As a lifelong gemstone setter, I give full respect to these delicate stones. In the following photos, you will observe that there is little space between each of them. 
The spacing is to prevent any touching along the "Girdles". 

 If two stones touch during the setting process, both of the stones could chip, or shatter.
============================================
 You can see that much of the metal is covering the Girdle on each stone.

I used my Flat #40 graver to Bright-Cut the metal where it is touching the stone. 
DO NOT USE A FILE, why? The chances of chipping the stone in this simple process are phenomenally high.
============================================
 The Scale of Difficulty on this exercise is 9+ out of 10.


  Already on two stones, there are three defects, I left the stones in the ring just to show you what can happen.
 
 As always, pre-polishing of Emerald rings is a 100% necessity. After the delicate setting, a light Rouging may be done.

 Always 'test and observe' how each of the stones will be sitting. For this ring, I set two of them slightly crooked just to show how simple errors can often happen. How did this error occur? The inside bearings were not aligned on both ends and were not prepared equally.

 In this particular ring display, these stones are set in an "End Bezel" design. All of these stones have a full amount of metal covering the Girdle. Kindly observe how much metal is over and protecting each stone. Please do not file this 'extra metal' away.


 Which of these 5 stones would you set first? I always start with the centre stone first and work my placement towards the end of the End-Bezels.

 I used a saw blade of #4/0 cut to separate the metal to make it easier to set these 'delicate' stones. I used a bud bur to cut a 'bearing' as where the Girdles will eventually sit. The thickness of the bur is dictated by measuring the widest width of the Girdle.

 (I might suggest from my own experience you could use #006 or #007.)
 
 If you use a round bur, you might find it difficult to carve a straight line. PLEASE USE A BUD-SHAPED BUR.
  Any filing must be done now, as once the stone is in you could easily damage the stone.

 Remember that even the Pavillion of the stone needs to be attended to. Remove all of the metal where the stone will & could be touching. Carve out the inner 4 corners of EACH opening.
THERE ARE NO SHORTCUTS IN THIS KIND OF EMERALD SETTING.

 Never assume that "Oh it's okay, the stone will fit" many times it won't. I always carve extra areas just in case I miss a spot. (we are human and mistakes can happen). "Mistakes with Princess-Cut, Emeralds" can be so very costly.
 
 All the stones should be of the same width on all of the 4 sides. If one of your stones is larger, place it in the centre, why? This is just for aesthetic reasons, the eye will gravitate to the centre and move towards the end of the End-Bezels. (This is human nature).
 
 I'm looking at this photo again, the two stones on the far right ARE LARGER.

 The stone on the second from the left is a tad SMALLER. 

  Do you want to try setting this ultra-expensive ($12,000+) Pear-shaped, Genuine Emerald? I rated this setting at a 35+ out of 10, on my "Difficulty Scale".


 Any questions for me? Email me at 'gerrylewy18@gmail.com'

Wednesday, 3 May 2023

Can we improve on this pendant? (2 photos)

 This pendant has been on display since mid-2022, in an 'upscale' jewellery store in Toronto, Canada. I will explain my reasons why it hasn't been "SOLD".  These are my reasons only and should not reflect upon the retail store, its location nor its staff.


Here is the size of this pendant resting on a 'neck display'

  From my experience of (only) 64 years, I've seen many beautiful pieces of jewellery and unfortunately, this is not one of them, why?

------------------------------------------------------------------------

1) There appear to be many poor qualities of diamonds that were set into the gold. I could lose count of how many of them need to be 'replaced'.

2) These colours are dark-brown and black and not to mention there doesn't appear that any Rhodium Plating has ever been applied.

3) On the periphery of this round disk, there has been no metal cutting. My 'metal cutting' is in the form of "Bright-Cutting". A very simple design would improve the 'selling' factor. There is no 'outside border' anywhere to be seen.

4) There also hasn't been any form of 'ornamental' metal cutting such as in 'extra cutting' along the outside edge in using Onglette gravers.

5) All of the above reasons seem to be neglected in the diamond setting process.

  For such a large and heavy pendant why choose a light-weight chain?

 If you the 'blog reader', disagree, please email me.

gerrylewy18@gmail.com

Tuesday, 2 May 2023

Unusual GEMSTONE link bracelets. (9 photos)

 On my trips to this upscale shopping mall here in Toronto,Canada I came across another 'display pillar'. This pillar showed bracelets of various sizes, shapes & colours of gemstones.

 One of these had Triangular shaped stones, it was too interesting to keep from being photographed. I capture anything that needs to be 'explained' fully.

 In just a few seconds of getting my iPhone ready, I mentally prepared for a new tutorial essay.

These five necklaces are just what the eyes need to see; beautiful arrangement of colours, sizes of stones and showing how the 'underneath assembly' has taken place.

 The very first thing to observe is the high quality of Polishing of each link. Setting of the stones is last on the long list of 'what to do'. 

 What many high-quality jewellers use is a "Magnetic Tumbler" to get the 'steel pins' into the small crevasses during the tumbling action.

 These steel pins literally rub against the metal necklace links and make the 'hard to reach' areas shine. This will avoid any 'cloth-wheel' polishing.

  You will see that every claw is 'rounded' from using a "77B, Cup-bur".


 In this photograph, the tops of each claw DO NOT EXCEED the top of the "TABLE" of any stone.

This "SWAROVSKI" display pillar was the beginning view of this essay.

 I intentionally took many pictures of this display and the results are here for you.


 For the jewellers who are deciding how create claws over the stones, you can see how six claws protect the three points of the Triangular stone.

 You can see that every link is highly polished and made 'smooth to the touch'. I would use my "Pumice Wheels" #180 grit, then #1,000 grit wherever possible.
 You are making a "Wearable Piece of Art".

 On each link, the jeweller decided to solder a circular link and join the neighbouring link into each other. This will give the 'wearer' complete movement and make the bracelet easy to wear.
 
 On one side, the link has been soldered to the underneath of the bezel. The side bezel slips through the adjoining linkage. Interesting idea? (I found this so very fascinating).
 
 After the complete soldering process, all that is required is to set the stones and a light "Rouge Polishing".

  There is very delicate soldering practices being at work here. NO SHORT CUTS and PLEASE, DON'T RUSH YOUSELF.
 
  DON'T 'MAGNETIC-TUMBLE POLISH' THE BRACELET WITH THE STONES ALREADY SET.

 "Gerrylewy18@gmail.com"