On my trips to this upscale shopping mall here in Toronto,Canada I came across another 'display pillar'. This pillar showed bracelets of various sizes, shapes & colours of gemstones.
One of these had Triangular shaped stones, it was too interesting to keep from being photographed. I capture anything that needs to be 'explained' fully.
In just a few seconds of getting my iPhone ready, I mentally prepared for a new tutorial essay.
These five necklaces are just what the eyes need to see; beautiful arrangement of colours, sizes of stones and showing how the 'underneath assembly' has taken place.
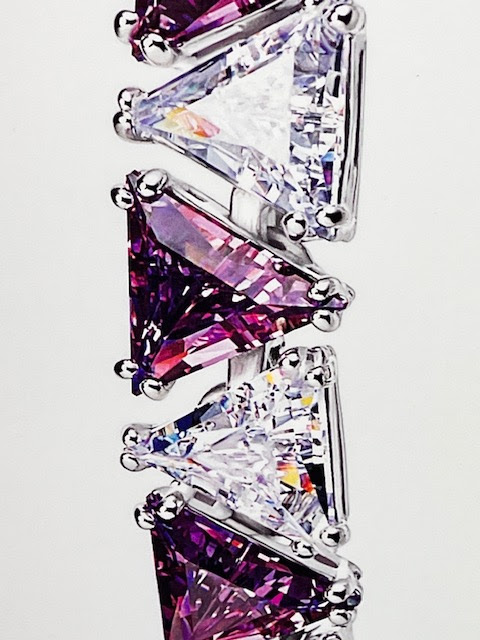
The very first thing to observe is the high quality of Polishing of each link. Setting of the stones is last on the long list of 'what to do'.
What many high-quality jewellers use is a "Magnetic Tumbler" to get the 'steel pins' into the small crevasses during the tumbling action.
These steel pins literally rub against the metal necklace links and make the 'hard to reach' areas shine. This will avoid any 'cloth-wheel' polishing.
You will see that every claw is 'rounded' from using a "77B, Cup-bur".
In this photograph, the tops of each claw DO NOT EXCEED the top of the "TABLE" of any stone.
This "SWAROVSKI" display pillar was the beginning view of this essay.
I intentionally took many pictures of this display and the results are here for you.
For the jewellers who are deciding how create claws over the stones, you can see how six claws protect the three points of the Triangular stone.
You can see that every link is highly polished and made 'smooth to the touch'. I would use my "Pumice Wheels" #180 grit, then #1,000 grit wherever possible.
You are making a "Wearable Piece of Art".
On each link, the jeweller decided to solder a circular link and join the neighbouring link into each other. This will give the 'wearer' complete movement and make the bracelet easy to wear.
On one side, the link has been soldered to the underneath of the bezel. The side bezel slips through the adjoining linkage. Interesting idea? (I found this so very fascinating).
After the complete soldering process, all that is required is to set the stones and a light "Rouge Polishing".
There is very delicate soldering practices being at work here. NO SHORT CUTS and PLEASE, DON'T RUSH YOUSELF.
DON'T 'MAGNETIC-TUMBLE POLISH' THE BRACELET WITH THE STONES ALREADY SET.


No comments:
Post a Comment