What is a "Bead-Burnisher" and what does it do? Why is it so important in Diamond Setting?
This one question can be answered with many writing of texts and 44 photographs, along with a few 'hand-drawn' diagrams.
You want answers, well I'm trying to make this as easy as possible. When you are learning a new technique in a very difficult profession, sculpturing your Gold hand-created-Bead or even in Platinum can be very problematic. I don't want you or anyone, to miss out on anything. I want to make "every door of problems get opened" and of course there are No Short-Cuts!
Along this route, "you might and will hit a road bump" if you do, I want you to overcome that problem as soon as possibile. After all, my apprenticeship took ME ...9 YEARS, and for you??
"Repeating each task in my learning, was my best teacher". As for you, you can learn by reading each sentence or paragraph, as often as you possibly can.
This simple essay can be a heck of a difficult technique, trust me! Bead-Burnishing looks difficult, but after a few Diamond Setting projects, all of this will come so very easy for you!
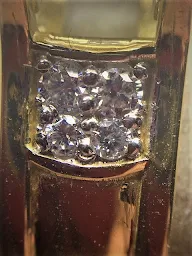
Not to mention that this setter (male, or female) hasn't even Bright-Cut the metal surrounding the many large diamonds on both sides of the ring.
In this photo-screen, the "Bead-Burnishing" was not acceptable, why is this?
I took this photograph for only one reason: This is to show you that some setting practices have been avoided. This setter has a need to practice more!!!
There were many beads with little shards of metal on every bead. NO, I DID NOT SET THESE STONES, it's just a very disgusting example of poor setting practices. Not everyone are proficient in completing every technique in this skill.
A "Bead-Burnisher" is a metal rod that can make all 'beads' round to the touch. That's when you create that little piece of metal to hold the gemstone 'rounded and secure'.
But what happens if your bead that is over that stone is not made round? Well, that piece of metal over the stone is like a sharp pin standing up and it will literally hurt your finger to the touch AND it will cut into the skin. This is not what you want, agree with me?
This "Bead-Burnishing tool" presses down on to the bead that you just made, and in turn, makes the bead 'rounded'. In essence, this is similar to rounding off a claw made by your cup-bur, "77B"!
Basically there is no other process that makes your beads sit tight to the stone. The process is quite simple and it retains that round-effect on each bead at the same time.
The container that you see comes in two set sizes of either 12 and also 18 burnishers. The choice is yours what to buy, I usually buy 2 'sets' (minimum) of these 18 set of burnishers at the same time. To keep your Burnishers well maintained, I always oil the covering, this will prevent any RUST to appear.
Sometimes I might need more than that one size, if they get worn down and they surely will, that is "where the duplication of any burnishers" and these will come in handy when you don't expect it!
These SQU numbers attest to your supplier where these burnishers are made.
I could be using 3-4 sizes of pins in just one project. In this project that is sitting on my bench-pin, hence, I'm ready to buy 2 'sets of pins' that come in 18 burnishers, or 36 burnishers.
If I bought only a set of 12, I'd be then required to buy two sets! Buying an 'extra set' is the easiest way to get your setting done on time.
I have 3 sets always in my bench, if one burnisher of one set are defective, then I have one or two always ready at a moments notice, simple as that!
Both you and your client will be very happy with the completion of this Diamond Setting project!

There is no other way to push down your beads...evenly and still keeping the rounded effect on each bead...after setting!

No matter what burnisher you are using, the correct one you need is the one that will result in giving you a rounded bead finish.
In this rudimentary Star-Setting, I created a 8-sided Star in two sessions. One Star comes with no stone and the other comes with a finished Star with a stone.
There is no Star that will give me the freedom of cutting with rounded Beads. I have to do everything myself and this is no easy task. "Bright-Cutting" is not the most easiest of tasks in Diamond Setting", it is very similar to Engraving. We share the very same engraving tools, polishing papers and shapes and sizes of cutting blades.
After a good many 'burnishing sessions' you can already see that the bead-burnishing metal rim, is starting to look worn. If this is the result, you can use the burnisher from your "duplicated set"!
Many times these can be modified or recycled, but there is a simple method in 'fixing the edges'.
What does this burnishing tool look like? It is a piece of the metal rod, but with no rounded or bud-shaped ending that holds the diamond in place. Instead at the very end, or the tip has an indentation of many sizes that are a;ways measured in millimeters.
BTW, these Burnishers seen below, are not worthy of 'fixing'. I wouldn't even think of doing this at this late stage of being used. These are not worth wasting your time on them!
All set of Burnishers come with their own handle, they are not the "screw type of handle" as you see in other handles, but each have a 'pressure-style' of wooden handles.
Rest assured, the 'holding power' is quite tight and you shouldn't be worried if these eventually get loose, they just won't loosen up while in constant use.
That very end fits just over the bead that you just bought! These pins come all with a wooden handle, all of these burnishers are now shown in the following pictures and made to fit beads of many sizes of 12, or 18 pins.
"Each set comes with a handle that fits all of the burnishers that are in that set". (Sorry if I'm repeating myself)
The name and numbering are the SQU, (international naming). That is, if you live in another country, that "SQU" will be a guide to you while buying from either Rio, Gesswein, Stuller, or ???
This is how each set (of 18 pins) look and is ready for use!

Why is there a 45 degree flange at the very tip? I'll come to that in a moment!
Compare these 'two sets' of burnishers:
This first set, (you can now see below), is useless and totally beyond repair. The center smaller pin is good for one thing only and that is "metal recycling" nothing else! Its so badly worn down, it's almost flattened!
(
Check this center burnisher!)

THIS lower SET IS READY FOR VERY MANY MORE BURNISHINGS, why? The edges are well defined, I have "modified" the edges (on the two larger pins) for specific reasons.
Why is this "edge" slightly modified? Here is the reason. None of the pins that you buy come like this! It's...all...up...to...you...to...make...the...correct...modifications!
THE SIMPLE REASON is that while you are in the process of pushing over the bead to hold each stone, you will see a "little edge, or rim" on each bead.
This is not nice to see!! Let's just call them UGLY and to remove these 'burnisher-rims' are almost impossible.
When I was taught Diamond Setting (so many decades ago) I was explained to put the burnisher of your choice, into the wooden handle, then what's next?
Place this burnisher on your oil-stone, at an angle of about 45 degrees and run it across the oil-stone from "one end to the other!" If your stone is 8 inches long, I'd run it at a length of 6 inches.
After 1-2 slow runs please EXAMINE THE EDGE with your 10x loupe.
The finished "RUN" should look just like this as its now shown below. The end result is that you have just avoided another "rim-effect, on every bead" that you will now make! How nice is that going to be?
You have an 8"inch oil stone, then please use as much of it's length as you can! This will give you a full run of your oil-stone.

The 45 degree angle allows to push your burnisher over the stone without any section of the tip touching the bead as it's being rotating as your push over the bead.
This means that you can push over a bead on to the soft stone Genuine Emerald with no ill side effects as in breakage!
As you can see here I put my enourmous Gold and Diamond item into a clamp and its tightly being held. I will then 'ever so gently push my burnisher' onto each of the beads.
There is no other method, or process that will tighten any, or all of the beads with no problems!

This "little item" is my "Guinness World Record". There is no possible chance for me to damage any of the beads with any other method in tightening any of the beads.
I just want to be 100% careful in everything that I'm doing.
After I do my Bright-Cutting, prior to setting any of my stones, I want my Bead-Burnisher to tighten all of my stones. This Bead-Burnisher is the "answer to all of the problems" in Bead Setting of diamonds.
Once that I can get the stones into the metal, I then can use my new tool and "gently push over all four of the newly formed beads" with no ill effects.
In this diagram, you can see just how the process is done in pushing the beads down tight. I MUST ROTATE AND PUSH DOWN at the same time. This way my new beads will be looking like little balls. They won't be flatened, if this is what you're thinking.
When there is a deep round recess, there is no possible way in getting any 'flat spots' on top of the bead.
I must at all times have the bead-burnisher be larger that the bead itself!!! If not, there will a rim all around the top of the bead.
If you have this, there are thousands of problems in trying to get rid of the 'deep indentation' that's all around the bead.
I'd call this absolutely butt-UGLY, and just poor planning, (so sorry with my strong language).
As a Diamond Setter, you and I must think first, than act afterwards!
AGAIN, THERE ARE NO SHORT-CUTS IN ANYTHING THAT WE DO while at the bench!
The most enjoyable aspect of this profession, is that once we finish with any setting problem.
We can now just sit back and look at our work and say.."WOW, it's finally completed!"
"Here are a few Foot-Notes"
My fantastic teacher for over 18 years taught me one thing. "Gerry, be very proud of your work and one day people will thank you for your time in your teaching!"
To be a good Diamond Setter is not the simplest thing on this planet, I have invented many tools to aid me in getting the best results.
That FLANGE on my Bead-Burnisher was one of my 'little aids' or inventions! This gives me better results in not having any rim around the top of the bead. This flange also allows me to bead burnish ultra-soft stones, these are Amethyst, Coral, Emerald, Cubic Zirconia...(ad infinitum)
This burnisher is a wonderful item to have at your bench, why so? Without it, you just can't make your beads easy to hold and then to secure the stone. Basically, IT'S YOUR FRIEND at the bench. I have three sets, made ready at a moments notice.
When you first buy a 'set', don't hestitate in creating a flange on the ones that you need the most! The little box on the right side, in my bench-pan are my gravers.
Then all of my gravers are kept seperate, as I only use 5 - 6 graver handles at all one time. But this is another essay coming up next!!..;>)

Be so very careful in preparing the Bead-Burnisher that you need, lay them aside on a mini-tray, instead of searching for the ones that you need the most and the most often.
"THINK FIRST & PLAN YOUR ACTIONS"
If for some reason that you find your 10x power loupe that one or two of the burnishers need to be checked for "wear and tear". You have two choices, either thrown them away or select another burnisher from one of your other unused burnishing sets.
Keep them: 1) Well Oiled, 2) Have the Edges Sharp and ready for use. 3) Avoid any contact with water which can cause RUST, (which is an enemy for the steel).
Basically, "Have these Bead-Burnishers always in pristene condition, they will then work for you, without any hesitation".
I like to keep all my "very large burnishers" kept in a seperate container, this way you will locate then at a moments notice!
I'm not telling you "how to work your tools", I do this even today, I too want to save time!
This well talked about FLANGE will allow you to run your burnisher to work over the metal bead without any thoughts of your tool destroying any soft stone.
If you aren't sure of any technique in this difficult essay, or in other gem-setting essays in my blog, write to me anytime day or evening. I'M HERE JUST FOR YOU!
"gerrylewy18(at)gmail.com"


No comments:
Post a Comment