These many photos have been sitting in my archives for many years. Here they are to be examined again for posterity.
=================================================
This is a Gents ring that could be used for any diamond that is 0.35 <=> 0.75 points or larger. In this setting process, filing with a Triangular file of #4 cut is the main active setting tool. With a follow-up of Pumice wheels of #180 grit.
Here are a few hand-drawn diagrams with explanations offered (including spelling & grammar mistakes).
THESE DIAGRAMS AND PHOTOS are self-explanatory.
I used a FLAT GRAVER to carefully remove any metal shavings from where the rotating High Speed Steel bur cut into the 4-claw setting.
Please keep the bur-cutting clean, prior to setting of the diamond.
These diagrams were seen in an American jewellery-trade magazine and proved to be very helpful to the readers.
I use a novel method in setting of any diamond or gemstone, how is that? I WANT EACH CLAW TO LAY FLAT ON EACH OF THE "CROWN FACETS" ON THE GEMSTONE.
My teacher showed me this method 65 years ago. I'm using a #4 wide of a saw-blade to do the cutting against the claw.
You can see just where each of the saw-blade cutting is taking place.
PLEASE AVOID NOT TO EXCEED THE SAW-CUT BEYOND THE "GIRDLE" OF THE STONE. If you do, there will be weakness in the structure of the setting.
This is my "favourite" claw shaping & cutting bur, make no mistake about the shape or the angle. It is made at a 45 degree angle, some burs come in at 76 degrees but no diamond is shaped at 76 degrees. THOSE ARE NOT THE CORRECT ANGLES.
Here are a few "MOHS" hardness's of materials that setter will come across.
When the stone is set, remember that all of the 4 claws should be at the same height. The only way to achieve this height, is to either file the tops/tips with your Triangular file #4 grit, or with an Emery wheel with a "Medium, or Fine" grit texture, as being shown.
Many gemstones have wide girdle, it is best to "show" the every wide area under the claw. With this unevenness, I'll create a 'seat' especially for that diamond.
Many of these 'well worn' burs are so badly worn down and in turn won't cut well. In a previous tutorial blog-essay I explained how to reshape them.
Keep all of your HSS burs in sequential order. If you are spending too much time looking for that one special bur, you'll be wasting your time and "Time is money".
I (sometimes) use a pair of fine-jaw pliers to push down on the tips of the claws to achieve added security.
These little areas all need to be 'well polished' prior to the stone setting. Once the stone is set, it's nearly impossible to polish with any cloth wheel large or small.
These 4 claws MUST BE EVEN, but not having the Emery Wheel get too close to the stone. DON'T REMOVE TOO MUCH OF THE METAL, this will explained further.
All of my claw tips are delicately filed with an Emery wheel, if desired. If you use a hand filing instrument, many of the claws could be left uneven.
The "High Speed Steel" bur come in various sizes. It's better to have a wide selection of sizes as needed than to have a few of the wrong size.
These claws are too long and need to be reduced in height, immediately!
This is an up-close photo showing the many sizes of "HSS" burs.
Here is a photo of a hand-filed aka 'trimmed' claw. Instead of using a 77B Cup bur everywhere, I file each claw as shown on the 'far left corner'.
All of the claws must be 100% cleaned and exquisitely polished prior to the gemstone setting. Once the gemstone has been set, 'forget the required' polishing process.
The high "Table Facet" of this stone is a problem for the client, why is this? The stone will be involved with many problems pertaining to damaged facets. I'd refuse to set this stone, without advising the client firsthand.
For your information, the teeth of this HSS bur are in need of repairing. These teeth are badly worn as the 'cutting and shaping' is greatly reduced.
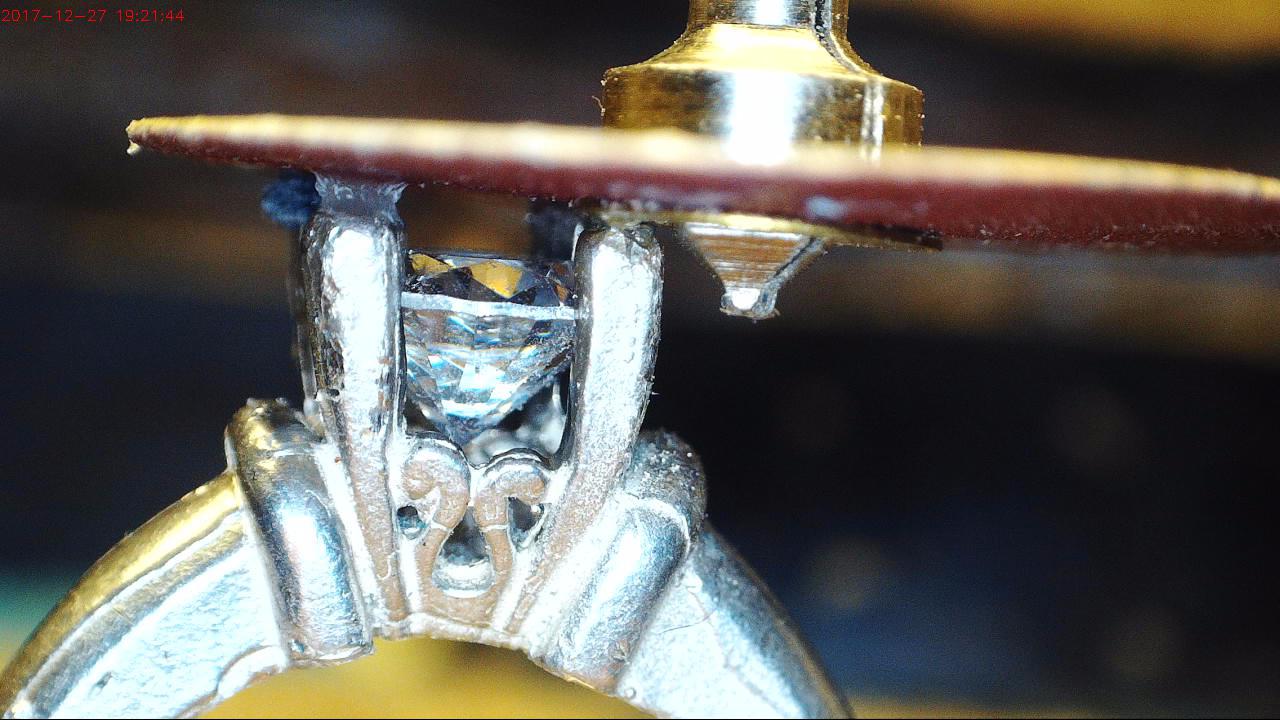
Here is a second photo showing where the "Emery Paper" disk is touching the 4 claws. IF THE DISK IS NEAR THE EDGE OF THE CLAWS, (SOMETHING BAD HAPPENS). The disk will bend and the claws will not be shaped evenly.
If you aren't sure of the height (or depth) of the HSS bur, try this method, use a bud-shaped bur into the desired depth for the stone. This another technique that my teacher taught me 65 YEARS AGO.
If you avoid this method, your 'rotating bur' will be skimming all around the claw. YUK!
Here you are deciding just where your bur will be sitting.
You can see just where the HSS bur is preparing for the stone to be set. DON'T HAVE THE "PAVILLION CUTS" BE MADE ANY LOWER THAN WHAT IS SHOWN HERE,
You have just two options in 'finishing' the claw tips-tops. The first is the easier method of making your claws rounded with your "77B", CUP BUR or using your Triangular file.
This is an assortment of the required tools & burs that are required in setting a 4-claw ring.
Here is a better view on where the "Girdle & Pavilion Facets" will be nestled against each claw.
The edge of the HSS bur is nicely preparing for the stone to be set. Already we've decided where the correct depth of the Girdle will be located.
On each of the sides of the 4-claws will be 'metal shavings' that has been created by the rotating HSS bur, get rid of this 'metal shaping'. BUT HOW?
DON'T USE A FILE! I use a FLAT #40-graver to remove the metal. If you use a file, these will be rough striations remaining on all of the 4 claws.
The saw-blade must positioned exactly in the front of the claw, not on the side. Then you will have a good chance to bend that claw.
Here you can see where that "Claw to Saw blade" is positioned.
Just a quick 'review' of where the Emery Disk is hitting the claw tips.
In this photo, again are the 'metal shavings' being seen? Get rid of them prior to setting of your stone.
The 'prepared bur cutting' is too high, their won't be any metal to be needed to hold the stone in place. You need metal security, metal polishing and general wearing of the ring.
This ring needs to be cleaned long before any stone goes in.
The "Culet" of the gemstone needs to be positioned in the absolute center of the 4-claws. Use your mini-bud bur to remove any casting excesses as shown in this photo.
When you initially setting a Square, "Princess-Cut" diamond please do what I was taught 6 decades ago. Use a marking device along the longest shape and draw a line where the long section of the Table.
To make sure that you have the correct proportions, use your Digital Calipers and place your stone as seen here.
If you avoid or not being aware of the dimensions, the Square set stone will look WIERD. The Longest angles must be at 90Degrees to the line of the axis of the ring.
Even on a Square-shaped, "Princess-Cut" stone the Culet MUST BE WELL CENTERED.
Prior to any setting of any diamond, ALL OF THE CLAWS MUST BE SEPARATED AND NOT JOINED TOGETHER. =>This is is first Cardinal Rule of Diamond Setting.
I suggest to set the smaller stones first...then proceed with the larger stones afterwards. The chances of hitting the larger stones will be greatly reduced.
After casting, there will be numerous problems in regards to 'metal burs' appearing anywhere or everywhere. As I mentioned before, GET RID OF THEM...NOW!
As seen early in this tutorial-essay use your #40 Flat graver to remove the shards of metal that were created from the rotary action of your bur.
All areas of ANY RING must be clean of any defects from casting.
Little aberrations from casting still remain and this is not nice to see.
To review the filing techniques; I honestly approve of Triangular trimming or filing, as seen on the left corner of the 4-claw setting. Cup Burs have a tendency to leave a rim along the outside edge.
Remove this Diamond and clean these claws immediately.
Even the 'Pavilion Claws' need to shaped to embrace the Diamond. The claw on the right is great looking, but the claw on the left was shaped with a file. That claw just won't fit against the stone.
Just another view of how the underneath claw looks prior to setting.
Much work is needed to 'clean' the inner areas of the setting. Gemstone setting is not on the immediate 'to-do' list yet.
You know what's next? Any guesses?
Keep your HSS burs well oiled, at all times. Then the metal will be easily removed while it's being prepared for setting.
This stone setting is made too high. The "Table Facet" is above where the claws are being created.


.jpg)


.jpg)
.jpg)


.JPG)
.jpg)