Sunday, 6 February 2022

Diamond Cutting: Yesterday and Today

 There are times, where all through my search of topics, I come across a topic that suits my blog just as if I did my own writing. I came across this essay many years ago and "saved it". This is one of the very few that I saved that came from someone else's pen.

 I can't give you the author's name, or the company, as this essay wasn't written down. If I did have it, I would have surely noted it for this blog.

===========================================
 In ancient times, uncut "Diamond Crystals" were just cleaned and mounted into jewellery. By the Middle Ages, simple faceted diamonds were finding favour with royalty and the upper echelon of society. Early faceting usually involved grinding one point of the crystal down to form the "Table".

 In the 1600's, very primitive "Rose Cuts" appeared in the market, this is after the introduction of the diamond polishing wheel. Diamond sediments, or dust were used to polish the larger stones.

With many refinements to the polishing wheel, the next step in the Cutting process was a Table above the "Crow Facets". These older stones had a tiny "Table", with a huge "Culet" and fewer "Facets" than today's "Brilliant Cuts".

In the late 1700s, the "Triple-Cut" also called the "Old Mine Cut" emerged with the full complement of Facets now used in the modern cutting styles. Cut diamonds had begun to resemble today's "Round Brilliant".
                                                                            
By the late 1800's, technical advances began to affect diamond cutting. High-speed rotary diamond saws introduced in 1900's, allowed cutters to get two stones from one rough diamond crystal.
 
By the mid-18th century, diamond cutting began to draw on the emerging "Science of Optics", which is just "The Study of How Light Behaves". These studies led to improved proportions in the finished diamonds. 

Diamonds like today's "Round Brilliant" were standard by the early 20th Century.
It's not unusual for older diamond styles like the "Old Mine Cuts" from the early 1900s to turn up for remounting. Small tables, uneven outlines, and large facets mark these cuts.

You can also spot some older styles by their square or "Cushion Outline", and their relative lack of Brilliance.

These stones are not more valuable than the modern ones just because they're old. In fact, the older styles are often recut to improve their proportions and brilliance. But many are family heirlooms and have great sentimental value for their owners.


Pearls and Cultured Pearls are very sensitive to chemical actions. Everyday substances like cologne, cosmetics, and even perspiration can affect them severely.

Cleaning solvents like ammonia can harm a lot of different gems--and the metals that they're set in. With many gemstones, almost any acid, even in a weak solution, can spell their ruin. You should discuss the durability even if the customer supplies the stone. Find out more about their work, and lifestyle to get a better understanding of how they will use them daily. 

=====================================
 Thank you for appreciating the unknown author's writing, as this essay is well-suited for my blog perfectly.

Gerry Lewy - Diamond Setter!
Thornhill, (Toronto) Ontario.
Canada.

Thursday, 20 January 2022

What are "Industrial Diamonds"?

There are "Diamonds being used in fine quality jewellery" and then there are "Diamonds being used in industry". These are still diamonds, but these uncut and unpolished stones even have another name to them. They are named "Boarts".


 What do these stones look like?  I looked through a jewellery site and at Google, until I found a tight group of these stones to show you.

 In my previous essay, I wrote about these diamonds extensively, but then I had to carefully separate these topics on "Diamond Polishing". separate these topics on "Industrial Diamond". 

================  "MY HISTORY LESSON, just for you!"  =======

 In those earlier years while living in England during the "World War 2", we had very difficult times. Just living day by day, or by the hour, was a trial for the strongest. 'We' had to survive by creating methods to make an income. Those who created the 'best' idea, won their own war.

 My Dear Father got married in Manchester, England and he brought with him an interesting feature through his knowledge of Diamonds. He was initially a "Diamond Polisher" in Antwerp, Belgium, but through 'some measures of fate', his life turned around by using his Diamonds.

 His 'creativity' started in seeing how these could be used and "the ball started to roll, and it  continued further at a fast pace". My Parents came to live in London where there he set up shop making high-end jewellery, as you can see that Diamonds played a great role in his life. 

During those horrific years the war played a terrible time for everyone. But somehow my Dad managed to survive, but the problems continued and bombing by the Germans made everything more troublesome. It was a 'survival of the fittest", but my Dad did survive...greatly!

 In those years circa 1942-1945, (I was born in May, 1943) were 'unbelievable to say the least'. We were told that there must not be any lights shining in our homes for the Germans to direct their bombs attack our homes, or businesses. Our apartment building were in direct line of the rocket Fueled, "Buzz Bombs". When those rockets ran out of fuel, they would just stop working . . . . they would just quickly crash.

  When people heard those "Buzz-Bombs" as they made a buzzing sound flying overhead, (as they were known) we were constantly running for our lives. Sleeping was a difficult as many times through "Blitzkrieg' many people had to literally sleep in the "Tube' stations otherwise known as Subway stations. People lived that way for days, or even weeks on end, and you call this living?  

 My Dad one day told my Mom "Sarah, it's not safe for us anymore, we're getting out of here...as soon as possible!" My Dad had look for a safer country? Was it going to be America, or maybe Canada. He had his Mother living in New Jersey, USA. But after researching other countries; Canada became his final choice, with him came his fantastic knowledge of Industrial Diamonds. While living in England, he came known as a relative great supplier of Natural Diamonds. His business so well needed in England, he made and sold "Diamond Tools" for the English (Wartime) Government. 

 They needed him greatly for his knowledge of "Industrial Diamond Dresser Tools" that were made to make thousands of bombs, aircraft companies and other wartime machinery needed his Diamonds that were used in cleaning grinding wheels. Now these cleaning wheels had diamond  dust impregnated in them. These were never heard of then, not until my Dad told them about this novel addition to each grinding & cutting wheel.

 Only his Industrial Diamonds kept their grinding wheels clean from getting clogged up with steel. These were called "Diamond Dresser Tools". There wasn't anything else that would keep them clean 100% of the time. He thought of Australia and then America, but eventually he settled upon Canada in 1947. We eventually left England to go to Toronto.

 Then in 1953, as my Dad was coming home for dinner one day, my Mom greeted my Dad at the door. "Maurice, you're going to be  famous, the "National Film Board of Canada" telephoned you and they want to make a movie on your Industrial Diamond business".

 I still remember this even today, my Dad thought my Mom was joking (to use a better word) She said "Maurice, I'm not joking".

 Here is the introduction flyer to the film that the "National Film Board" made of my Dad. From being a wartime survivor to now starting a new & growing business in Canada.

 My Dads' movie was then shown in all of the movie theaters across Canada. The movie actor, Lorne Green from the "Bonanza" of the (American-Western movie fame), was the "National Film Board" movie announcer. This was due to Lorne Green having a deep baritone and authoritarian voice. As my Dad's movie-fame grew and was starting to spring forward, he appeared on many television programs about these new strange looking "Industrial Diamonds". 

 The story was that no one knew anything about these non-jewellery diamonds. He was a forerunner of this new industry, in those years, diamonds were only used in making jewellery.  The Industrial Diamond industry was about to change, "with the many thanks to my Dear Dad". These unusual looking, natural unpolished diamonds were still in their infancy.       Machinists were still trying to see what they could do with these stones. In those earlier days, Industrial Diamonds were then still a novelty.

 Eventually, these Industrial Diamonds were starting to become an interesting & useful tool for everyone. With this new diamond tool, my Dad began to travel across Canada showing machine operators what they could do with these new diamond tools.

 His major client was "Massey-Ferguson" and "Hayes-Dana Steel, of Canada", plus some American metal manufacturers began to hear and assist my Dad to produce their metal cleaning tools, now with diamonds in them. (Americans were always very helpful). 

 I knew these names personally, as I sold some of those tools to them after my Dad & Mom were killed in a car-truck accident in 1968.

 What did these "Diamond Dresser Tools" look like. These few "Diamond Dresser Tools" left with me were enough to write these informative tutorial-essays!


  This display of Diamond Tools appeared with him in his film. 


 This is my Father on the right-side of this photo, holding the forerunner of a machine that makes girdles on EACH Diamond. From this, every square crystal shaped diamond, is then made...round.

 From this 'round shaped-diamond', it's then given to a Diamond Polisher who will make multiple facets on every stone. "Only a Diamond can do any form of diamond shaping" as we can see this "process being pictorially demonstrated", that's shown further down in this essay.

This photograph was of him (on the right) in Antwerp, Belgium when all of "This History" was just starting to take place in 1932 A.D.

  As shown in this tutorial-essay, I'm showing you now how the many uses of these Industrial Diamonds are being used. From this Faceting process, the next process is to start the all important 'Diamond Polishing". Every step is important. As I always state...."There are no short-cuts in any Diamond Setting", even now Diamond Polishing. 

  These steps are: 1) Mining of the stone, 2) Girdle making, finally, all of the very important   3)Facet making of each and every stone...!!!

 Where could any short-cuts occur? It's because, there aren't going to be any!


 BTW, You can just barely see the "rounded edge" of this Girdle. This is the 'beginning' of any Girdle on any diamond.


I had to go into 'Google' to obtain photo's of natural stones as I didn't have any.


This great looking photo is a close-up of a selection of natural stones. I picked this particular photo, as this has of a nice colour arrangement.

 In this photo nicely shows how a fine grouping of stones that evenly address a worn down a well used grinding wheel. This portrays how some of Dad's "Dresser Tools" work, instead of using one single stone, this machinist uses a soldered collection of small diamonds together on a steel hollow square tube. Being hollow, prevents a substantial heat build up. Interesting idea?

 
 The machine-operator will operate that (new) diamond-tool and slide it sideways, until the grinding wheel is flat and smooth to the touch on his "Tool Rest".                                                                                                               

 With these colours of stones, not one of them will be used for gem-quality fine jewellery, pity!
I've heard that '1 stone out of 10' natural diamonds will have that honour of being used for jewellery.
 Again, '1 stone out of 10' are acceptable for fine jewellery. The rest of the 9, are still going to be used,  but never discarded, as they will finally used in one form or another!!!

You can see the vast array of colours.


The "CDT" aka "Canadian Diamond Tool" were the official initials that then appeared on all of his tools. 


  I'm using my fingers to display the length of this "dresser tool", as you can see just how short in length they are.  


 After nearly 50 years of rust, I wanted to clean this inventory for this essay. By turning my Diamond  Setting bench into now a display area. As you can see that this wasn't an easy task.   Imagine cleaning up 50 years of rust? "To me it was a labour of love", as I was preparing a new life for these tools as these are now being used in a "tutorial-essay"

 My temporary Diamond Setting bench now turned in a photo-studio just for this tutorial essay.
This lighting studio assisted me in many photos being shown in this essay, as well as showing the  close-up "CDT" insignia and Dresser Tool numbers.


This sharp edges of this diamond has not being touched, but only by "Mdm. Nature". These edges& corners are a fine examples of how all of these stones are being found in the (ground) mine.


 These photo's are just an inventory of some of his Dresser Tools. No information is needed here for these few tools.

 This is "screw type" of a tool, this tool was created by the need of some of the machinists. Together my Dad and them, worked together in a symbiotic-relationship. "He had what they wanted, and they wanted exactly what he had". What a melding of minds!


 This wasn't a good 'photo' but it showed that the machinist could then use 3 or more diamonds in his cleaning process, instead of  one! 


 That yellow colouring around the diamond, is a brass "bonding agent" that binds the Diamond into the tip of the steel rod. When the Diamond is worn down, he will remove many times and turn it over exposing another section of the multi-corners of the crystal.


 As one stone gets worn down, all he does is to expose the next stone. This process has been used for the past 70 years, (give or take a decade.)  

Although this diamond is nice and so very sharp, it too, will get worn down as just noted the machinist will again expose the diamond.


Here is another dresser tool in my small collection.


Here is grouping of smaller dresser tools.                                                               

This diamond is purposely shaped prior in being placed into the steel rod. The customer needs certain angles made to each stone, if required. 

 Many dresser tools are using 3 diamonds in a row, but made 1 stone inside a steel rod. The machinist just grinds down into the metal and exposes another diamond. The changes have been made tremendously in the many years since 1947 A.D.
 The basic ideas are being shown here, but with modern technology, computers are even polishing every stone making each stone setting made faster, and of course cheaper.


 Instead of larger and heavier tool, my Father came up with the idea of lighter tools in both size and weight. 


  This diamond scale is not an antique, hand-held type. But it works 'like a charm" not accurate, but it gives the stone apprasier a better idea of the diamonds' weight.
(BTW, this company is still in business, after many years.)


In this portable travelling scale you can see the actual weights used by the operator.

 In the top right hand corner, is the official registration stamped by the government. If there is no hand-stamping, the appraiser will not justify that the weight is not accurate. 

All of these stamps are accurate from the government. "No Metal Stamp, No Validation". Simple as that!

In the right corner shows the "Official Crown of Great Britain"
, that number designates the office where the weight was made official. "Everything was made legal, even today!"

  These weights are official and legal, those without any stamp, these could be of a dubious weight! (I can see 5 weights that are not acceptable.😞)

On the reverse of my Dads pictures, shown to have his hand-stamping of his Birth name.

 If the viewer looks at the photo, at an angle, he will see the name, My sister only a few days, told me that he changed his name to "Maurice" after he arrived into England, in 1932 A.D. 

"Anvers" as shown below, is a Flemish name for Antwerp, (Belgium). This type of writing in those days, 100% avoided forgery.

  To my good friends on my Blog, I could have written much more from the Internet & "Google", but these wouldn't be from my Father.

 I've written only what I have in the inventory of Diamond Dresser Tools, and what I have remembered in my earlier English history".

 As I have many other short stories of "MY HISTORY" while living in England and my earlier years in Toronto, Canada, these would not be useful to this essay, pity!

 In closing, if you have any questions, please feel free in contacting me at my email address; "gerrylewy18(at)gmail.com"


Wednesday, 12 January 2022

" How are Diamonds Polished" aka. "Shaped"

How are our diamonds "Faceted" before they are given to us, for the task of Diamond Setting? 

 What you see in the following photos are the "Polished Diamonds" these are ready now to be made into fine works of art.  But how do they get to this stage?

Many years ago (circa 1930) my Father lived in Antwerp, Belgium, it was there he learned his profession as a Diamond Polisher. (Before my Parents deaths, due to a car-truck accident in 1968) he had the foresight in letting me know of some of his Diamond Polishing techniques.

 A few of his "Diamond Polishing" tools, were left to me, through this essay I am showing them to you. Although I didn't have many to show you, these photographs are enough for me to create this "teaching-essay". The tools have changed, here are some of the 'basic tools'.

  I am a Diamond Setter for the past 60+ years, we use the same tools today as the setters did from the 1930's. (I know this for a fact)

From two hundred diamonds given to me, I created something beautiful, as shown below. 


 This gentleman's 2.75 inch diameter pendant had only 40 diamonds in it initially and then I gave it an additional 239 MORE DIAMONDS.  
 This gave it much more lustre through my designing, it now has 19.18 carats of diamondsAll of this work took almost 2 weeks of constant setting. Why am I writing this? This Diamond Setter transformed this disk into a "Wearable, Piece of Art". 

My client had no idea what I was going to do with it, all he wanted was "ALL DIAMONDS" all of those diamonds in that black tray, were eventually used.  


 All diamonds are still using this method of holding larger stones with these "two arms" that hold the large diamond.
  Does this diamond look unsightly? This diamond is the original stone that my Dad practised his new skill on. He had to learn "How to Facet Diamonds" and this is the very stone that he used circa 1931 A.D. 

 In this photo, you can see the very FIRST diamond he ever polished. Today, every Diamond Polisher uses the same method & still uses these same clamps. Nothing has changed in over 93 years.


 In this photo you can see the "Pavillion Facets" being polished just above it is an "Unpolished Girdle". That white spot is called a "Window", when the Polisher looks through this window he can see where the "grain of the stone" is being located.
 
 Here is another view of the starting of the "Upper, Girdle Facet". From here, he or she, will continue to cut & facet all around the stone until there are multiple facets all over the stone.


The Culet of the stone will be situated INSIDE the "Tube", this will 'secure & protect' the diamond for any aggressive polishing. As the Culet is the most delicate spot of the stone, no harm must come to it!!!


You can see where the "Table" of the diamond is now being seen.

 Here you can see that there has been no "Faceting" being done at this point. Its still a very rough untouched stone amd no "Girdling" or Polishing on the Girdle of the Diamond
 Basically, its still one step from being a "Boart", or a diamond that is just taken out of the ground.

 I'm using a large Cubic Zirconia, just to let you see all of the many facets that have being polished. Now you can see the "Culet" where it's sitting safely in this Tube holder.


 I used a green stone to make your viewing more possibile. I placed the "Table" of this stone laying flat as to make the Pavilion to have easier access. These "two arms" are carefully holding the stone inplace, (but not squeezing it), lest it might break.


 In these groups of fantastic photo's, I'm showing you something that not too many folks have a possibility of seeing, what is that?
 This is the method of having the "Dobb" holding the stone in place while the polishing is in process. The stone is held tightly against a rotating circular metal disk while the faceting is starting. BUT HOW DOES THIS HAPPEN?

 Supposing that the diamond is against the disk, what cuts & polishes the diamond? The answer is so very easy...only another diamond can do the cutting or polishing. What does that diamond look like?


 The only cutting action is to take place, is another diamond, but it's in a form of DIAMOND  POWDER, as shown here. This POWDER is so very fine, as it's measured in MICRONS.
 Remember this, this vial of Diamond Powder is 93 YEARS OLD. I've kept it secure for all of this time, I've never had it opened, even in this form, it's very expensive.
 
 This powder is applied to a rotating metal disk that is in the shape of a 'Long-Playing Record", but how does it stay on this disk? The Diamond Polisher uses (sticky) Olive Oil and he/she applies this DIAMOND POWDER against the rotating disk. Then that diamond powder-dust will 'cut & shape' this diamond ...interesting process isn't this?


  Even if the "Table" needs to be repaired, "Only A Diamond (dust) can cut & repair another Diamond".


 If the polisher needs to examine up close what is needed?  How can that person see the problem? 

  He will use either a 10x power, or even a 15-20x power Loupe to examine every inconsistancies with that stone. This polisher MUST OBSERVE EVERY DEFECT. If the stone has a defect, it muct be corrected before it's "sold", or released to the wholesaler.


ALL FACET EDGES, OR CORNERS, MUST BE IN LINE WITH "THE THOSE ABOVE  THE GIRDLE, AND AS WELL AS BELOW".
 That square looking "Upper Girdle, Facet" is named as as "Kite", why this name? Look at a kite that you play with, in the air.."Kite" is an easy name to remember. Simple?

 If this girdle being shown here was indeed a diamond, it wouldn't be released for sale. It would be fully repolished as there are 'numerous errors' on that polishing surface.


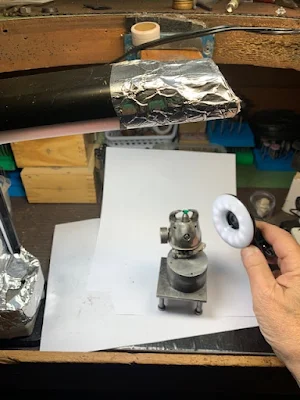
 Just for this essay I used my "GRS-Vise" to hold & secure the "Dobb" for this demonstration. Apparantly, this technique worked perfectly.

 What is this little "brass & steel" gadget for? If you don't know, let me tell you. The diamond-polisher MUST place his diamond inside the opening and make sure the diamond is at "41, or the 40 degree angles".
 If not, back to the polishing wheel and recut the "Pavillion" angles, AGAIN!!!

 All diamonds MUST have all of the correct angles and now be labeled as having an "Excellent Cut". If it is 39, or 41.5 degrees, it will (immediately) loose much of it's value on the stone.   

 But why is "40, or 41 degree angles" so very important? The light will reflect at that angle back to the viewer and give a diamond a"brilliant" shine to the stone. Anything less, or more, will turn the stone into a black colour. Another thing is that the light will not return back the persons eyes, it will look very dull.

 All diamonds MUST have one of these two angles, either 40, or a 41 degree angles. If any of angles are not accurately created, problems will defintely occur. Please excuse my rough drawing, but this is the best that I can do under a tight time schedule. (Please don't laugh, it was nearly my time for dinner and my wife was asking me to get ready for dinner.)


 This is what can happen if the angles are not met. The light entering this diamond can get bounced all over the place and not back to the eyes of the diamond wearer.
 It won't be a good thing to see, either the stone looks BLACK, or even partially transparent if it was turned over. Accurate Diamond Polishing is so very important, all of this depends upon the hands of the Diamond Polisher. 
As its known, a Diamond Polisher himself "can make, or break a diamond" he has to be well trained and have great  eyesight and fingers that can handle any size of stone. 


This 'upclose' of view of the (unfinished) diamond. You can see how the girdle of this stone looks. The many facets have not being completed, you can see the initial "girdling" that has just started.


 This is just another view showing a coloured, synthetic stone. The "Table-Facet" is nicely protected, now the Polisher can cut any section of the "Pavillion", where needed!!!

 My setting-bench was turned into a mini - "photo-studio",  just for this tutorial-essay.

 I used a white paper for a good background, plus overhead and side-lighting. You can see this holding device, it's called a "Dobb" even after 90 plus years, these are still being used today.


These weights were good for 'metal & diamonds', but these days, I'd shy away from using them,

 My diamond dealer showed me his "travelling scale", he told me that this scale is accurate to maybe .01 to .02 points. But this scale that my Dad used is almost as good, but I'd use an "Electronic Scale" to be 100% sure of any stone weights.

 Hand-Scales are good, but as I mentioned above, I would still use the 'electronic version' best. When you are measuring hundreds of carats of diamonds, these "hand-held devices" leave less for any accuracy. 
 My diamond dealer has a scale that is accurate to 1/10th of a point, or .0001 of a carat, either way, I will trust his scale over what I use.


This is my small portable travelling diamond scale. I'm using my loup to show how small it is in reference against other less accurate 'hand-held' scales. But this scale is accurate to 1/10th of a point. As a Diamond Setter, I sometimes need to reasure my client that the weights are, what they are.


 These 'weights' (being shown here) are not all that accurate. I'd only use these as "demonstration" & not for selling. Just too much guess-work involved!


 My very good friends, here you have an essay that I enjoyed writing, I planned this essay after many weeks of thinking and examining many of his "Diamond Polishing" tools. 

 These tools were that my Father used continually in his Diamond business in London, England. My next essay is even more interesting, as this was his favourite business. He was one of the first person in Canada and North America to manufacture "Industrial Diamond Tools" circa 1947 A.D.

 If you have any questions, please don't hesitate for a moment. You can email me at 
"gerrylewy18(at)gmail.com".

 Regards to you and everyone, I hope that you learned a few things. Remember, none of these facts were copied from any other source.