Tuesday, 18 June 2019

Long, 4 x 2 mm's Baguettes in a wedding band setting!

 I want to show how some companies are using just a basic ring and remodeling that band into something fantastic. 

 First of all, let me say at the opening of this essay this technique is NOT FOR THE BEGINNER!!!

 I will give this exercise on this "Difficulty Scale"  rating a definite 15, out of 10!

 In the following essay, I'm using a semi-round band and setting two long baguettes into it. This will be an interesting process, it will look easy, but this is where the absolute challenging process starts!

 I will state at the start, that this is not for the beginner. The jeweller/setter should have an estimated 2-3 years of continual use of dealing with many bur shapes and their sizes. Not too mention WHICH BUR to use and WHEN! 

 Great care must be taken in deciding how to plan the very next procedure & following many steps afterwards. I have done this kind of setting before and this can be very rewarding or a great failure! 

 Remembering, there are NO SHORT CUTS in Diamond Setting!   

 Let's just look at this photograph on a variety of little errors. If you look at the Ruby Cabochon tube-setting and directly below it are three specially created "Faceted Emeralds". Their corners are not touching any metal and therefore "leaving many empty spaces".

 What is now happening is, there are little amounts of metal not hold the many stones securely in place. The stones are staying in...but just barely!

Someone, or some people haven't planned the 'faceting' correctly, agree?


 I drilled these holes as a start, but understanding that there will be much more drilling in the minutes ahead. I'm carefully estimating how long the baguette setting area will be! 


 I'm now examining the stones on how they might look together 'end-to end'.

 Will I have enough ring width to 'play' with and are these two stones able to be set with no problems.

The girdle width on both of them will give me many problems. I'm no second-guessing if these stones can even be used?

 On these blue sapphires I notice that they are too wide at the Girdle facets. I decided that I'm not going to use them! This is the most important decision that I can make now! If I continue, I might just ruin the ring and the whole setting process...goodbye!

 Sometimes I buy these stones just for the width & length, as in 2 x 4 mm's. But upon a closer examination, I'll keep them for other purposes, not for now!

 Lets compare the two sets of stones, they both have the very same measurements, but the "blue set" has to go! The faceting process was just 'mediocre', at best!

The Amethyst stone set are more suitable for this exercise. The facets above the Girdle are almost uniform! I will make allowances during the carving & bearing steps.

 Look at the "blue set" of stones; the 'upper Girdle facets' are not even passable. Imagine if I had to set these, I'd be having untold labour wasting problems!

 Results of my thorough examination; I changed my mind, I like these Amethyst stones best!

 I'm now measuring the new 'total length' of the two stones 'end-to-end' @ 4.0 mm's each.

 I'll scribe on the metal the length of both together. The selected stones will be now put aside in case of getting damaged.

 I ink-marked the exact length and width of the stones, to the metal, this is too important to avoid!

 I'm slowly and very methodically gauging how the stone openings are to take place. In this picture you see that I used a graver point to locate and core out the 4-corners.

 Now comes the delicate metal cutting and using only a fine #006 round bur and I'm now starting to cut the 'bearing grooves'.

 I'm starting to prepare the inside of 'the new home' for these stones. I must allow for the depth of these stones. I prefer to dig deeper and allowing for the Culets.

 The depth of the stones must carefully gauged and examined at all times during this procedure!!!

 I'm avoiding to cut the 'opening' any wider that the stones width. If I did, I'd be having a very difficult time in trying to 'push or hammer' over the metal.

 In preparation for the lower level for the Pavilion of the stones, I need to visualize just how they will finally sit!

 I need a 'reflective surface' as I need these stones to sparkle in their. I'm now going to use my Flat #40 graver to smooth the surface, and make it shine. Using a round or bud bur can't do this properly.

 Already I can see how the stones 'might' sit. I need now to use a round bur #007 and make an drilling indentation at the corners of the opening, for the stones "two corners" to now sit!

 You can see in this photograph that the corners of the stones are sitting snug in their 'new home'!

 With this 'coring out' for the stones, I must make sure that the stones will fit and not overlap.

 But what happens if the stones overlap? At least I found out NOW, that the opening is too short in length and not when the actual setting has started..WHEW!

 I will make every effort and extend the length of the opening...AGAIN!

 Is this frustrating? YES, to a point, but time is not wasted, 'I call this time being saved".

 I will at many times try and assess how the stones will be fitting..take out one, or both stones and do this repeatedly, until I'm totally certain that I'm ready for the hammering process.

 I marked as to where the first hammering will now start. The hammering is basically to 'move' the metal towards the stone. This process is not to 'push' the metal down onto the stone.

 You can see that the hammering hasn't come close to the edge, I have no intention to have the hammer-anvil come close as it might hit and damage the facets. This is too important not to mention!

 I've now hammered all the way around the two stones. Examining at each stage, if my reciprocating hammer has come too close to the edges, or not.

 I will reduce the hammer-pressure to the 'four' outside corners. The 'corners' can and might break if the downward, hitting-pressure is too great!

 The 'hammering process' has now been truly successful.

 In using your "Snap-On", Medium grade" emery wheel, please be so very careful in not touching the two stones. This is the most delicate part of the cleaning process..!!!

 I see some deep hammering marks, these are not nice to see. These problems were caused by leaving the 'Reciprocating Hammer' in one spot too long!!

 The metal was "squeezed on the stone" and not just pushed over..major cleaning problems here!

 I would use my "Pumice Wheel" of #180 grit, to further smooth the metal...everywhere!
Don't leave you polishing (cloth) wheels to do this for you. It isn't really going to happen!!


Please use your Flat #40 (highly polished) graver to clean the inside of the channel wall.
But, "DO NOT USE ANY TRIANGULAR FILE HERE!" If you do, you will for sure scratch the soft & delicate facets of the stones.


 Here is my Pumice Wheel #180 grit doing what its supposed to do...that is to clean & remove any defects after setting!
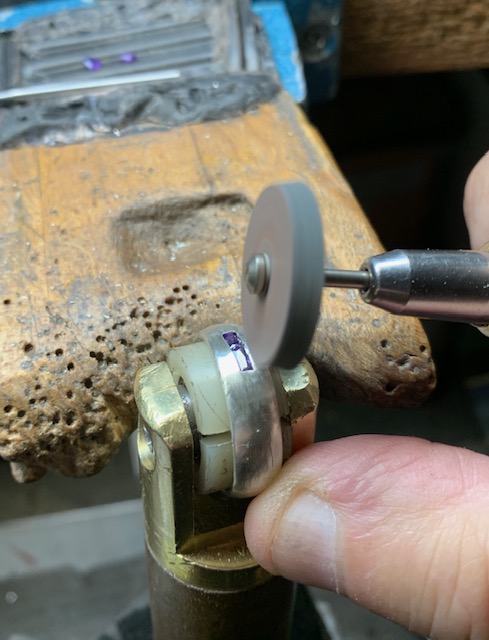

 Here is the #1,000 grit Pumice wheel polishing the metal prior to the cloth-wheel finishing!

 Now this is what "cleaning" is all about. Cleaning, but not touching the stones.


 If you have any questions on this essay, you may contact me at "gerrylewy18(at)gmail.com".


Sunday, 16 June 2019

"Princess", Square-stones in End-Bezel ring

 In this new essay I've decided to explain something just a bit different. This just isn't a "Channel Setting" nor is it a "Bezel Setting". I would definitely now name this exercise an "End-Bezel Setting"

 This particular design has "Semi-Split, End Bezel" metal covering that one stone. But here is the interesting part, is that these sections are all joined together..OUCH!

 Remember that we are now dealing with "square stones" and all of them must be dealt with great care! The care required, is in protecting the four corners of that stone, allowing the Pavilion not to be touching any metal underneath. 

 Of course the bearings must be straight across the end-sections of the semi-bezels.
Is this difficult? NO, not in the slightest, but certain rules & techniques MUST be followed!

 On my "Difficulty Scale": I'd put this pattern at a 7.0 out of 10. 

 You can easily see just how the end-bezels are looking, each one of them are attached to the next. We must now separate each of them with a saw-blade, I prefer a blade of #2/0 width.

 Further on in this exercise, I will use my bud-shaped bur to again separate the metal after setting, but not the saw-blade!!! This will be explained further in greater detail.

 My very first step is to make the setting hole square as this must conform to the Pavilion group of facets on the Princes stone. In this photograph all of the bezel holes look almost rounded..YUK!

 I now have much work to do in creating each of these holes and also cleaning them to accept each of the Princes stones..loads of hard work with the #007 bud-shaped burs,

 I'm now using a bud bur #006 to clean out the inside-corners of the channel. I want each of them to be in a good condition to be able to move towards the stone.

 As you can now see how the corners of the holes are starting to now appear. Don't spend too much time on this step, just make sure they are clean from any casting defects!

 This is not to be seen by your customer but make sure the stone will sit against the holes with no effort!

 I'm inspecting how the Princess stone will look against the edges of the walls.

Now you can easily see how and where the stone will be sitting. As you can see that the "Pavilion" is not touching the inner hole...NICE!

 Before I start to make a bearing-cut, I need to have a bud-shaped bur, what size will I be needing? I have no idea, I will have that opportunity by placing the bud-bur against the "Girdle" of the stone.
I'll pick a bur that is slightly larger. The bur number is not important, but as long as the bud-bur is larger than the Girdle of the stone!!!

 Before I touch the inner wall, I need to know just where I will start the first bearing for these lines!
I prefer to mark with an "felt tip, ink-marker to estimate the depth and where each bearing will be made. In this view, you can see the separation of the walls

 I prefer a bud-shaped bur for this exercise, no round burs are allowed. You will see in a moment!

 Don't play around by ruining your bearing-cuts with any use of a round bur. These will  not work as you can see in this photograph.
  You MUST HAVE A STRAIGHT and WELL MADE BEARING CUT!!! Each line must continue from the previous line to the next section, simple as that!!!

  Now comes the fitting of the stone, there are many things to look out for. Bearing must be made wider that the Girdle, is the Pavilion touching the inside hole?

 How about the side Pavilion facets => are they touching the metal under the bearing line; so much to think of ..WHEW & OUCH! Everything you do now takes precious time, no guessing!

 If the stone is too (girdle) wide, I will exchange it for a thinner (stone) Girdle?

 I like to clean the inside of the hole with my Flat graver. I want the metal to be shiny at all times (if this is at all possible) and no remaining pieces of metal that might touch the stone..:>(

 Make the bearing wider than the Girdle, don't have the metal squeeze the stone when it's set!!!

 Already you can see just how wide the stone is. But look at the height of the wall, as it's holding the stone, this is exactly what I'm looking for. I'll explain in a minute.

 Be so darned careful that not one corner of the stone is touching the corners of the metal. If this is happening, take the stone out and re-core the corners, again! (I made this error just for this demonstration of what might & could happen!)

 Your (tapered) corners...must...look...like...this, agree? THIS CONFORMS TO THE SHAPE OF THE STONE.

 OMG, the corners of this stone are overlapping well into the next setting spot. What do we do now? I'm not worried!
 I will make allowances to this problem by having the corner rest against the slanting design or end-pattern. I will make an extra "half-bearing" to allow that corner to rest INTO the metal.

 I used a pair of pliers to individually open up each two sides to allow the stone to sit in it's new 'home'. As you can see that these green stones were not well-made in the 'faceting department'. I'd call this a 'double problem' for any setter, or jeweller.

 But it's great to know nothing is perfect, when dealing with inexpensive imitation stone cz's..YUK & YUK, again!

 As I only had a few green stones in my inventory, some of them are showing signs of previous setting. Get all of the stones really close to each other.
 I don't want any spaces in between any of them, plain & simple!...NO SPACES. Just a fine line of the colour GREEN!

 I'm making sure that the stones in their respective setting and the metal has been pressed over  with your pair of pliers (to gently secure). I don't want any movement when the metal is being tapped over with your Riveting Hammer.

 I will use the hammer on the ring while the ring is sitting on a steel mandrel, why so? If you hammer in a leather clamp, the 'hitting power' will get absorbed and the stone will never get tight!

 Tap one side of the end-bezel on all of the stones, you can see that the stones are getting secure at each tap! Try not to use the "Reciprocating Hammer". I find that with this strong hammer, I have little control on these very delicate and large stones.

 As each hard downward tap might move that stone and crash against the neighbouring stone and WHOOPS! Both stones might get broken!

  I chose in using a 'bud-shaped' bur and not the saw blade as I need, and can also change the width of the cutting at that moment. Using a saw-blade is too restrictive and time wasting for me..:>(

 If I need a #006, or then a #007, I can easily change the bur in a couple of seconds...saw-blades takes too much time and my mind is on one thing, that's to separate the metal edges..FAST!!!

 This "chosen cutting apparatus" gives me more access to anywhere on the ring, and at any position!

 This final cleaning is so important that there are no short-cuts, anywhere, at any time!..:>(

 I marked the outside area of the top edge. I now know where and how far against the metal must a file be touching (on the outside edge only) in the finishing stages of this ring!

 I won't touch anywhere near the front of the edge,why? You will see in a moment.

 This 'front section' against the stone, is just where the Flat Graver #40 will do it's final cleaning. I even won't touch the top area, as I must have "thickness" of the metal to "Bright-Cut".
PLEASE  do not use a file to clean the front metal, why? 
 Two reasons: you might hit & scratch the soft stone, and leave striations in the inside metal line!

  Can you see any spaces in between the green stones? There aren't any, and that is what is required.
 Eye-Appeal at all times!


 Any further cleaning is up to you. I still find (sometimes) that I have to do a "minor touch-up" and everything should be ready for the final polishing and be left in a pristine condition!

 Even on smaller (4 mm's) stones, the same principles and techniques are used. There are no differences in the burring and making bearing-cuts..Straight lines across the inside walls at all times! 

 Just some more things to remember, please be very careful when dealing with these large and very delicate stones. Think about the nest step & the continuing steps ahead in this type of setting!