The jeweller & artist Salvador Dali created a Piece of Art called "The Eye of Time". In this spectacular item, is a pattern aptly named "Cut-Down" and this is just why I'm writing this topic on this 'Diamond Setting blog'.


In the "Eye of Time", there were only 3 diamonds that were set using this particular process. As the setter had so little room to set ANY stone, he had little available room to do any major Bright-Cutting, instead he still succeeded in his engraving. He chose the very ornamental "Cut-Down" method.

Salvidor Dali allowed his diamond setter to have full "Carte Blanche" and to create something beautiful!
The Difficulty Scale is "off the charts" or about 35 out of 10; being 10 is very difficult and can be fraught with 'unforeseen problems'. The 'many problems' are caused by the very fact that once you start this cutting, it is almost impossible to correct any errors. I suggest that you should attempt a 'few practice cuttings' prior to your customers' item.
In this photograph, is showing a little teardrop coming from the "Eye"! This tear-drop is right underneath the Bezel-set, Ruby Cabochon Gemstone. This picture caught my attention and the rest is in this essay!

The reason for this odd sounding name is exactly what the setter is doing...He is 'cutting down & away from the stone', right to the edge of the metal.
In the following essay, I am explaining 'the only & correct' method in cutting this pattern!
I am using many (42) photographs just for this essay, why? I need to make sure that you understand the processes in creating this interesting pattern.
I do not use any 'Computer Aided Design' to act as a cutting guide. All of the measurements are 'done by eye' and maybe a marking-pen to get the 'inside patterns' laid out! (These will be shown as you scroll down & study the pictures.)
I'm dedicating this essay to my diamond setting teacher & best friend, Mr. Stan Levine who passed away 5 years ago. He taught me this difficult technique about 45 years ago! Today, I am pleased with teaching this same technique to you, of what I learned so many years ago...:>)
I'm using a .925 silver, half-round bar for this essay, as it is 'quite easy' to cut these intricate patterns.

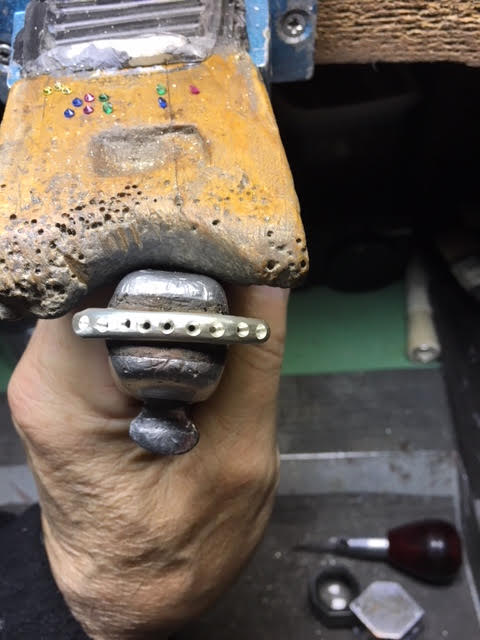
I've drilled the holes & kept the distance in between each stone of equal separation! This alone can make some very serious problems while cutting!!

To understand this and just how the stones 'must' be set flat and level. I prefer to using a "156C" a.k.a. 'Undercutting Bur' to make a seat for each stone that is needed. Uniform separation of each stone is paramount, prior to the cutting.

Each stone must be level and the 'table' of each stone must be flush (or lower) with the surrounding metal. Hence, the desired depth now allows for the 4 'wire-beads' to be created evenly. If failing this, this exacting creation will be a problem in the next step of graver cutting.

The space from the 'girdle' to the 'table' allows just enough metal for the 'wire-beads' to be created. I would use a fine emery paper to remove any of those raised edges around the stones. This rim of metal will interfere with the bead making!


Once the creation of these 'wire securing beads' has taken place there is now a blank space in between each stone. These spaces must not be untouched, I've devised a 'method' of what is to take place. This method is to mark or draw the pattern that is you require!

I also will draw a little square around each stone. I call it a 'picture frame', in each 'corner' is just where each wire-bead will be placed or created.

How are these beads made? I place the edge of the flat graver at one corner and dig into the metal. Once the graver is digging into the metal, I will literally 'rotate the graver face' and have that graver face 'dig-in & scrape deeply' and create that 'wire-bead'.
This process is to dig in at the 'pivot-point' & secure the stone, just as simple as that! Was this easy? Now comes the best & easy part...the cutting!

Why do I draw "squares & lines"? These only act as a guide for the intricate graver cuttings. YES! I will even Bright-Cut the 'lines' as marked on the metal.

Here you can see the unequal spacing in between some of the stones. This alone might cause some major problems in trying to Bright-Cut the 'inside' metal.


In this 'ultra-close up' picture, again another view just where these wires are being placed.

You can now see what can happen if there is too much space in between these stones. Although we are looking at only a few millimetres, it can affect the overall appearance and the subsequent pattern. BTW, the green stone beads are not desirable for setting in this delicate "Cut-Down" pattern.
The stone on the left had poor bead construction, not a desirable thing to have! This shows what can happen if the setter is interrupted while starting the setting process.

While the spacing is very important, the setter must make every effort to make this an 'easy task'. Problems may and can occur when the beads & stones are not aligned in a straight line. This is one of the 'problems' in preparation prior to cutting.
The Blue & Red stones are not properly aligned with the others, this might cause problems further on.

This is a major fault, no 'inside squares or patterns' should be longer than the new wire-beads. As I repeat, uneven spacing will cause much grief in cutting!

Please be very careful when you are creating these beads. The graver, as it is rotating, might very easily damage the table of the synthetic stone. Difficult to replace broken stones!
I'd use three colours of the "USA" flag, RED (Ruby), WHITE (Diamond or CZ), & BLUE (Blue Sapphire), why so? These are the strongest and most durable stones for these kinds of metal engraving.

Please observe the drilling of the holes, keep all of the stones in a straight line! This drilling of the holes has a 'ripple effect' as you continue in your cutting.
The lines that are shown as they were drawn can be Bright-Cut. For this, I'd use my 'modified' Onglette #2 to cut grooves on either side of the line that was drawn. While cutting, cut deeply with the intention of Bright-Cutting next.

I found that the green stones were not able to withstand any 'direct contact' from any graver blade that is being used in this exercise. I suggest you inform the client in case of breakage, you should not be held financially responsible!!!

Here is an up-close photograph of the "in between cuttings" prior to the important Bright-Cutting. There are many 'additional unfinished areas' that still need cuttings.
BTW, the Blue stone was set too high in the metal. The previously mentioned "ripple effect" is now taking place, why is this?
When using your Flat graver, you must be able to dig and make wide-contour cuts in the metal, as they are starting the cutting process. Now this is almost impossible..:>(

I'm showing now the actual positioning of the Flat Graver #40, or Glardon #12! I use this graver, as it has a wide cutting blade. The blade width is only 1.30 millimetres and is held constant at a 45-degree, cutting-angle.

In this interesting photograph, you can see both sections (almost) clearly. One section has been Bright-Cut and the other is still waiting to be 'contoured'.

You can observe the positioning of the graver as it will start the interesting process of starting the 'Cutting Down' pattern. I'm placing the graver in the middle of 'rough-cut' that was made with the assistance of the (thin & modified) Onglette #2 graver.

The Flat-graver face has its own measurements of .50 millimetres from the bottom of the blade to the tip of the 'face'. This is to gain access to the inverted 'vee' pattern.
This is the most delicate section of this pattern, no short-cuts, or errors are permitted, why? If the cutting pattern is made with speed, errors will happen.

Where does the graver start to cut and how where will it finish? I use the 'facets' of the stone to give me a proper guide & angle that will cut towards the rim of the ring.

Here is the width of the cutting of the Onglette. I measured this important blade and it has a width of only 0.43 millimetres. I need this reduced width, to create the narrow 'vee' cuts.


The setter needs continuous 'attention' in the cutting, at all times. If the setter or anyone, not having the correct selection of tools, this creation might not look nice!

I previously made a ring to emphasize these many cutting processes. You can observe that the spaces are even & this makes my cutting so much easier.

Up close, you can see two cutting sections but look at the separation in between the stones. I could use a half-round #50 graver blade to do the cutting, but instead, I chose a #006 bud bur to clean out the inside metal.
First, I used this bur at two speeds, slowly at first and then speed up the motor to carefully smooth the inside metal. I only 'touched the metal' & not digging in I might not have complete control at higher motor speeds. I used a #006 round bur to cut a groove just where the wire beads are located.

Basically, the design is like a little 'X', or a cross. The round bur should be aimed into the bud-bur cut. The downside is that the contact to the stones will ruin the burs!
My other option is the make these bur-cuts before the stones go into the hole. But this is up to you! Experiment at all times, but no short-cuts!

Can you now see how these 'round & bud' burs are creating the interesting patterns? Do not let the burs touch or ruin the 'wire-beads'.

I like this photograph as you can now see up close where the Onglette graver is cutting. Now you know why I modified the Onglette blade? I needed the reduced width to gain access to cut into the metal. If I had a wide Onglette, I couldn't make any these 'narrow cut's.

In the following photographs (out of sequence) is how & where the bud bur is cutting. This bur looks large, but it's only a #006, or 0.06 millimetres in size.

Do not just 'gently touch the metal' while using the bur, I'd ask you to cut deep into the metal. A complete separation and removal of the metal is what is now required.
If you look closely at the stone just beside the bur, you can see how deep the stone is into the metal. That depth will give you the correct thickness for the new wire-beads!!

I don't like soft stones, as they can chip or get broken by the graver or twisting of the wire-beads. The Laser engraved name on the "Table" of the stone speaks for the hardness of the stone. I believe the Swarovski stones are about an 8.75
<-> 9.0 on the "Mohs Scale of Hardness". (Please correct me if I'm mistaken.)

When I have a Tapered Pumice wheel of #180 grit, I always run the edge of the wheel inside and along where the bud & round burs were cutting.
If I had to use the cloth polishing wheel, it just wouldn't have any access to the inside of the burred areas. Don't leave anything to 'later, or afterwards'..do it NOW!!!

After all of my bench work has been completed, I usually use my mini-cloth wheel with a touch of Rouge, just to see how the metal cutting is progressing. This rotating wheel (at a slow speed) also smooths the wire-bead tips!

Just to follow up on the use of the greatly modified Onglette #2 graver. Here is the same graver cutting the metal, before any Bright-Cutting is to take place. Can you imagine if the graver was very w-i-d-e at the cutting face, what would the results be? Just horrific to say the least. There wouldn't be any 'semblance of order' and the pattern wouldn't be nice to look at!

Just another view, but not as so close-up. I suggest you should dig a bit deeper into the metal just to make sure the Flat graver, "Bright-Cutting" will achieve what is required.
One last point, make these cuts deep as to make sure you can get the results you need! Shallow, or surface cuts do not do justice to the designs & pattern!

In closing, this rather challenging technical essay was about 2-3 weeks in the writing, editing and picture taking. No easy task!
This technique is not easy, but once you learn it...who knows where you can use your new setting design?...any ideas?


In the "Eye of Time", there were only 3 diamonds that were set using this particular process. As the setter had so little room to set ANY stone, he had little available room to do any major Bright-Cutting, instead he still succeeded in his engraving. He chose the very ornamental "Cut-Down" method.

Salvidor Dali allowed his diamond setter to have full "Carte Blanche" and to create something beautiful!
The Difficulty Scale is "off the charts" or about 35 out of 10; being 10 is very difficult and can be fraught with 'unforeseen problems'. The 'many problems' are caused by the very fact that once you start this cutting, it is almost impossible to correct any errors. I suggest that you should attempt a 'few practice cuttings' prior to your customers' item.
In this photograph, is showing a little teardrop coming from the "Eye"! This tear-drop is right underneath the Bezel-set, Ruby Cabochon Gemstone. This picture caught my attention and the rest is in this essay!

The reason for this odd sounding name is exactly what the setter is doing...He is 'cutting down & away from the stone', right to the edge of the metal.
In the following essay, I am explaining 'the only & correct' method in cutting this pattern!
I am using many (42) photographs just for this essay, why? I need to make sure that you understand the processes in creating this interesting pattern.
I do not use any 'Computer Aided Design' to act as a cutting guide. All of the measurements are 'done by eye' and maybe a marking-pen to get the 'inside patterns' laid out! (These will be shown as you scroll down & study the pictures.)
I'm dedicating this essay to my diamond setting teacher & best friend, Mr. Stan Levine who passed away 5 years ago. He taught me this difficult technique about 45 years ago! Today, I am pleased with teaching this same technique to you, of what I learned so many years ago...:>)
I'm using a .925 silver, half-round bar for this essay, as it is 'quite easy' to cut these intricate patterns.

I've drilled the holes & kept the distance in between each stone of equal separation! This alone can make some very serious problems while cutting!!
To understand this and just how the stones 'must' be set flat and level. I prefer to using a "156C" a.k.a. 'Undercutting Bur' to make a seat for each stone that is needed. Uniform separation of each stone is paramount, prior to the cutting.

Each stone must be level and the 'table' of each stone must be flush (or lower) with the surrounding metal. Hence, the desired depth now allows for the 4 'wire-beads' to be created evenly. If failing this, this exacting creation will be a problem in the next step of graver cutting.

The space from the 'girdle' to the 'table' allows just enough metal for the 'wire-beads' to be created. I would use a fine emery paper to remove any of those raised edges around the stones. This rim of metal will interfere with the bead making!

I'm showing how & where the flat graver corner will pivot and dig into the metal to allow for this wire-bead process! "Dig in & twist" easy to remember?

Once the creation of these 'wire securing beads' has taken place there is now a blank space in between each stone. These spaces must not be untouched, I've devised a 'method' of what is to take place. This method is to mark or draw the pattern that is you require!

I also will draw a little square around each stone. I call it a 'picture frame', in each 'corner' is just where each wire-bead will be placed or created.

How are these beads made? I place the edge of the flat graver at one corner and dig into the metal. Once the graver is digging into the metal, I will literally 'rotate the graver face' and have that graver face 'dig-in & scrape deeply' and create that 'wire-bead'.
This process is to dig in at the 'pivot-point' & secure the stone, just as simple as that! Was this easy? Now comes the best & easy part...the cutting!

Why do I draw "squares & lines"? These only act as a guide for the intricate graver cuttings. YES! I will even Bright-Cut the 'lines' as marked on the metal.

Here you can see the unequal spacing in between some of the stones. This alone might cause some major problems in trying to Bright-Cut the 'inside' metal.

In this photograph, you can see the 'digging' of the flat graver pivot-point! You can see the depth of the stone as it accepts the new wire-beads. Remember this simple fact, Emeralds don't like to be touched, look at the "table".

In this 'ultra-close up' picture, again another view just where these wires are being placed.

You can now see what can happen if there is too much space in between these stones. Although we are looking at only a few millimetres, it can affect the overall appearance and the subsequent pattern. BTW, the green stone beads are not desirable for setting in this delicate "Cut-Down" pattern.
The stone on the left had poor bead construction, not a desirable thing to have! This shows what can happen if the setter is interrupted while starting the setting process.

While the spacing is very important, the setter must make every effort to make this an 'easy task'. Problems may and can occur when the beads & stones are not aligned in a straight line. This is one of the 'problems' in preparation prior to cutting.
The Blue & Red stones are not properly aligned with the others, this might cause problems further on.

This is a major fault, no 'inside squares or patterns' should be longer than the new wire-beads. As I repeat, uneven spacing will cause much grief in cutting!

Please be very careful when you are creating these beads. The graver, as it is rotating, might very easily damage the table of the synthetic stone. Difficult to replace broken stones!
I'd use three colours of the "USA" flag, RED (Ruby), WHITE (Diamond or CZ), & BLUE (Blue Sapphire), why so? These are the strongest and most durable stones for these kinds of metal engraving.

Please observe the drilling of the holes, keep all of the stones in a straight line! This drilling of the holes has a 'ripple effect' as you continue in your cutting.
The lines that are shown as they were drawn can be Bright-Cut. For this, I'd use my 'modified' Onglette #2 to cut grooves on either side of the line that was drawn. While cutting, cut deeply with the intention of Bright-Cutting next.

I found that the green stones were not able to withstand any 'direct contact' from any graver blade that is being used in this exercise. I suggest you inform the client in case of breakage, you should not be held financially responsible!!!

Here is an up-close photograph of the "in between cuttings" prior to the important Bright-Cutting. There are many 'additional unfinished areas' that still need cuttings.
BTW, the Blue stone was set too high in the metal. The previously mentioned "ripple effect" is now taking place, why is this?
When using your Flat graver, you must be able to dig and make wide-contour cuts in the metal, as they are starting the cutting process. Now this is almost impossible..:>(


In this interesting photograph, you can see both sections (almost) clearly. One section has been Bright-Cut and the other is still waiting to be 'contoured'.


The Flat-graver face has its own measurements of .50 millimetres from the bottom of the blade to the tip of the 'face'. This is to gain access to the inverted 'vee' pattern.
This is the most delicate section of this pattern, no short-cuts, or errors are permitted, why? If the cutting pattern is made with speed, errors will happen.

Where does the graver start to cut and how where will it finish? I use the 'facets' of the stone to give me a proper guide & angle that will cut towards the rim of the ring.


The setter needs continuous 'attention' in the cutting, at all times. If the setter or anyone, not having the correct selection of tools, this creation might not look nice!

I previously made a ring to emphasize these many cutting processes. You can observe that the spaces are even & this makes my cutting so much easier.

Up close, you can see two cutting sections but look at the separation in between the stones. I could use a half-round #50 graver blade to do the cutting, but instead, I chose a #006 bud bur to clean out the inside metal.
First, I used this bur at two speeds, slowly at first and then speed up the motor to carefully smooth the inside metal. I only 'touched the metal' & not digging in I might not have complete control at higher motor speeds. I used a #006 round bur to cut a groove just where the wire beads are located.

Basically, the design is like a little 'X', or a cross. The round bur should be aimed into the bud-bur cut. The downside is that the contact to the stones will ruin the burs!
My other option is the make these bur-cuts before the stones go into the hole. But this is up to you! Experiment at all times, but no short-cuts!

Can you now see how these 'round & bud' burs are creating the interesting patterns? Do not let the burs touch or ruin the 'wire-beads'.

I like this photograph as you can now see up close where the Onglette graver is cutting. Now you know why I modified the Onglette blade? I needed the reduced width to gain access to cut into the metal. If I had a wide Onglette, I couldn't make any these 'narrow cut's.

In the following photographs (out of sequence) is how & where the bud bur is cutting. This bur looks large, but it's only a #006, or 0.06 millimetres in size.

Do not just 'gently touch the metal' while using the bur, I'd ask you to cut deep into the metal. A complete separation and removal of the metal is what is now required.
If you look closely at the stone just beside the bur, you can see how deep the stone is into the metal. That depth will give you the correct thickness for the new wire-beads!!

I don't like soft stones, as they can chip or get broken by the graver or twisting of the wire-beads. The Laser engraved name on the "Table" of the stone speaks for the hardness of the stone. I believe the Swarovski stones are about an 8.75
<-> 9.0 on the "Mohs Scale of Hardness". (Please correct me if I'm mistaken.)

When I have a Tapered Pumice wheel of #180 grit, I always run the edge of the wheel inside and along where the bud & round burs were cutting.
If I had to use the cloth polishing wheel, it just wouldn't have any access to the inside of the burred areas. Don't leave anything to 'later, or afterwards'..do it NOW!!!


Just to follow up on the use of the greatly modified Onglette #2 graver. Here is the same graver cutting the metal, before any Bright-Cutting is to take place. Can you imagine if the graver was very w-i-d-e at the cutting face, what would the results be? Just horrific to say the least. There wouldn't be any 'semblance of order' and the pattern wouldn't be nice to look at!

Just another view, but not as so close-up. I suggest you should dig a bit deeper into the metal just to make sure the Flat graver, "Bright-Cutting" will achieve what is required.
One last point, make these cuts deep as to make sure you can get the results you need! Shallow, or surface cuts do not do justice to the designs & pattern!

This technique is not easy, but once you learn it...who knows where you can use your new setting design?...any ideas?


