These new following essays will be a compendium of very useful gem-setting techniques. These essays might look familiar from my previous writings, let's just write that these are 'very important reviews'.
I don't like the word "tricks", only entertainers do 'tricks', but these are just 'very important jewellery & stone setting techniques'.
The Level of Difficulty is '15+ out of 10'.
In this diagram, I'm showing the angles of the cutting-bur should be using. This HSS bur was crafted similarly to a diamond. The chosen angle should match the angle of the stone that's being set into the ring.
The 'angles of the bur' must apply to the stone that you are using. If the bur is crooked or at an angle so will the stone be crooked. Simple as that.

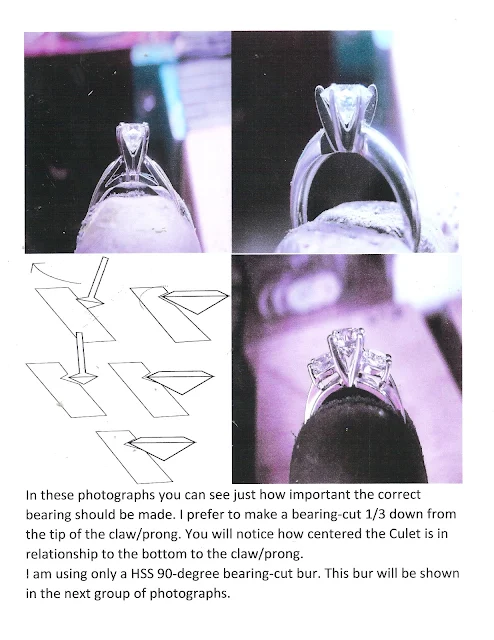
I use the phrase to describe this style of setting as a "Flat-Top Setting" pattern. This pattern can be used on any style of jewellery.

In this prepared diagram and views of a completed 'stone& ring' you can see what could happen if care hasn't been used.

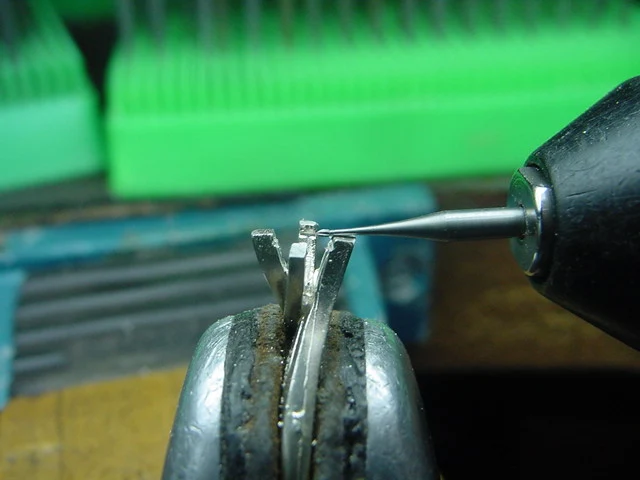
I shaped one of the claws as shown with a triangular file the other remaining tips will be reshaped with a Cup Bur #77B.


This is a close-up of my saw blade #4/0 thickness, some setter use either a very course width of #3/0 or a fine #6/0 thickness.
I regularly use a #4/0 saw blade, but a #6/0 will be thinner (in width) if needed. We are basically evening the space on top of the "Girdle Facets". This 'cutting' shouldn't extend further than the inside of the Girdle of the stone.

On rarer occasions, I use my serrated plier jaws to squeeze the claw tip against the stone. This will prevent the claw from being out of alignment as it is being used to cover the edge of the stone. A 'crooked claw' is not good to see and sometimes a problem to repair.

Here is one major problem when using any bur to create a 'seat', there will be a sliver of metal remaining from the drilling, DON'T LEAVE THIS METAL BUR AGAINST THE CLAW. I use a FLAT graver (not a file) to clean the side of the claw.


Another tool I use to continue the 'cleaning' is to use a Pumice Wheel to give additional 'cleaning of the claws' before the stone setting.

Before the stone has been set, observe if there are any casting marks or metal defects around the 'claw basket'. GET RID OF THEM NOW!

When the stone is set, nothing else should be done with anything else around the diamond.


The next step is to lay the ring on its side apply your 'Pumice Wheel of #180 grit' and clean all of the lower section of the claws. Rotate the ring to have all of the claws 'well cleaned'.

I do not use any 'fine-toothed' 156C cutting bur for preparing the seats for the stone. The teeth of this bur are too close together and as well they don't have the correct cutting angles.
I use an "HSS" (High-Speed Steel) cutting bur, upon closer examination these 'wonderful burs' are the exact shape as of the diamond.
For your information, I have well over 175 of these burs of many sizes in my inventory.
What size of HSS bur is needed? This is a fantastic question!
The best answer is a bur that is 3/4 of the size of the stone. Nothing larger or smaller should be used!
The teeth of this bur are equally spaced to cut into the metal and will not slide around and against the claw.
The claw on the left has not yet been touched by any cleaning tool. Now compare the claw on the right side. WOW, what a difference? If there is any engraving that needs to be completed inside of the 'basket', do this extra cleaning also, NOW!

These are the diamond-setting tools that I use continually

When the stone has been inserted into the 4-claw setting, what is next?
They should be all of equal heights. I try not to use a file, as filing might move some of the claws out of alignment.
I used my Emery "Snap-On" disk of a "Medium" grade that is held horizontally and gently touches all 4 claws AT ONE TIME.
Keep all of these claws equally flat.

Just one more thing to remember, when you are drilling the seat inside the claws. KEEP THE CUTTING BUR WELL LUBRICATED. If not, the bur will overheat and the metal will collect on the rotating bur.
Take absolute care in using these burs, THESE BURS ARE NOT CHEAP. MY BURS HAVE LASTED ME LITERALLY YEARS not weeks or days. I can resharpen them when needed, this cannot be done to the soft steel 'Carbide, 156C burs'.

As you can barely see the "Snap-on Emery" disk is slightly out of alignment and not sitting horizontal to the flat 'Table' of the stone.


You will find that all 4 sides of the claws will surely have that little extra sliver of metal remaining ON ALL OF THE 4 CLAWS. This is a very common occurrence.

Oh, I nearly forgot something in my '4-claw instructions' You shouldn't just go ahead and use the rotating bur with "no rhyme or reason". I had a great habit for the past 65 of my stone-setting YEARS and that is to use a 'bud-shaped bur' and prepare a seat for the stone. This preparation will act as a guide for the HSS cutting bur.

What you are doing here is allocating where the HSS bur will start its cutting, if not the fast-rotating bur will run amok around the claw. Then this repairing is a scary process.

As shown before, I used a bud-shaped bur to start the cutting into the claw for this stone. One last remaining question is "How far into the claw should the HSS bur be cutting"? The ratio is no more than 1/3 of the thickness of the metal.


On any semi-precious stones, either genuine or synthetic stones the Girdles widths may not be equal. There might be extra thicknesses as you rotate the stone.


The Tapered Pumice is a fantastic cleaning bur, why is this? It will get into areas that no file will ever get into. These tapered wheels 'cleans and polishes' at the same time.

These Flat angles must not be horizontally flat but with a slight incline to make the appearance pleasing. I even shape the claw as shown here.

(This is not a defect, but in the polishing of the stone the weight had to be kept high as to keep the selling price high). It's all about the mighty dollar. Interesting fact?
Many times, furthermore make all allowances for the setting of the stone, you might have 2-3 widths for one stone and to each of the 4 claws.
KEEP YOUR 10x LOUPE IN CLOSE PROXIMETARY TO YOUR WORKING AREA.

Reshape your Pumice Wheels all the time, your tapered wheel needs continual adjustments while you are using it. Keep the edge sharp as you can!

Reshape your Pumice Wheels all the time, your tapered wheel needs continual adjustments while you are using it. Keep the edge sharp as you can!

This is why the sharp edges on your pumice wheels are so critically important.


The amount of metal on the top of the stone is so very poor. In a few early months of wearing this ring, she could easily lose this precious and expensive diamond.

Keep your FLAT Graver near your work area. Not to mention it has to be as sharp as you can for this remedial work.

What is wrong with this stone in the ring?
1) The stone is very CROOKED
2) The stone is set too high in the 4-claw setting.
3) The amount of metal over the Girdle is insufficient.
4) The claws are at different heights.
5) The stone is too large for the ring as a smaller stone would be more advisable.

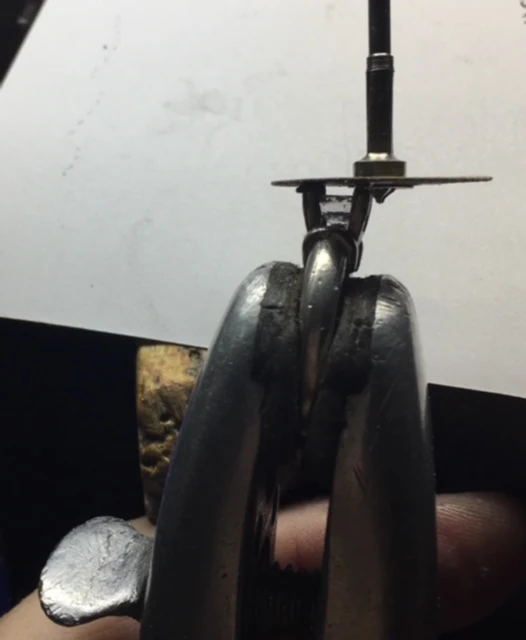
I prefer to use an "Inside Ring Holder" instead of a regular ring clamp. The main reason is that the ring will be more sturdy while being used. There won't be any reason for the ring to slide around in the clamp.

This is a reprint of an article that appeared in an American jewellery magazine many years ago. It bears repeating as often as I can.

No comments:
Post a Comment