Monday, 13 May 2019

"Square-Shape", Inside-Cutting used in Bright-Cutting patterns"

 This exercise & essay is not for the absolute beginner. It might be used as an example as one of the most intricate & novel setting techniques in my "Bright-Cutting" inventory. 

 It is very labour intensive even for me! A vague knowledge of graver cutting will make this exercise difficult to grasp, this technique is basically...very demanding & technical, trust me!

The Difficulty Scale: This is about 30, out of 10. (If not more!)

What setting tools are needed?

>Planning ahead of every cutting action will be well advised.
>Experience in using your gravers of at least 5-6 (or more) years.
>Mistakes will happenleave your frustrations in another room..:>(

Flat graver of #40, with a face height of 0.30 mm's.
Knife-Edge Graver of  0.25mm's in width, why so thin? You'll see in a few moments.
Optivisor with #5 lens. Lens #3 is not strong enough, lens #7 is even best.
Hand-held loupe of 10x power, you must continually 'double-check' what you're doing!!!
Onglette #1 graver, that is shaped to cut only on the Right-Side..(if you're right-handed).
Polishing Paper for your gravers. I suggest #800, or even a #1,200 grit.
Oil Stone, to keep your gravers (extremely) sharp at all times. You can't cut with a dull graver!!!
Marking-pen. This is used extensively to layout your new patterns, prior to your 'rough-cutting'.
I use this method on a regular basis.

 I will be showing two variations of graver cuttings. Each version is similar, but just slightly different from the other.
                                             
 This little ink-pen is my favourite (new) setting tool, why? Without it, I might not know where the next cut will start or even finish, buy one and get used to it.

  I like this pen because it has a very fine point to it...get the point?..:>)

 Start your very fine graver cutting right at the edge of the hole. You don't want any sort of metal remaining once the stone is set, it just looks ugly!

 Take a few little cuts if you are not familiar with this sort of rough-cutting. This is a learning curve, but once learned it'll be then it'll become 'second nature' to you!

 See where the graver cut, it's cutting right inside the hole? I like this 'close-cutting'.


 Use your 'ink-pen' and draw a little square, as shown below. This will be the first group of many cuttings you will be needing with your graver, If you feel the drawing is not as expected, rub it off and start again! You can't do that once you cut into the metal!!!

 With your fine Onglette Knife-edge graver start your cutting right into the center of the hole. Then make a cut right to the line-cut you made previously. 

 Just follow the cutting shown in this diagram, remember that you are now starting to make room for a bead to push over the stone..much later on!

 Here is an "up-close, diagram" of where to start your cutting. This will take some time in figuring out how it's going to finish..two words 'Practice & Practice"!
                                          

  With your ink-pen acting now as a guide, you can visualize how the next few cuts will look.
                                    

 Here is your first cut, now continue on with the next three cuts.

 With the four cuts being made, do you see a pattern starting to evolve?


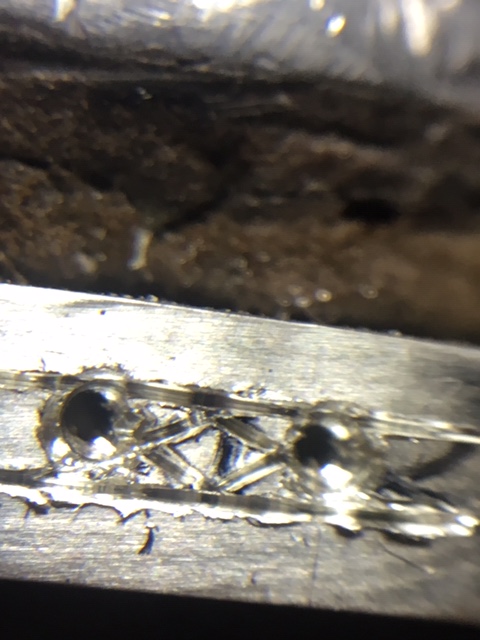
 What I would like you to do NOW is to re-cut, again a little deeper and a third time deeper, why so? This is for your Flat-Graver to get into that 'deep line' and to start your Bright-Cutting!!!

 Look at the difference of the dimensions between the inside bead-triangles and the outer "v" shapes! The main reason is that the outside cuts are there for the final finishing..not to be discussed now!
                                                \

 You can see just where the Flat graver started to cut, remembering that all of four sides to this pattern MUST BE CUT AT THE SAME & EQUAL ANGLE.

 The reason is that your Flat graver should not be leaning over too far and making this pattern to look mediocre.

 This takes much practice and your graver blade has to be well maintained in being able to cut with no stirations.


  With all four Bright-Cuts completed there is still one little surface to look at; 'it's the top flat area'.


 I use my Flat graver and remove the top 'rough textured' area as to make this a 5-sided bright cutting area! Now this section might look like another stone has been added, that is my intention from the beginning!!! When this is polished...WOW!


  When all of your stones are set, it'll look like you have more stones in your project.


SECOND VARIATION:

 Although this picture is the same as the first version, this cutting gets more interesting as we will now see.

 I'm now going to be using my ink-pen extensively. Without it, I won't be able to have a guide where the multitude of cuts will eventually be made.


  At one spot I might need to have a corner where the two sides converge. All of this "planning" is done long before the first cut was even made.
 If I have a larger or longer space, I decided to have two squares...(as shown here)!


  There is no other graver made this thin. You should be able to refine the leading-point of the graver to get into this very tight area.
  Remember that this point is only 0.24 mm's wide. I will start at the middle of the two holes and end at the far side of that hole


  These two diagrams still apply to this 'second version'.


  Always keep your graver-point sharp!!!

 These rough and jagged cuts are to be cut away further on in this Bright-Cutting process, don't worry if this looks ugly. It will be in a pristine condition when all is done!


 I suggest making your cuts deeper at least three (3) times. This will be better for your Flat graver to get inside and make sharp cuts.
 If these cuts are left shallow, you won't be getting a definite and exacting design/pattern!!!

 This polishing paper is "your friend", use it as often as you can. As I always say you can't get great looking cuts with a dull or a worn graver..:>(

 From a distance, this looks nice, agree?

 But from a closer inspection, this first square looks even nicer. Don't forget to 'cut the top of the square', all surfaces need to be as shiny as possible.

 The long bar in the center, is the 'casting sprue', I keep it there as I don't want any movement during the delicate graver cutting.

 I've accomplished literally everything I need in creating these "Bright-Cut, Ornamental Squares" When you are creating this kind of pattern, don't look at your watch, timing is not essential.

 I can spend literally 1 hour in getting to this stage of setting. Then comes the actual Bright-Cutting process, I'll be leaving this 'continuing setting process' to another essay.

 When all is done, this completed process could take me about 2.5 hours. But when perfection is warranted, don't ask me how long this could take..:>(
 If you have any questions, please contact me "gerrylewy18(at)gmail.com"

Sunday, 5 May 2019

"Two Bead, Half-Round! Semi Fish-Tail" Diamond Setting


                                           "Fish-Tail" Diamond Setting. Version #2!

 The title of this essay is long. The following series of photographs will explain how to create this less labour intensive, but very useful diamond setting technique! 

The Scale of Difficulty is (estimated) at 7.5 out of 10!

What tools will be needed and subsequently used?
Onglette Graver: #2. I shaped this to Bright-Cut on one side.
Onglette Graver: #0 (or a #5/0...the thinner the better!) I actually use both.
Flat Graver: #40 you need a wide cutting width.
Bead-Burnisher: #11 or #12 (depending on the size of the finished new beads).
156C Undercutting bur: (estimated a #008, but no larger than #010) depending on the bead size.
Bud bur: #006 (this will be explained & shown in this essay).
Triangular file only with a #4 cut, nothing coarser!!!  No file of #3, or even a #2.
Pumice wheels with a #240 grit. I personally prefer a "Tapered point".
Pink Pumice wheels of #1,000 grit. These two Pumice wheels are used in the final cleaning process.

 The basic width of 'any' new Onglette graver is as shown 1.27 mm's, but I've reshaped it down to only 1/4 of its original width. The reasoning is the necessary fine line-cutting that will be shown in the next few photographs. In fact, another graver I use now is only 0.25mm's.

 The Flat graver cutting face is also reshaped to be now 0.45 mm's, why so thin? It has to cut in between a narrow allotted space. I want that graver to cut only where it is needed and not ruining the whole effect!!!

Now you can see the thin cutting face. I could even make it thinner if I choose to during the precise cutting stages.

 These are my assortment of graver blades. I don't waste my time searching for a multitude of unnecessary gravers, I keep my selection to a bare minimum! 

  This is the exact casting-wax that I use and soon enough it will be transformed into a great looking 'piece of art'. There are many modifications that I do before the casting process, there are many, but I won't get into them right now!


 For all the cutting that I do, is to prepare a line (as a guide) in ink. This is where the line-cutting starts.

 The very first cut is SO IMPORTANT, this cannot be overlooked. I'll be cutting a line just at the 'rim' of each hole. Compare this photograph from another recent essay I wrote a few days ago.

Now please compare that picture to what I'm showing you now and the following photographs! 
The line-cutting was not against the edge of the hole! These "results speak for themselves".

 One hole was not in line with the others, this will give me a little challenge, what am I to do?
I'd first have the round bur lean/move as it's rotating on one side towards and closer to the rest of the stones. No big deal, but this takes some serious and careful drilling.
 When done, I'll just continue on with the line-cutting right through the original edge of the hole. Remember that we're only dealing with (maybe) 1millimetre, just don't worry!


 YES, cutting against a curve is somewhat of a challenge. What I do is to take shorter graver cuts and slowly cut around the curve.

 Just go slowly, and with much care in using your modified Onglette #1 graver. I could take three cuts in the metal to traverse each of the two holes.
                                     

 If you fail in cutting at the edge, problems will lay ahead and the final effect will not be what you desire!


 Now the heart-shaped pattern is starting to take place. Although it's only in its infancy, I can see where this is taking me & us!

 With your greatly modified, ultra-thin graver, start another stage in cutting. From in between each of the two holes cut into each hole as shown.
 The result is a little triangle or "Vee" shape configuration. These two cuts will eventually be your new beads!!!


 With your thin Flat #40 graver, start your cutting along the edge of the hole...AVOIDING the little triangles. Cut one side down towards the round area, then cut on the other side, The resulting action will be two separate cuts!!!

  Now can you see how the cutting is done? Not too difficult is this?


 KEEP YOUR FLAT-GRAVER sharp & highly polished by using #800 or #1,200 Polishing paper.
 I'd cut the areas 2-3 times to get the effect that is needed! BTW, I would cut a gentle curve where the two Flat cuts converge.

 With your modified Flat #40, or your Onglette #1 graver start Bright-Cutting exactly where you made the original previous cuttings. Don't touch for any reason those little triangles, as these will be your beads once the stone gets set.

 To prove that your cutting is clean & sharp, you can and should see a reflection of the beads on the cutting surface.

  Now you can see just where & when the #006 Bud bur is being used!

  BTW,  the sprue that is still attached, is used to grip the heart-pendant into a clamp! 
You can see just where the filing is taking place, gentle twisting around the curved spots. After this, you can use your Pumice wheels to smooth the 'filing stirations'.

In these two photographs, you can see just where the Pumice wheels are being used and which in
sequence. I'll tell you first, use your Pumice wheel #240 grit then following with a Pumice #1,000 grits. The second wheel almost polishes all of the markings, as the cloth-wheel on your polishing where just buffs everything but not in those little areas.


  Now, what are we going to do? My suggestion is to reduce the 'vacant areas' from the inside edge to the Bright-Cut sections. We're going to be using a wide Flat-Cutting #40 Graver, simple as that!!! 


 Please make sure that your Flat Graver #40 has a sharp edge for cutting into metal and not leaving any stirations..as seen in this picture. This cut being shown is almost acceptable!

 Ah-h, this newer cut now has a very clean cut. I'm cutting at a very wide angle, enough to remove all of that 'unnecessary' metal in just one cut!!! I think the Flat graver is now at a 45degree angle.

 This is just the kind of Onglette cut that I'm now looking for, no cutting marks. I'm actually digging into the metal aggressively!


   This is another view of the long cuts that I'm interested in.

 This will be now the final cutting on the inside area. You can see the angle of the graver doing the last finishing cut!

 With your greatly modified Onglette graver, or even your Flat graver you can now Bright-Cut the inside area near the new Beads.

 When both Bright-Cutting angles are cut, you will have two reflective (inside &out) cutting areas..are now starting to be shown! 

 Once you get the stones into the holes you can now burnish and at the same time push-over that bead.

 Only two opposing beads to the other will hold and secure that one stone. No need for four beads in this design.

 For setting delicate Emeralds, "just tread lightly" with your bead-burnisher. I'm using for this example a #12 burnishing tool.
Hold your burnisher at a greater angle away from the facets, so the tool won't touch the stone!!! 

 In this up close photograph, you can see just where the 156C undercutting is situated. This bur is now making a 'seat' for the stone and as well as preparing a groove in & against the new bead!

 With the stone nicely sitting in the metal, its time now to push over the new bead. This can be accomplished so easily, all it takes now is your bead-burnisher to literally move the little bead up and of course, over the stone. 
 I'd ask you to use your Loupe of 10x power to check how this is finishing!

 For any other harder stone you may hold the burnisher at a near verticle angle!


 For this demonstration, I only set a few stones. The reason is, I wanted to have you see what it is like 'before and after' the many setting processes. 


  Here is the original silver pendant just from the casting office and as it appears now! Just a bit of difference, agree?


 IN CONCLUSION; I would say that this version #2 is far easier to 'make & create' than the previous essay dated "April 7th, 2019". I just go into many more details, it's because I have to!
Contact me anytime: "gerrylewy18@gmail.com"