Some jewellers will call this kind of gem-setting "Channel Setting", I'd name this style a difficult setting. What ever name you wish to call it, this setting is not for the beginner! .
Another essay to follow shortly is similar to this, but that one IS a "Channel Setting" process. Both are similar in nature, but just so very different.
The Difficulty Scale on this technique is rated at about 15 out of 10, with a Frustration level of ???
As you can see that accurate measurements are necessary with starting any program in setting.
Each stone is measuring (exactly) 2.50 x 2.50 mm's

The opening is .58 mm's or much longer that the 5 stones. We will deal with this problem further!


The 'bearings' for the Princess stones is not a long continual cut. It is composed of individual straight lines, but joined together! After all, each square stone is cut straight across, agree?

I'm leaving the 'end-stone opening' untouched at the present time. The first bearing is only a guide for the next 2-3 cuts. Each cut is deeper INTO the metal.

You can now see how deep the cuts are getting!

From a curved end-opening, I want to make a square-corner..by using a small #006 round bur!

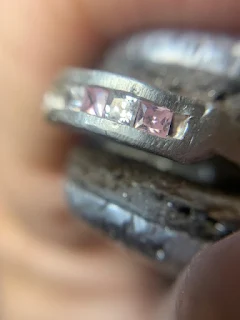
The first of the 5 square stones, are now easily placed into the metal. If the preparation is successful, than no problems will occur. Just simple planning of the next few steps. Always making sure that the stones are "nearly touching", but not that close together!

I removed the round channel ends and now starting to make a square, end-opening.
Now this is starting of the "frustrating segment"of this project. The reason is allocating enough space exactly for ONE MORE STONE....with no finished spaces at the ends!

Just observe the slow removal of metal as the next stone will be ready to be set. You MUST make the opening longer, but never wider!

Remember, you are making the two spaces of equal length, at both ends of the Channel setting! Double the work, but it'll turn out so much nicer, when finished!

When the drilling has been completed, then use a round bur of #007 to cut the inside corners for these two square stones.

Turn over the stones and determine how much more metal must be removed! THIS IS SO NECESSARY!

I would scribe the metal and then measure another 2.50 mm's (stone size) ready to be cut out.

Here is the starting of the 'removal process'. You notice that I haven't gone further than the scribe lines!!!

I'd cut deeper inside the metal just for the Pavilion of the stones.

Repeating what was just done on the first end and again measure the length for the second cutting.

These stones are riding on top of each other. This particular c.z. has a wide girdle more allowances for more drilling with your round bur.. into the metal!
This can be so very annoying, as sometimes the stones might just break at this point!

HOORAY, the two stones finally went in! You will notice that there is no, or little touching of the stones with all of this "aggressive, metal excavation".
At this point, you may use your riveting hammer to tap (lightly) the metal down over the stones. Some setters will use their Reciprocating Hammer at this point, why? They (and I) want to make sure that all of the metal is now ON EACH STONE!!!
If any of the stones ARE TOUCHING in hammering process, they might vibrate and you can have two broken stones..:(
I prefer a little space in between each of the stones, but barely visible with your 10x power loup.
 With your Flat #40 graver shave off the over-hanging metal, over each stone. Don't use a file, as you should have a clean Bright-Cutting surface.

Don't attempt to file the surface until the Bright-Cutting has been completed. You need the thickness of the metal to manually cut with your graver.

When you're starting to use your Pumice wheel have the wheel not to grind the metal flat. I would angle the metal (at a gentle angle) away from the front of the wall!

I have only one word for this final photograph..NICE!

Another essay to follow shortly is similar to this, but that one IS a "Channel Setting" process. Both are similar in nature, but just so very different.
The Difficulty Scale on this technique is rated at about 15 out of 10, with a Frustration level of ???
As you can see that accurate measurements are necessary with starting any program in setting.
Each stone is measuring (exactly) 2.50 x 2.50 mm's

The opening is .58 mm's or much longer that the 5 stones. We will deal with this problem further!

I'm now showing a simple array of setting tools that will make this setting a reality!

The 'bearings' for the Princess stones is not a long continual cut. It is composed of individual straight lines, but joined together! After all, each square stone is cut straight across, agree?

I'm leaving the 'end-stone opening' untouched at the present time. The first bearing is only a guide for the next 2-3 cuts. Each cut is deeper INTO the metal.

You can now see how deep the cuts are getting!


The first of the 5 square stones, are now easily placed into the metal. If the preparation is successful, than no problems will occur. Just simple planning of the next few steps. Always making sure that the stones are "nearly touching", but not that close together!

I removed the round channel ends and now starting to make a square, end-opening.

Now this is starting of the "frustrating segment"of this project. The reason is allocating enough space exactly for ONE MORE STONE....with no finished spaces at the ends!

Just observe the slow removal of metal as the next stone will be ready to be set. You MUST make the opening longer, but never wider!

Remember, you are making the two spaces of equal length, at both ends of the Channel setting! Double the work, but it'll turn out so much nicer, when finished!

When the drilling has been completed, then use a round bur of #007 to cut the inside corners for these two square stones.

Turn over the stones and determine how much more metal must be removed! THIS IS SO NECESSARY!

I would scribe the metal and then measure another 2.50 mm's (stone size) ready to be cut out.

Here is the starting of the 'removal process'. You notice that I haven't gone further than the scribe lines!!!

I'd cut deeper inside the metal just for the Pavilion of the stones.

Repeating what was just done on the first end and again measure the length for the second cutting.

These stones are riding on top of each other. This particular c.z. has a wide girdle more allowances for more drilling with your round bur.. into the metal!
This can be so very annoying, as sometimes the stones might just break at this point!

HOORAY, the two stones finally went in! You will notice that there is no, or little touching of the stones with all of this "aggressive, metal excavation".
At this point, you may use your riveting hammer to tap (lightly) the metal down over the stones. Some setters will use their Reciprocating Hammer at this point, why? They (and I) want to make sure that all of the metal is now ON EACH STONE!!!
If any of the stones ARE TOUCHING in hammering process, they might vibrate and you can have two broken stones..:(
I prefer a little space in between each of the stones, but barely visible with your 10x power loup.


Don't attempt to file the surface until the Bright-Cutting has been completed. You need the thickness of the metal to manually cut with your graver.

When you're starting to use your Pumice wheel have the wheel not to grind the metal flat. I would angle the metal (at a gentle angle) away from the front of the wall!


No comments:
Post a Comment