'Computer Aided Designing" aka "CAD" can be used for all sizes of gemstones. In this essay, I am also examining these different construction details and styles of jewellery.
Many of these photos have been seen many times before, but my texts are 'new and fresh'. This pair of cufflinks was made for a lawyer who appeared in court cases. Hence the name "LAW" that's engraved on the tie bar.
BTW, this same lawyer (family relative) died of ill health one year after my completion.
All rings with multiple mini-claws should be polished before being set with diamonds. The easiest method is to 'magnetic tumble" the ring instead of polishing it with a cloth wheel which can ruin many of the mini-claws.
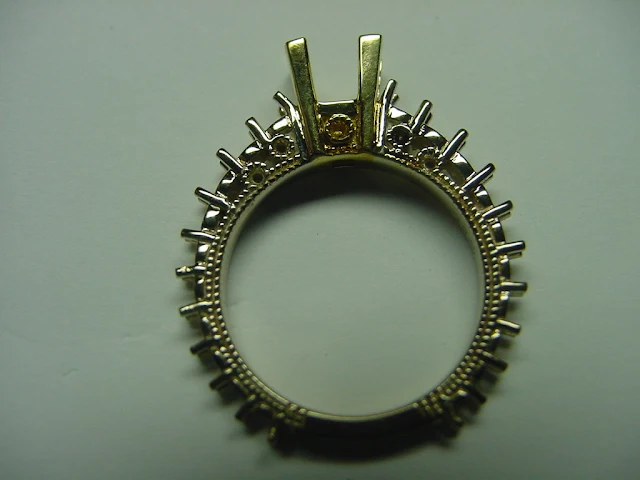
The centre stone head was a separately created piece of gold, why was this? There would not be any opportunity to accurately polish all of the 4 claws without damaging the mini-claws.
In fact, you can see that some of those mini-claws were gently moved aside to allow greater access to the 'head' for soldering.
All sides of the '4-claw head' must be bright & shiny using a 'flat polishing lap'.
Before any stone-setting has started, the inside of the setting, all of the holes MUST BE CLEANED and polished. When the diamonds are inserted there is no opportunity to do so afterwards. This is the only time when this procedure can be done!
Here is another example of a 2-piece assembly, how do I know this? You will notice that the highly polished centre stone claws are all in 'pristine condition'.
This ring is of a 2-piece construction and you can see the separation of the 2 pieces.
(The jeweller, who soldered the ring, paid little attention to the joining of the pieces.)
With this ring, there are two colours of gold, namely 'white and yellow'. This acts as a nice combination of 'karats with colours', agree?
Before any diamond setting, maximum attention should be given to the little claws that might appear to be missing. (But not here, thankfully).
"KARAT AND COMPANY TRADEMARK STAMPING" MUST BE DONE BEFORE ANY STONES ARE SET.
In case of any errors, soldering and subsequent repairs can be made without endangering the stability of the multiple gemstones.
It's advisable to 'deeply engrave any designs' as these should be seen clearly. Engraving from the metal casting is not sufficient for any expensive ring like this.
Before any stone setting it is important to be sure that no major claws are hiding any metal fractures. I would even pre-polish the little diamond settings. All that remains is to gently set the centre stone.
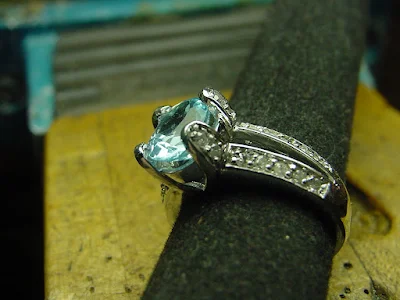
This ring has a three-step setting process, how is this?
1). The first is to set the diamonds on the "double band".
2). Next is to prepare the claw setting for the Blue Stone, BUT LEAVING THE TOP TWO STONES UNTOUCHED. But the 'opening of the holes' should be done, NOW.
3). The third and final step is to finish setting the TWO TOP Claw Stones. This is a very delicate section of the series of stones to set.
All of the major claws must be first 'highly polished' and this is setting the mini-stones along with polishing the mini-stone tips.
=> BTW, THERE ARE NO SHORT-CUTS IN ANY DIAMOND SETTING <=
In this stone-setting process, DON'T USE ANY PLIERS AS THERE COULD BE 'PLIER MARKS' REMAINING. I would use a large 'Bead Burnisher' to move the claws together.
Don't force the claws and if one claw gets broken the item must be removed from the shellac and then repair the broken claws. A big cleaning problem will ensue.
When the setter is dealing with 'shared, mini-claws', the setter should use a round bur to keep the claw tips separated. I suggest a round bur of #003 size.
The mini-claw separation could be done early in the preliminary steps of setting. These claws appear to be too close together.
DON'T ATTEMPT TO "BRIGHT-CUT" ANY SIDES OF THE PATTERN. The metal is too narrow to use any graver cutting.
The mini-claw separation is the correct spacing that is required. Again use your 'Bead-Burnisher' to move the claws. VERY GENTLY, PLEASE!
This item was 'placed and secured' upon the shellac stick. I chose only the smallest stones to be set and all were uniform in size.


No comments:
Post a Comment